Chat integration with Intercom
- name:
- Chat integration with Intercom
- description:
- Add advanced live chat capabilities to iTop with Intercom
- version:
- 1.1.0
- release:
- 2022-09-01
- itop-version-min:
- 2.7.0
- code:
- combodo-intercom-integration
- state:
- stable
- php-version-max:
- PHP 8.1
Intercom is a paid, hosted, third-party, live support chat that can be easily integrated within iTop to offer a new contact channel. It's a perfect way to enable live chat in iTop with minimal effort.
Features
-
Add a live chat widget within iTop to allow end-users to chat with support agents
-
Allow support agents to interact with iTop directly from the Intercom chat dashboard to
-
Create a ticket in iTop directly
-
See ongoing iTop tickets of the end-user
-
Link current chat to an ongoing iTop ticket
-
Both features can be activated either together or independently depending on your use case.
Revision History
| Version | Release Date | Comments |
|---|---|---|
| 1.1.0 | 2022-09-01 | Enable support agents to create tickets in iTop from Intercom GUI |
| 1.0.0 | 2022-04-24 | First version - Warning: Conf. parameter “api_key” has changed since the open beta, it must be migrated to “workspaces” parameter |
| 0.0.1 | - | Open beta |
Limitations
-
Unfortunately, embedding the agents dashboard in iTop through an iFrame dashlet is no longer possible as they have shutdown this feature.
-
Ticket update from Intercom to iTop:
-
1 Intercom conversation can be linked to several iTop tickets, but an iTop ticket can only be linked to 1 Intercom conversation.
-
-
Ticket visualization from the Intercom dashboard:
-
Attributes of the following types cannot be displayed:
-
Linked set attributes (
AttributeLinkedSetandAttributeLinedSetIndirect) -
Blob attributes (
AttributeDocument,AttributeImage, …) -
Case logs (
AttributeCaseLog)
-
-
-
Ticket creation from Intercom dashboard:
-
Attributes with huge amount of values (some external keys) may not be rendered correctly for selection by Intercom.
-
Attributes of the following types cannot be prompt for filling as there is no suitable input provided by Intercom:
-
Read-only attributes (eg.
AttributeExternalField,AttributeFriendlyname, …) -
Linked set attributes (
AttributeLinkedSetandAttributeLinedSetIndirect) -
Date(time) attributes (
AttributeDate,AttributeDateTime,AttributeDuration, …) -
Blob attributes (
AttributeDocument,AttributeImage, …) -
Dashboard attributes (
AttributeDashboard) -
Custom fields (
AttributeCustomField, eg.service_detailsin aUserRequest) -
Case logs (
AttributeCaseLog)
-
-
Requirements
iTop 2.7 or newer
Installation
Use the Standard installation process for this extension.
Datamodel changes
If UserRequest class exists in the datamodel, the
extension will:
-
Add new
chatvalue to theoriginattribute. -
Add new
intercom_refattribute to document the reference of the corresponding conversation in Intercom. Can be useful when iTop and Intercom teams need to make sure they talk about the same thing. -
Add new
intercom_urlattribute to provide a direct link to open the conversation in Intercom. -
Display both
intercom_refandintercom_urlattributes in the “Relations” fieldset of the object properties.
Those attributes are only used with the ticket creation feature.
Configuration
Configuration of the extension may vary depending on which features you want to use. For that reason each feature configuration is explained in a dedicated page showing only the necessary parameters to configure.
Live chat widget
Configuration of the live chat widget requires several steps, check the dedicated page.
Tickets creation / sync.
Configuration of the tickets creation / sync. requires several steps, check the dedicated page.
Configuration parameters
The extension comes with a set of predefined parameters for the
live chat widget and tickets creation / sync.
features. Refer to the their corresponding section just above for
detailed explanation.
Below is the complete list of all available parameters.
- itop-design | module_parameters | parameters@combodo-intercom-integration
-
<workspaces type="hash">
        <!-- Set one line per workspace, allowing one live chat widget / chat dashboard per matching OQL -->
        <!-- By default, everyone (see allowed profiles) will access the same workspace -->
        <PUT_YOUR_WORKSPACE_ID_HERE type="hash">
                <scope><![CDATA[SELECT Organization]]></scope>
        </PUT_YOUR_WORKSPACE_ID_HERE>
</workspaces>
<!-- Used to authenticate incoming requests -->
<sync_app.client_secret>PUT_YOUR_APP_CLIENT_SECRET_HERE</sync_app.client_secret>
<!-- Used to authenticate outgoing requests -->
<sync_app.access_token>PUT_YOUR_APP_ACCESS_TOKEN_HERE</sync_app.access_token>
<sync_app.ticket.class>UserRequest</sync_app.ticket.class>
<!-- Used to map custom DM attributes (values) to standard DM attributes (nodes) -->
<sync_app.ticket.attributes_mapping type="hash">
        <org_id>org_id</org_id>
        <caller_id>caller_id</caller_id>
        <status>status</status>
        <intercom_ref>intercom_ref</intercom_ref>
        <intercom_url>intercom_url</intercom_url>
        <intercom_sync_activated>intercom_sync_activated</intercom_sync_activated>
        <!-- Target log for public messages of the end-user and the Intercom support agents -->
        <public_log>public_log</public_log>
        <!-- Target log for private notes of the Intercom support agents -->
        <private_log>private_log</private_log>
</sync_app.ticket.attributes_mapping>
<!-- List of attribute codes to display in the ticket creation form for the Intercom support agent. -->
<!-- Note that mandatory attributes will be prompt no mater what -->
<sync_app.create_ticket.form_attributes type="array">
        <attribute>title</attribute>
        <attribute>description</attribute>
        <attribute>urgency</attribute>
</sync_app.create_ticket.form_attributes>
<!-- When an Intercom support agent browses ongoing tickets for the end-user, tickets in the following states will NOT be displayed -->
<sync_app.search_ticket.excluded_states type="array">
        <state>rejected</state>
        <state>closed</state>
</sync_app.search_ticket.excluded_states>
<!-- Attribute code to be displayed to Intercom support agents in the ticket lists (ongoing tickets, linked tickets) -->
<sync_app.search_ticket.subtitle_attribute>title</sync_app.search_ticket.subtitle_attribute>
<!-- List of attribute codes to display to an Intercom support agent when viewing an existing ticket -->
<sync_app.view_ticket.details_attributes type="array">
        <attribute>status</attribute>
        <attribute>title</attribute>
        <attribute>description</attribute>
        <attribute>start_date</attribute>
        <attribute>last_update</attribute>
</sync_app.view_ticket.details_attributes>
<!-- Only makes sense if Intercom support agents have access to iTop backoffice -->
<sync_app.view_ticket.show_open_in_backoffice_button type="bool">true</sync_app.view_ticket.show_open_in_backoffice_button>
<!-- iTop URL Maker class used to send to the end-user links to tickets. By default, links redirect to the standard "itop-portal" -->
<sync_app.portal_url_maker_class>iTopPortalViewUrlMaker</sync_app.portal_url_maker_class>
<!-- List of GUI in which the live chat widget should be displayed ("backoffice" for the backoffice, portal ID for any end-users portal eg. "itop-portal" for the standard one) -->
<enabled_portals type="array">
        <enabled_portal id="itop-portal">itop-portal</enabled_portal>
</enabled_portals>
<!-- List of profiles for which the live chat widget will be displayed -->
<allowed_profiles type="array">
        <allowed_profile id="portal-user">Portal user</allowed_profile>
</allowed_profiles>
If you want to overload these parameters, you can do it in your iTop's configuration file
  'combodo-intercom-integration' => array (
                'workspaces' => array (
                  'PUT_YOUR_WORKSPACE_ID_HERE' =>
                  array (
                    'scope' => 'SELECT Organization',
                  ),
                ),
                'sync_app.client_secret' => 'PUT_YOUR_APP_CLIENT_SECRET_HERE',
                'sync_app.access_token' => 'PUT_YOUR_APP_ACCESS_TOKEN_HERE',
                'sync_app.search_ticket.subtitle_attribute' => 'title',
                'sync_app.search_ticket.done_states' => array (
                  0 => 'rejected',
                  1 => 'closed',
                ),
                'sync_app.view_ticket.details_attributes' => array (
                  0 => 'status',
                  1 => 'title',
                  2 => 'description',
                  3 => 'start_date',
                  4 => 'last_update',
                  5 => 'priority',
                  6 => 'org_id',
                  7 => 'org_id_friendlyname',
                  8 => 'servicesubcategory_id_friendlyname',
                  9 => 'public_log',
                ),
                'sync_app.create_ticket.form_attributes' => array (
                  0 => 'title',
                  1 => 'description',
                  2 => 'service_id',
                  3 => 'servicesubcategory_id',
                  4 => 'urgency',
                ),
                'enabled_portals' => array (
                  0 => 'backoffice',
                  1 => 'itop-portal',
                ),
                'allowed_profiles' => array (
                  0 => 'Administrator',
                  1 => 'Portal user',
                ),
        ),
Usage
For detailled information on how to use
Intercom, check their web
site
Live chat widget
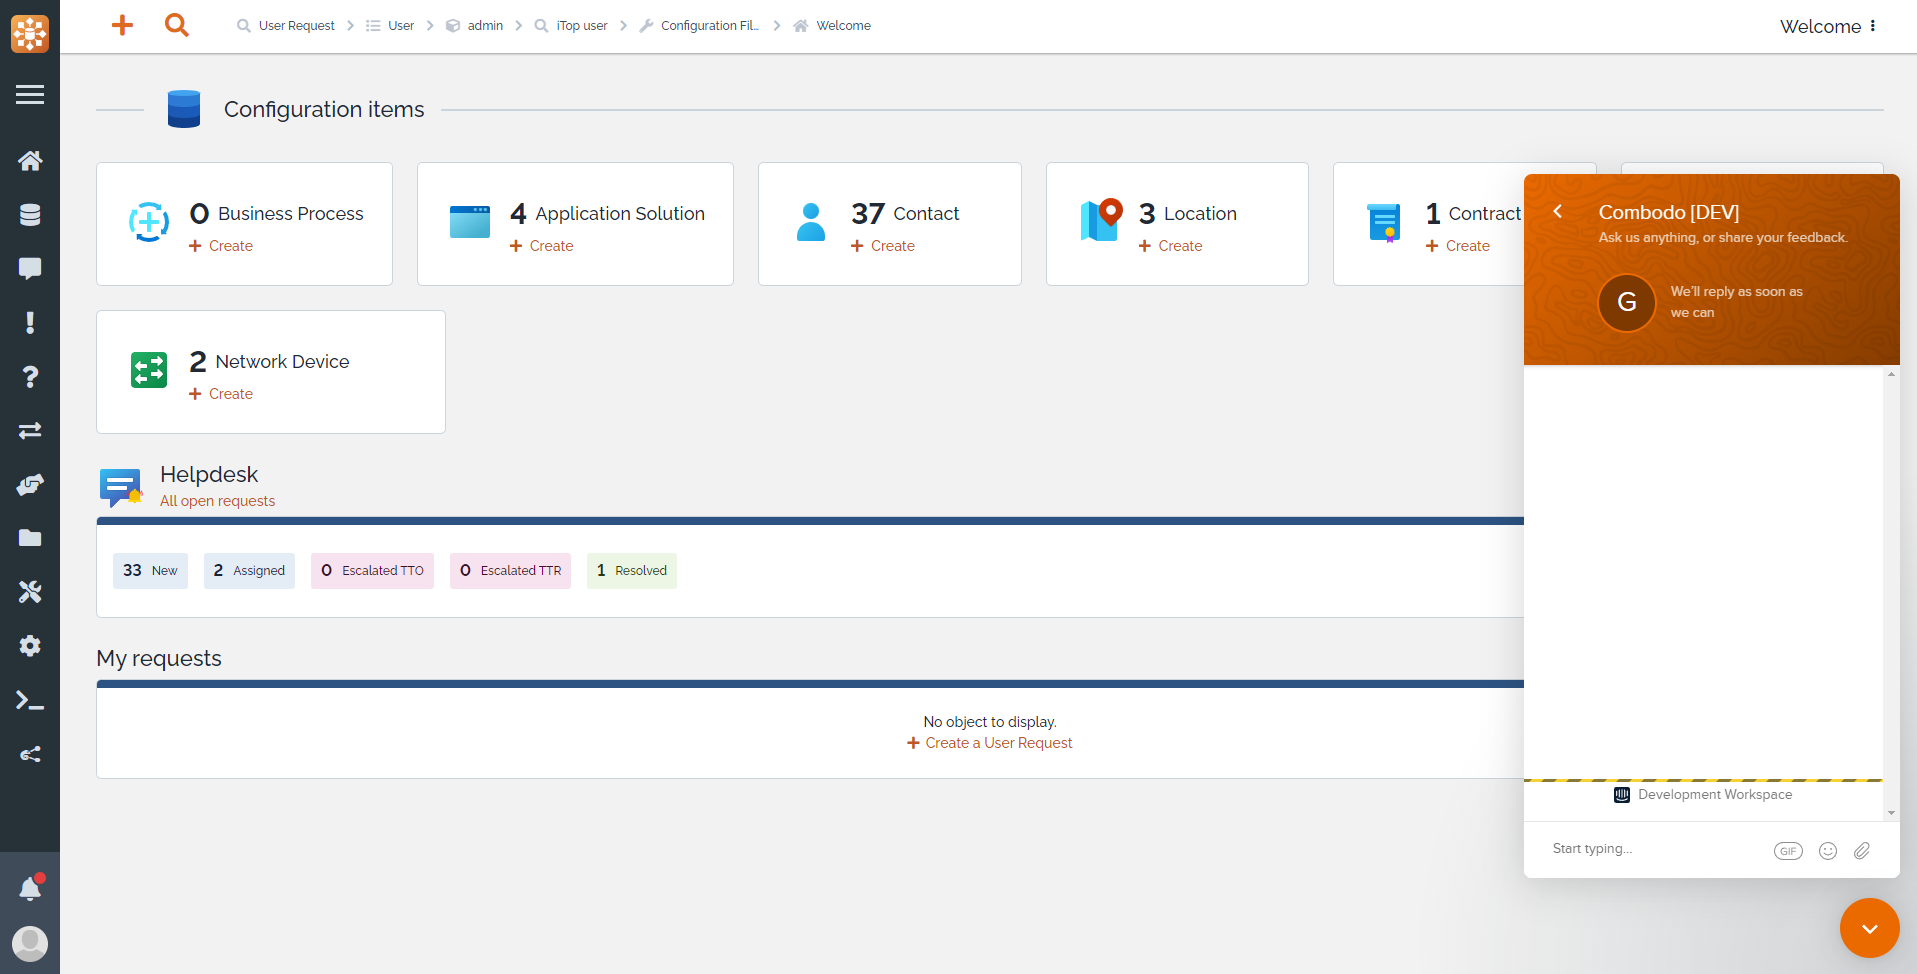
Once the extension is installed and configured:
Portal users will be able to open the Intercom live
chat widget and start a chat conversation with your support
agents.
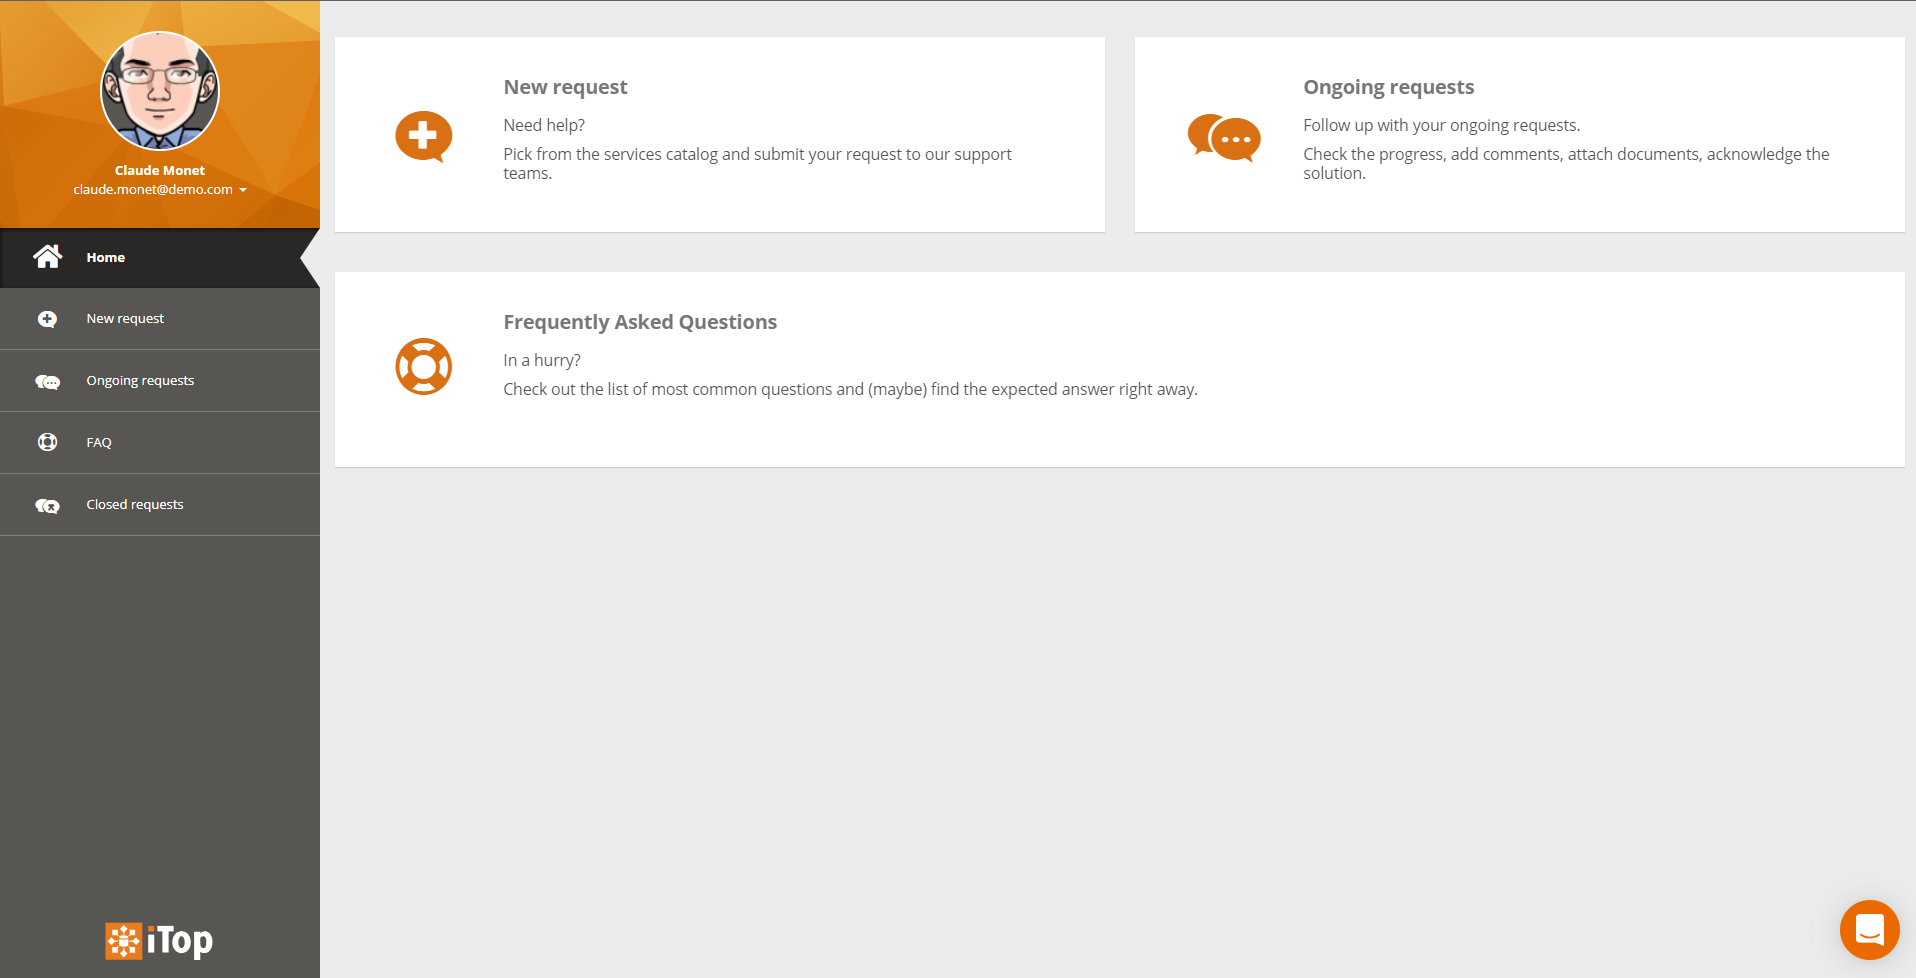
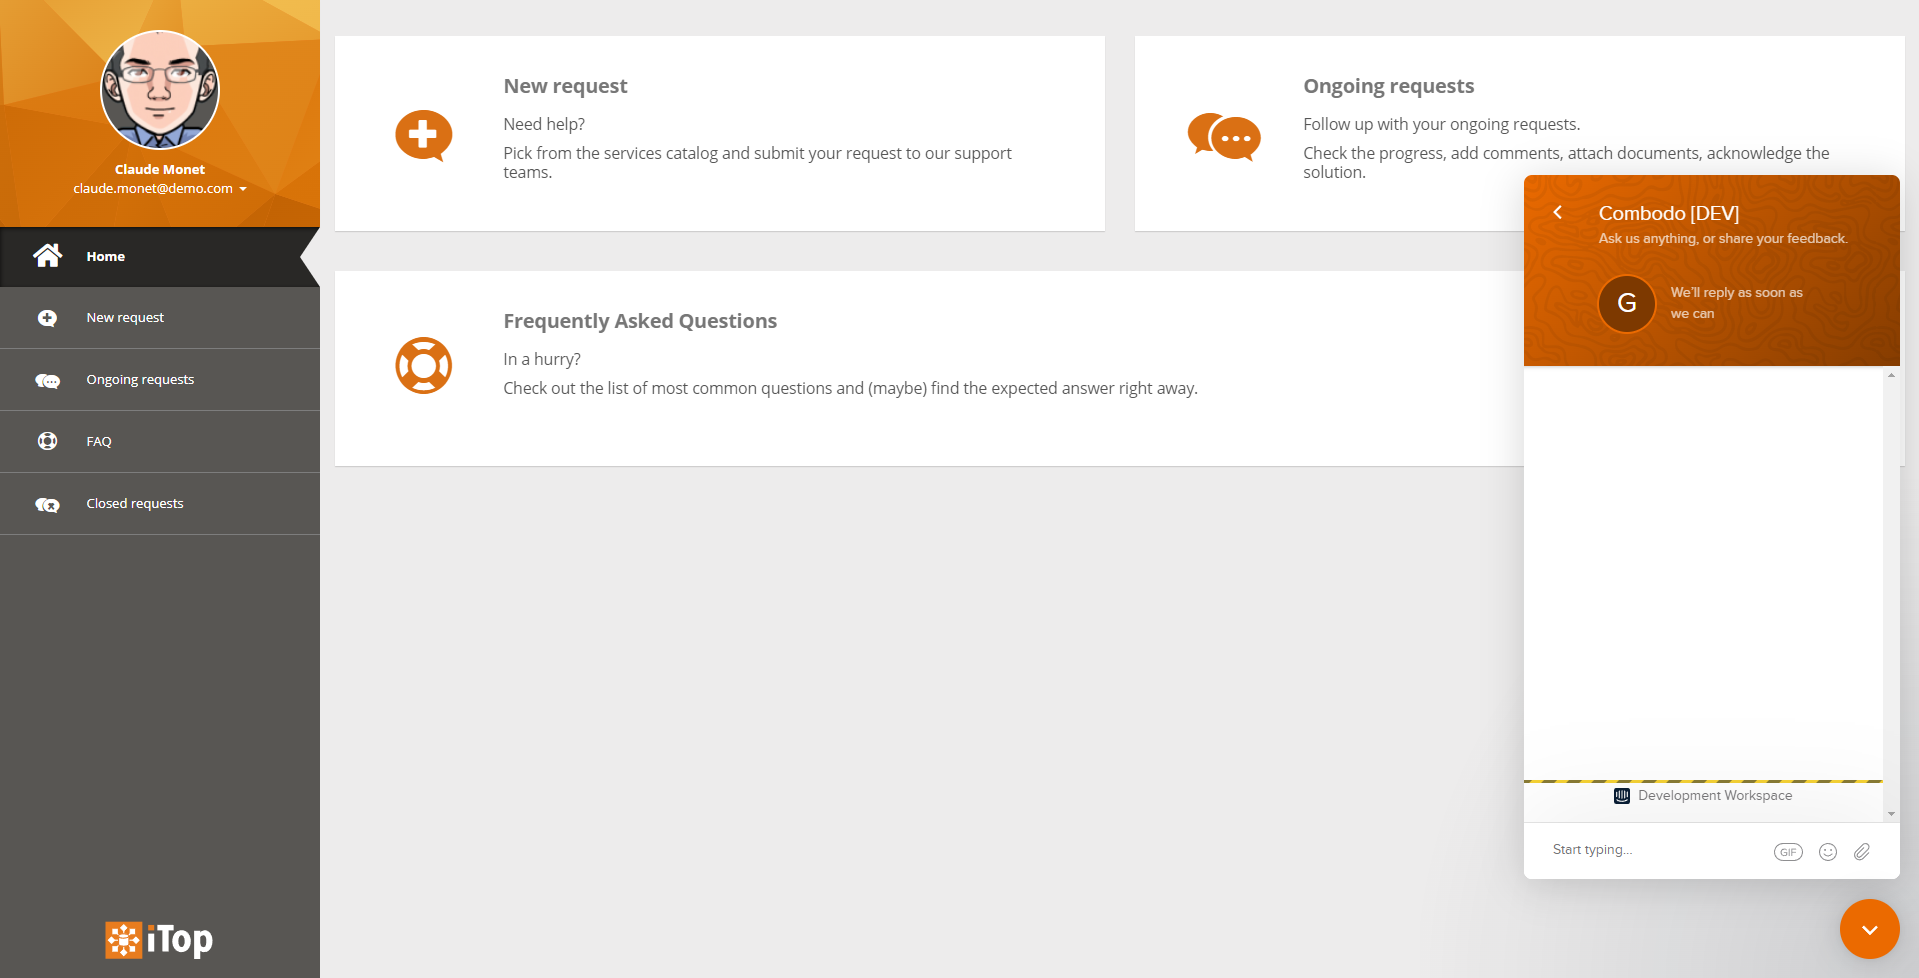
Note that the live chat widget can also be enabled in the backoffice, see configuration parameters.
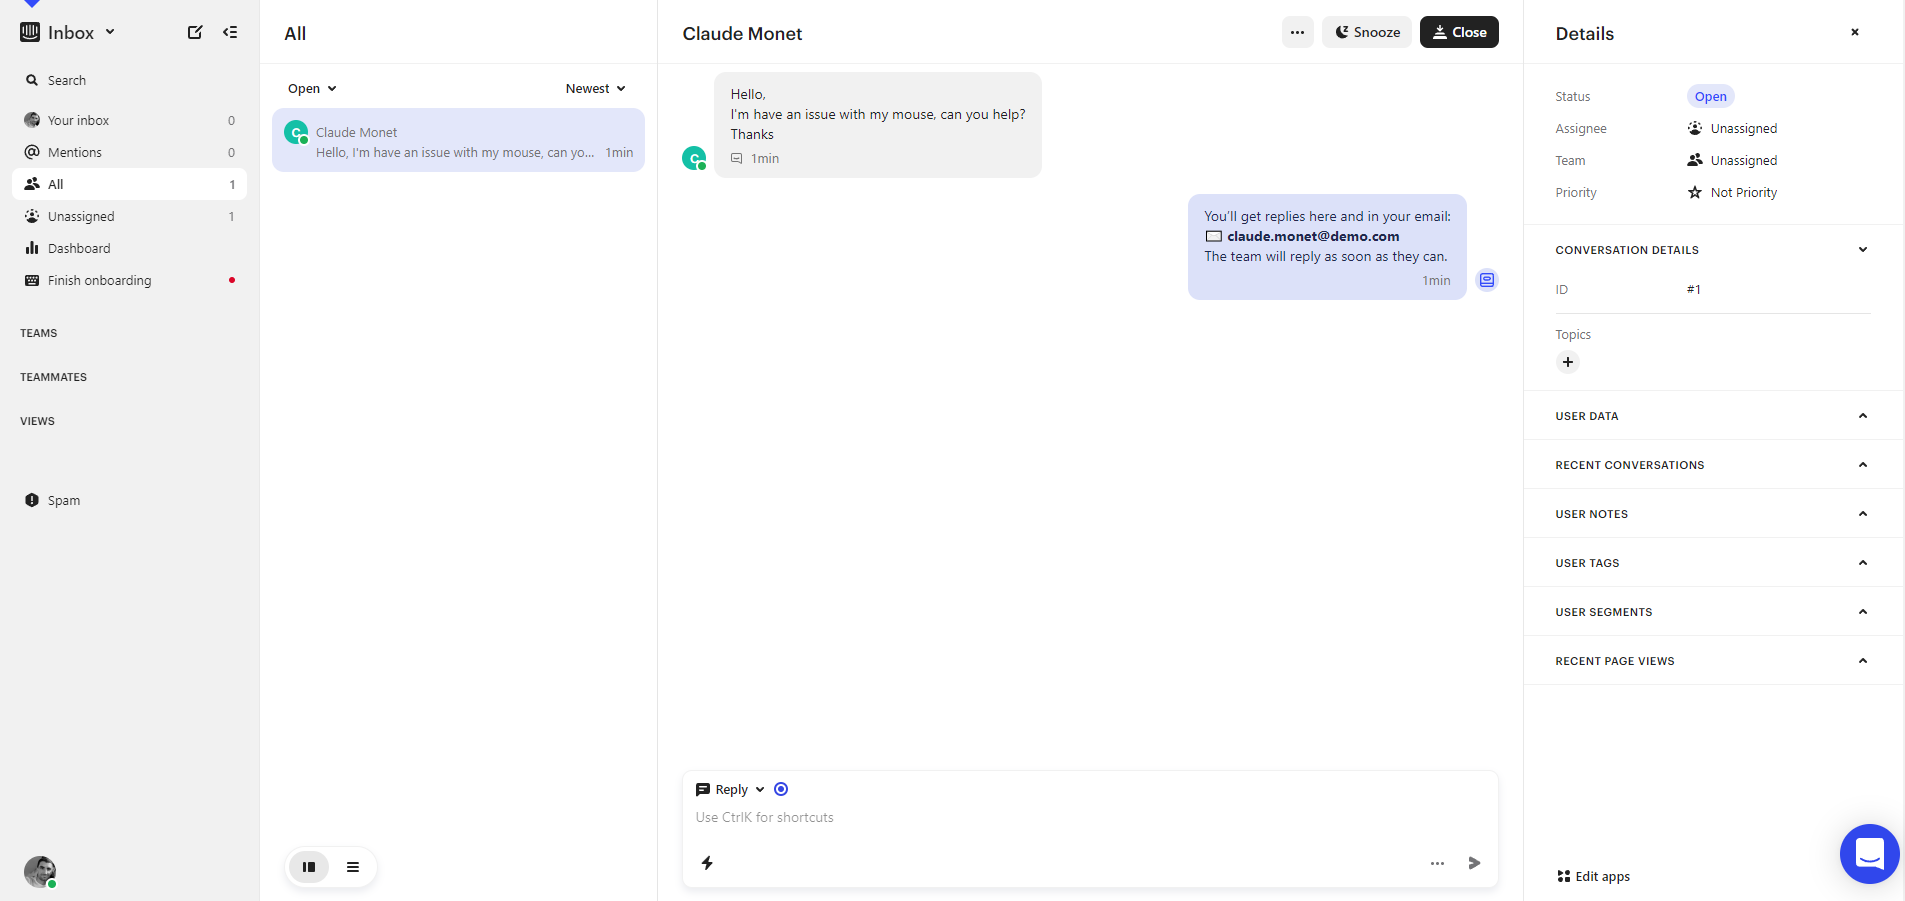
Support agents can reply through the Intercom dashboard, and optionally create a corresponding ticket within iTop, see following section.
Tickets creation / sync.
General
When creating a ticket in iTop from the Intercom conversation, the whole conversation will be copied in the ticket.
-
Public messages (“Replies” in Intercom) will be copied to the public log
-
Private messages (“Notes” in Intercom) will be copied to the private log
For each log message, the extension will try to lookup the person in iTop:
-
The end-user is identified by its iTop datamodel class (eg.
Person) and ID (eg.3). Note that these data are passed by the chat widget to Intercom. -
The support agent lookup is based on its email
-
The first non obsolete matching iTop
Contactwill be selected. -
If no match, the log entry will be added on behalf of “<AGENT_FULLNAME> (Intercom)” to trace that the log entry comes from someone that is not known in iTop. This can be useful if the support agents on Intercom have no access to iTop or are not in the database.
-
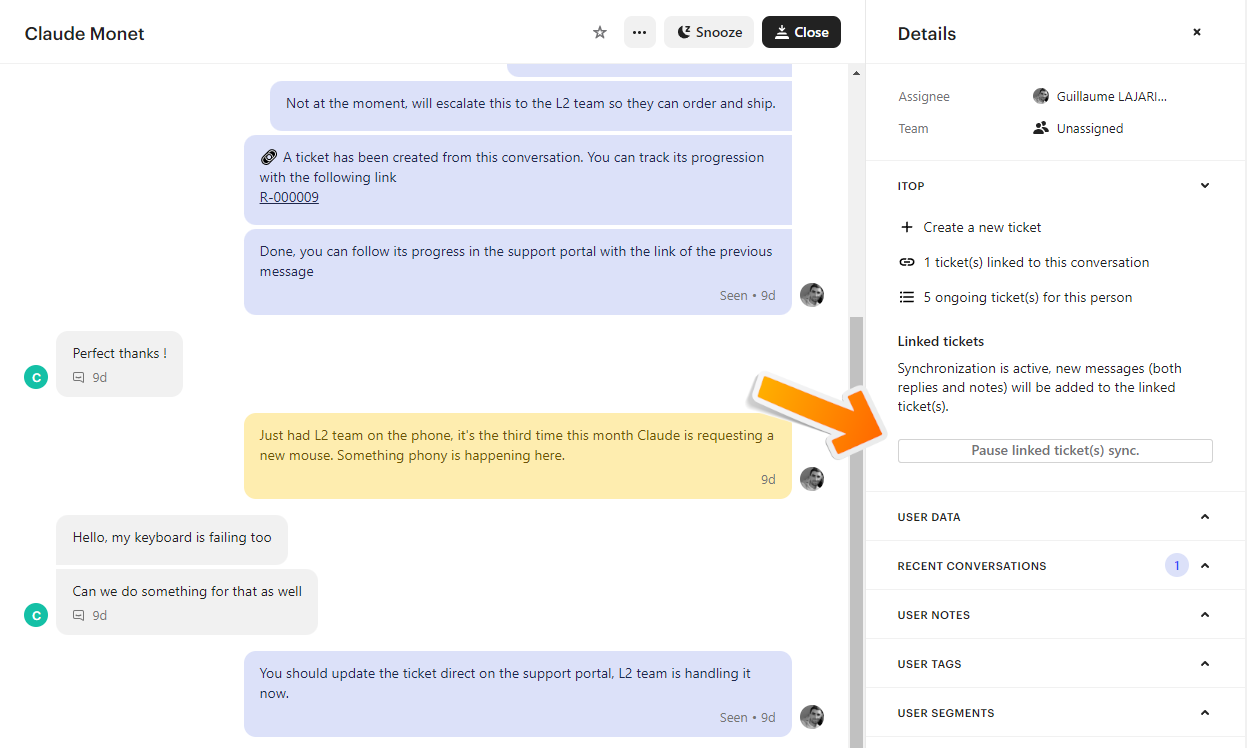
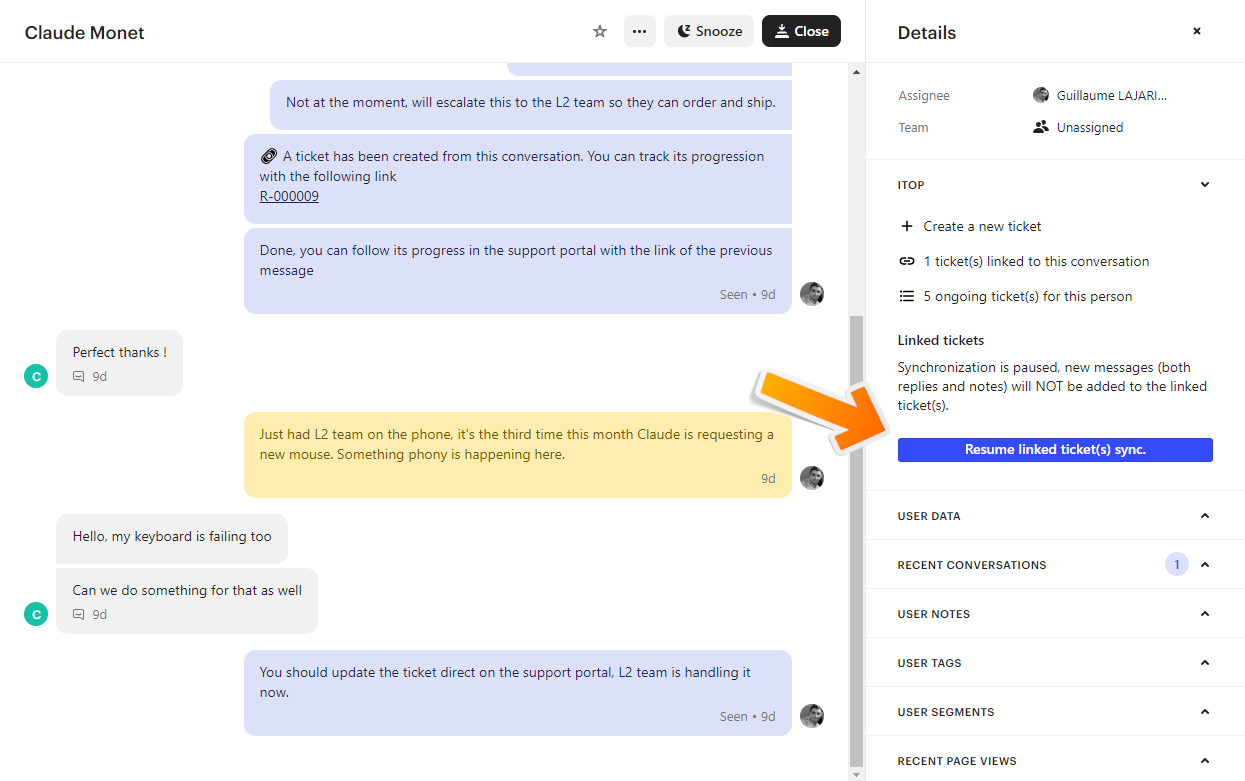
Logs synchronization
Once an Intercom conversation is linked to an iTop ticket, new messages in the conversation will update the ticket's logs. \ This messages will be identified in iTop by a disclaimer message

The Intercom support agent can pause/resume the new messages sync to iTop at anytime. This way the ticket won't be flooded with unrelevant messages.
Questions & answers
General
Why is it necessary to create my own Intercom app when there are apps already available for some other apps in the Intercom marketplace?
Pre-configured apps in the Intercom marketplace work as a proxy that redispatches interactions to the different iTop instances using the extension. This typical works for a SaaS application, but not for on-premise applications such as iTop as that would require us (Combodo) to have a public access to your iTop instance.
That why you have to manually configure your own app. But don't worry we made a step by step tutorial to guide you through it. 😊
Troubleshooting
Are there any logs specific to this extension?
Yes the extension outputs some logs in the standard log file,
they can be configured following the standard log
mechanism.
The log channel for the extension is
combodo-intercom-integration.
For example, if you want to enable verbose logs for the extension while keeping the rest of the logs at an error level, use the following configuration:
  'log_level_min' => array(
                ''            => LogAPI::LEVEL_ERROR,
                'combodo-intercom-integration' => LogAPI::LEVEL_DEBUG,
        ),
The live chat widget isn't displayed in iTop
There can be several reasons for this:
-
Check that you enable the current GUI in iTop configuration file (
combodo-intercom-integration⇒enabled_portals) -
Check that your user has the necessary profiles in iTop configuration files (
combodo-intercom-integration⇒allowed_profiles) -
Check the browser's javascript console (press F12, then go to the “Console” tab) for error messages related to Intercom
-
“[Intercom] Launcher is disabled in settings or current page does not match display conditions” : This could be related to the
User trafficsetting in the Messenger configuration. Check the “Live chat widget” tutorial in the previous sections.
-