Authentication by Token
🤦 🤦 🤦 Included in iTop Community from 3.1.0 😎 😎 😎
- name:
- Authentication by Token
- description:
- User and Application authentication using a token
- version:
- 2.2.1
- release:
- 2025-01-16
- itop-version-min:
- 3.2.1
- state:
- stable
- php-version-max:
- PHP 8.3
This extension adds iTop authentication for web services via Personal tokens and Application token instead of login/password.
Features
This module provides two ways to use authentication token for API calls:
-
An application token is a particular type of user in iTop.
-
It authenticates using a ~120 characters token
-
It has its own profiles and allowed organizations
-
It can access by default any iTop user interface (Console, portal …) but it can be restricted from iTop 3.2.0
-
It can access all APIs (REST, Synchro, Export ..) with no possible restriction
-
-
A personal token is linked to an iTop user
-
It authenticates using a token and cannot connect to the iTop user interface (Console, portal …)
-
It inherits the profiles and allowed organizations from its associated user
-
It can be restricted to some a subset of the APIs (for example only REST/SJON and Export)
-
Only users with a (configurable) set of profiles are allowed to create and manage personal tokens.
-
If your company security policy forces every user to authenticate through a SSO (SAML, OpenID…), then Personal Tokens are the solution to access the iTop APIs, since non-interactive scripts do not support SSO mechanisms.
Personal tokens can also be used for creating spreadsheet (like Excel) or PowerBI dynamic reports.
Revision History
| Version | Release Date | Comments |
|---|---|---|
| 2025-01-16 | 2.2.1 | * N°8047 - Give full rights to SuperUser Profile
on PersonalToken * N°7790 - Align XML version and syntax used * Removed module combodo_my_account into a separate extension |
| 2024-11-30 | 2.2.0 | * Move the “My account” menu in extension combodo-my-account |
| 2024-07-30 | 2.1.7 | * N°7694 - Update german translations thanks to
@Attila0428 * N°6365: no need to specify a XML setup for unattended * N°7521 - ApplicationToken revocation |
| 2024-05-03 | 2.1.5 | * N°7423 - Forbid UserTokens to be able to connect to the backoffice (or any portal) |
| 2024-04-30 | 2.1.4 | * N°7246 Fix dict files : translated keys with
tildes * N°7251 Add tests around usages of JS libs deprecated in iTop 3.2 * N°7424: Add opt-in for fallback token resolution * N°7487 - Fail to connect with personal token on external users |
| 2023-11-28 | 2.1.3 | * N°6450 - Moving outside of “My account” page
displays a useless warning * N°6451 - Personal Token creation: not following standards * N°6452 - Auto-lock: 2 regenerate buttons * N°6800 - Security hardening |
| 2023-07-13 | 2.1.1 | * N°6521 - PHP 8.1: Fix deprecated notice for null value passed to string parameter of strlen() |
| 2023-07-03 | 2.1.0 | * N°6358 - Add support for login in REST
API using
tokens * N°6449 - Add support for personal tokens on iTop 3.1+ * German translation from Lars Kaltefleiter |
| 2023-07-23 | 2.0.0 | * Personal tokens handled via scopes and
expiration dates * My account menu added to handle your personal tokens and also your current user/contact * UserTokens renamed as ApplicationTokens |
| 2023-01-23 | 1.0.0 | * First version with application tokens called UserTokens (released as a module in combodo-intercom-integration/1.1.0) |
Limitations
authent-token v2.0.0 is compatible with below versions:
-
2.7: Offers only
Application
token
, noPersonal token -
3.0: Personal token can't be used on IMPORT/EXPORT
-
Before 3.0:
Application tokencannot easily be prevented from accessing the Console -
Excel Spreadsheet via personal token:
see tricky Excel UI configuration https://wiki.combodo.com/doku.php?id=latest:user:excel_report#with_personal_token
Requirements
Installation
n/a as included in Community
Configuration
Those features are not enabled by default. You have to some following parameters to activate it.
Enrich iTop core configuration, with additional value on existing parameter
| Parameter | Description | Default |
|---|---|---|
| allowed_login_types | To log in via PersonalToken you have to add
token to allowed_login_types option
(rest-token also accepted with the same meaning
for backward compatibility). This will enable this authentication
mode among others (like the classical form via
login/password). |
token mode is not enabled by default |
| allow_rest_services_via_tokens | You can allow anyone with a PersonalToken to use the REST APIs (or Data synchro CLI scripts), without the need for the RESTServices profile, by setting this configuration parameter to true. | false |
authent-token configuration
| Parameter | Description | Default |
|---|---|---|
| enable_myaccount_menu | To enable my account menu for everyone (by default invisible otherwise) You have to set enable_myaccount_menu to true. | false |
| personal_tokens_allowed_profiles | To define which iTop profiles are allowed to manage and use personal tokens to authenticate. With this option, users with listed profiles can manage their personal tokens from 'My Account' menu along with their current user/contact. By default no-one can do it | none |
| application_token/allow_fallback_token | Allow fallback token resolution when decrypting the token is not possible due to encryption library change | false |
Sample configuration
- config-itop.php
-
'allowed_login_types' => 'form|token|external|basic',
'allow_rest_services_via_tokens' => true,
- config-itop.php
-
'authent-token' => array (
        'personal_tokens_allowed_profiles' => array (
                 0 => 'Administrator',
                 1 => 'Configuration Manager',
        ),
        'application_token' => array(
            'allow_fallback_token' => false,
        ),
),
Usage
Managing Application Token
-
Application Token is a new type of User in iTop.
-
It is managed by the Administrator (or any user allowed to manage Users) via the
User accountsmenu -
Such user is not identified by a login and a password but via a Token, which is automatically generated at User creation
-
Don't forget to add REST Service User profile if the scope contains REST/JSON
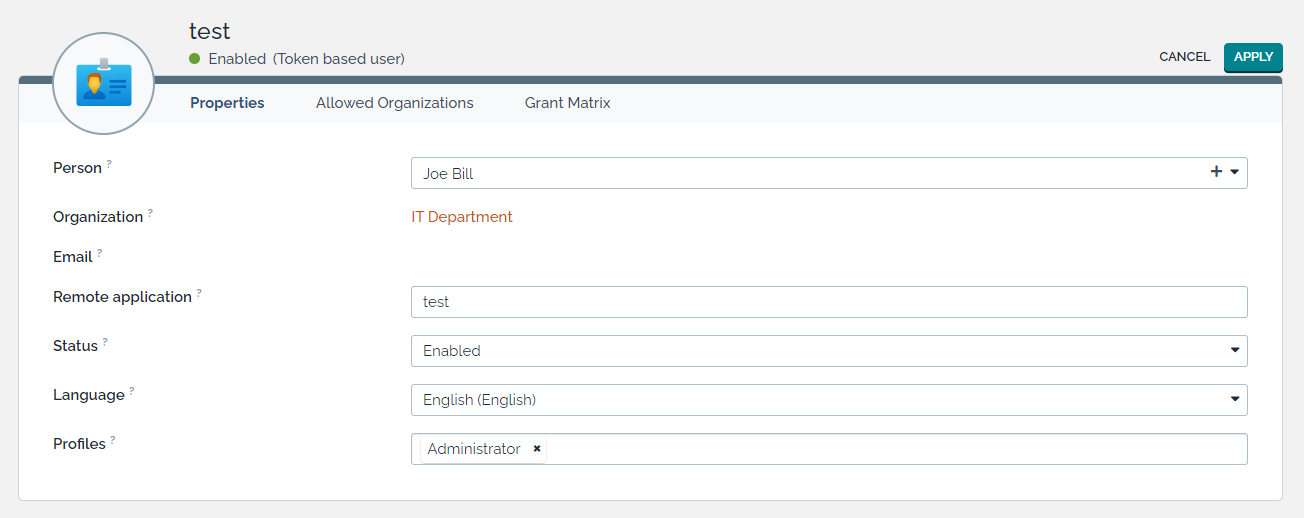
This user is linked to a Contact and identified by a name stored
in Remote application field.
-
This name is used in the Change history of iTop when such user create or modify elements
-
This User must have profiles and can have
Allowed organisationsas any other user -
This type of User is designed to access webservices pages (import and export), data synchronization and rest services
-
As any User, it requires
REST Servicesprofile to access the REST API when the scope containsREST/JSON -
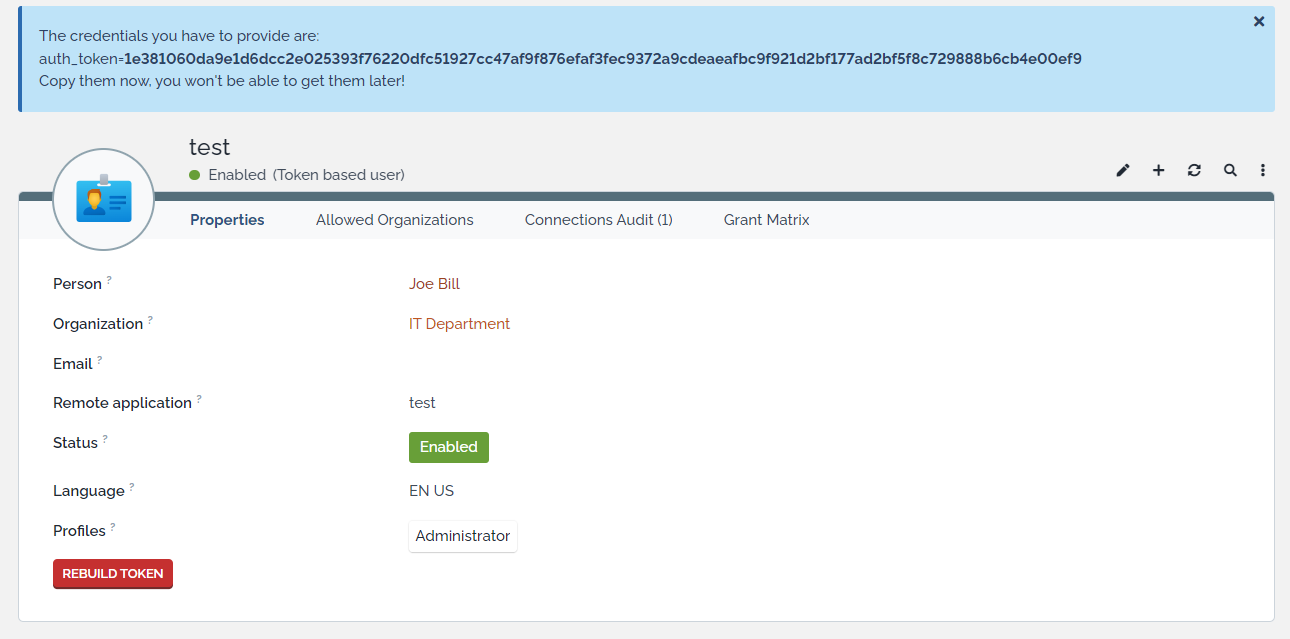
Token must be recorded after it as been generated as it cannot be displayed later
-
Token can be rebuild
Managing Personal Token
Personal Token is a separate object, automatically linked to an existing user.
-
Personal Token gets automatically the Profiles and the
Allowed organizationsof its associated User, and they cannot be different. -
It allows connection to iTop Webservices (import and export), data synchro services and rest services
-
Personal token cannot be used to connect to the iTop UIs (console, portals)
-
If
allow_rest_services_via_tokensis true, then all Personal Tokens can be used to access rest services, otherwise, rest is only accessible if the corresponding User hasREST Servicesprofile. -
Token must be recorded after it as been generated as it cannot be displayed later
-
Token can be rebuild
They are two ways to manage personal token: either your allowed by your profil to manage the token by yourself, using the My Account Menu, or an Administrator will generate it for you.
Manage your own
To manage it by yourself, follow the my account menu, which is available as soon as you are allowed to manage Personal Tokens. If you don't have it, ask your iTop administrator either to give you a profile allowed to edit Personal tokens or ask him to create the token for you.

This page contains 3 sections:
-
on the left : your current user (login/organization/profiles)
-
on the right: your current contact (email, name,…)
-
below: your personal tokens to authenticate as your current user under specified contexts (import, export, data synchro and rest)

In the token section you can:
-
add a new token via '+' button on the right
-
edit each existing token with pen button
-
refresh each existing token to generate another token for authentication, for eg. if you lost it or if it was compromised (previous one is no more usable)
-
delete any existing token with dustbin button
Personal Token fields
-
application: name of the token
-
scopes: context in which iTop authentication will work
-
expiration date: if set, date after which token will expire and will not work anymore
-
count: number of successful authentications with current token
-
use date: date of the last successful authentication
When you create or rebuild a Token, copy the generated token to be used by your script as it won't be display anymore. If you forgot to do so, just regenerate the token.

Manage others
As an administrator or with a profile allowed to edit
PersonalToken class, you can manage all personal tokens.
For this uses below menu:

Then you can handle any token operation (add/modify/refresh/delete) for any User:

REST with token
If you use a Personal token:
-
the User must have
REST Servicesprofile or the configuration parameterallow_rest_services_via_tokensmust be set totrue -
the personal token must have REST API in its scope
If you use an Application token, it must have REST
Services profile.
To call the Rest API and provide the token, you can either put it in the header or in a post parameter.
-
in the header: 'Auth-Token: YOURTOKEN'
-
in a POST parameter: auth_token=YOURTOKEN
- curl example with token provided in the header
-
curl --location -g --request POST 'https://localhost/itop/Develop/webservices/rest.php?version=1.3&json_data={
"operation": "core/get",
"class": "Person",
"key": "SELECT Person WHERE email LIKE '\''%.fr'\''",
"output_fields": "friendlyname, email"
}' \
--header 'Auth-Token: YOURTOKEN'
- curl example with token provided in the query
-
curl --location -g --request -F 'auth_token=YOURTOKEN' POST 'https://localhost/itop/Develop/webservices/rest.php?version=1.3&json_data={
"operation": "core/get",
"class": "Person",
"key": "SELECT Person WHERE email LIKE '\''%.fr'\''",
"output_fields": "friendlyname, email"
}'
Export-v2 with token
Limitation: Authentication with a Personal token on Import and Export can only be used since release 3.1 of iTop.
The export-v2.php API is useful to extract data that are stored in QueryPhrasebbok for eg.
-
With a Personal token, be sure that the Export is set in the Personal token
scope. -
With an Application token, this part is automatic.
Below examples on how to export iTop data using wget and curl:
- export-v2.php with wget
-
wget -q --server-response --post-data='auth_token=YOURTOKEN' --no-check-certificate -O - "http://xxx/itop31/webservices/export-v2.php?format=csv&login_mode=token&date_format=Y-m-d+H%3Ai%3As&query=14"
- export-v2.php with curl
-
curl -X POST -F 'auth_token=YOURTOKEN' "http://xxx/itop31/webservices/export-v2.php?format=csv&login_mode=token&date_format=Y-m-d+H%3Ai%3As&query=14"
Troubleshooting
This authentication can fail for below reasons:
-
token (credential) passed is not the write one
-
It can be due to a wrong copy-paste of the token
-
If someone refreshed the token object. Regenerate the token and copy-paste the new value before testing again
-
-
token object (Personal token and Application token) has been deleted in iTop
-
token (Personal token) has an expiration date and it is indeed expired
-
token (Personal token) does not have the proper scope to handle the ongoing operation
-
User associated with the Personal token is disabled in iTop
-
Application token is disabled in iTop
Other possible root cause
-
for a REST API call, Personal token does not have REST in its scope.
-
same for collector calls without Synchro in the Personal token scope.
-
For Personal token, maybe your user does not have the required profiles, check if you can query those objects in the console with your User.
Token handles authentication, authorizations uses iTop core mechanism based on Profiles.
-
The fact that you can log in via a token to call REST APIs, does not guarantee that you will get a result. For this you must be privileged enough to execute it.
FAQs
Can I create an Application Token via the REST/JSON webservices?
No, this will not work. You can actually create the
UserToken object via the REST/JSON API but you will not be
able to use it without viewing the UserToken object in
iTop. This is because the actual value of the token to pass for
connecting is only displayed in the console when creating or
refreshing the token interactively.