Data collector for OCS Inventory v1
- name:
- Data collector for OCS Inventory
- description:
- Data Collector for OCS Inventory NG
- version:
- 1.0.7
- release:
- 2021-01-05
- download:
- https://store.itophub.io/en_US/products/ocsng-data-collector
- code:
- ocsng-data-collector
- state:
- stable
- alternate-name:
- Data collector for OCS Inventory NG
- diffusion:
- iTop Hub,Combodo site
This stand-alone application collects information from a single OCS Inventory NG server in order to populate the iTop CMDB with the collected Servers, PCs and Virtual machines. The collector uses the iTop data synchronization engine to synchronize the information between OCS Inventory and iTop.
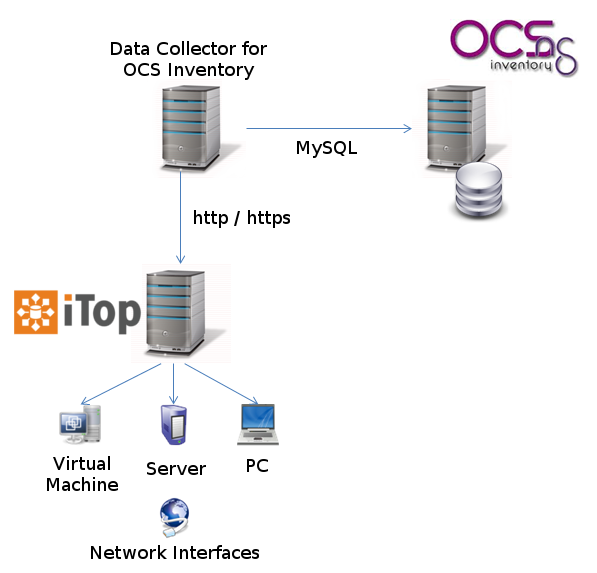
An additional (and optional) extension Component details from OCS is available to display the content of the OCS Inventory pages directly inside iTop, for each synchronized object (Server, PC or Virtual Machine):

Features
-
Automated inventory of Brand, Model, OS Family, OS Version, Physical Server, PC and Virtual Machine from OCS Inventory server
-
Automated inventory of Network Interfaces
-
The collector can reside on any system with web access to iTop and mysql access to the OCS Inventory server
-
Automatic creation and update of the Synchronization Data Sources in iTop.
-
An optional small extension is available to display an extra tab “OCS Inventory” on synchronized PCs, Servers and VirtualMachines. This tab displays the OCS page for the device (using an IFRAME).
Revision History
| Date | Version | Description |
|---|---|---|
| 2021-01-05 | 1.0.7 | - Fix compatibility with SSO set as default
connection mode - Configurable timestamp added in the logs - New option for usage: –help - The path to the configuration file can be specified via the option --config_file on the command line.- The location where to store the collected data is now a parameter in the configuration file: data_path.- Better checking of Data Source definitions to catch missing reconciliation keys |
| 2019-11-13 | 1.0.6 | - Reject invalid characters for
database_table_name - Added the specific class MySQLCollector which forces the DB connection to use UTF-8 characters - Change all OCS SQLCollectors into MySQLCollectors |
| 2019-10-29 | 1.0.5 | Handles TeemIp : - Automatically detects if TeemIp (as an iTop module or as a standalone application) is present. - Optional synchronization of IPv4 addresses - Optional synchronisation of IP interfaces |
| 2018-09-04 | 1.0.4 | First public version. No longer requires an alteration of the data model. |
| 2018-06-26 | 1.0.3 | New debug trace |
| 2015-05-20 | 1.0.1 | A few bug fixes: support of Windows file names (i.e. c:\Program Files\…). Conversion of SPEED from '100 Mb/s' to '100'. Forcing a NON case-sensitive comparison for 'Laptop' et al. |
| 2015-02-16 | 1.0.0 | First version |
Limitations
-
The collector does not retrieve installed software information
-
The collector is not normalizing Model, OS Family and OS Version
-
The collector synchronizes only PCs and Servers which have a valid serial number in OCS
-
If IP collection is enabled, only IPv4 addresses are collected, not IPv6
-
If your iTop is accessed using HTTPS, then the same must be true for OCS Inventory otherwise the inline frame of OCS Inventory inside iTop will not display because of browsers's security restrictions.
-
There is no single sign-on between iTop and OCS, so you'll have to login to OCS when displaying the OCS tab.
Requirements
-
PHP Version 5.3.0
-
An access to the OCS Inventory NG mysql database
-
An access to the iTop web services (REST + synchro_import.php and synchro_exec.php). Note: starting with iTop 2.5.0, the user must have the profile
REST
Services User
in iTop. -
+ Data collector Base requirements.
Installation
Installation of the OCS Inventory integration extension
Automated installation via iTop Hub
-
Go to the extensions store on iTop Hub
-
Click on the cart icon to make the acquisition of the extension and follow the on-screen instructions to deploy it on your iTop instance
Manual installation
-
unzip the file “itop-ocsng.zip” into the iTop
extensionsfolder -
make sure that the web server process has enough rights to read the copied files
-
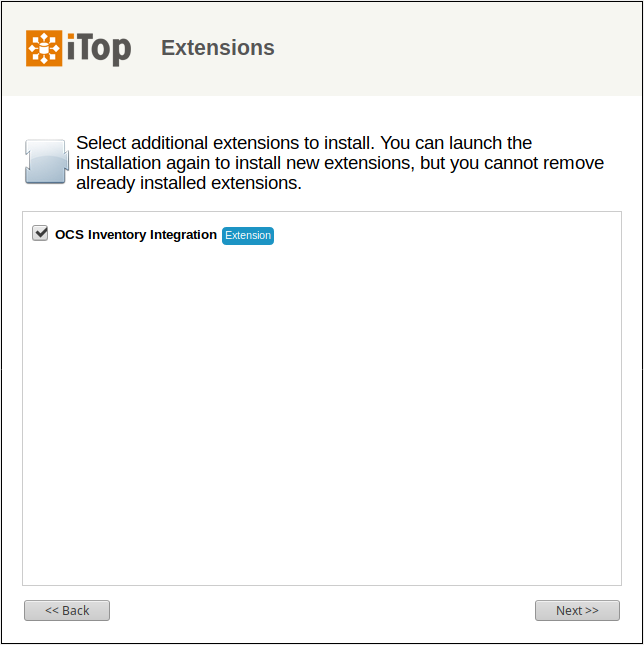
Launch iTop setup
-
Select the OCS Inventory Integration extension, when prompted
-
Edit the iTop configuration file to specify the URL to access the OCS web server:
      'itop-ocsng' => array (
                'ocsng_url' => 'http://localhost/ocsreports/',
        ),
Install the Data collector for OCS Inventory
-
Expand the content of the zip archive “ocsng-data-collector” in a folder on the machine that will run the collector application. This machine must have an SQL access to the OCS NG database and a web access to the iTop server.
-
create the file
conf/params.local.xmlto suit your installation, supplying the appropriate credentials to connect to OCS NG and iTop.
By default this file should contains the values used to connect to iTop server and OCS NG server:
<parameters>
  <itop_url>http://localhost/</itop_url>
  <itop_login>admin</itop_login>
  <itop_password>admin</itop_password>
  <contact_to_notify>john.doe@demo.com</contact_to_notify>
  <synchro_user>admin</synchro_user>
  <sql_host>localhost</sql_host>
  <sql_database>ocsweb;charset=UTF8</sql_database>
  <sql_login>root</sql_login>
  <sql_password>root</sql_password>
</parameters>
| Parameter | Meaning | Sample value |
|---|---|---|
| itop_url | URL to the iTop Application | https://localhost/ |
| itop_login | Login (user account) for connecting to iTop. Must have admin rights for executing the data synchro. | admin |
| itop_password | Password for the iTop account. | |
| contact_to_notify | The email address of an existing contact in iTop, to be notified of the results of the synchronization | john.doe@demo.com |
| synchro_user | iTop user used for synchronization web service | admin |
| sql_host | The address to connect to OCS server database | default:localhost |
| sql_database | database to connect to. You can use ;charset to force the character set | default ocsweb |
| sql_login | Login to connect to the OCS database | |
| sql_password | Password to connect to the OCS database |
Configuration
By default the data collection configuration is defined in the
file collectors/params.distrib.xml. Do not modify this
file! If you need to adapt the configuration, create a file named
params.local.xml in the conf directory
and copy/paste the needed definitions into it (the structure of
both XMl files is the same). This configuration defines which SQL
queries have to be executed on the OCS NG server to retrieve the
data and synchronize with iTop.
  <default_org_id>Demo</default_org_id>
  <default_status>production</default_status>
  <PCCollection>yes</PCCollection>
  <ServerCollection>yes</ServerCollection>
  <VMCollection>yes</VMCollection>
  <OCSBrandCollector_query>SELECT DISTINCT SMANUFACTURER as primary_key, SMANUFACTURER as name FROM bios</OCSBrandCollector_query>
  <OCSOSFamilyCollector_query>SELECT DISTINCT OSNAME as primary_key,OSNAME as name FROM hardware</OCSOSFamilyCollector_query>
  <OCSOSVersionCollector_query>SELECT DISTINCT CONCAT(OSNAME,OSVERSION) as primary_key,OSNAME as osfamily_id,OSVERSION as name FROM hardware</OCSOSVersionCollector_query>
  <OCSServerModelCollector_query>SELECT DISTINCT CONCAT(SMANUFACTURER,SMODEL) AS primary_key,SMANUFACTURER as brand_id,SMODEL as name, 'Server' As type FROM bios WHERE TYPE COLLATE utf8_general_ci NOT IN ('Notebook','Laptop') AND SMANUFACTURER COLLATE utf8_general_ci NOT LIKE 'VMware%'</OCSServerModelCollector_query>
  <OCSServerCollector_query>SELECT b.SSN as primary_key,h.ID as ocsid, h.NAME as name, h.OSNAME as osfamily_id,h.OSVERSION as osversion_id, h.PROCESSORT as cpu, h.MEMORY as ram, h.IPADDR as managementip, b.SMANUFACTURER as brand_id,b.SMODEL as model_id,b.SSN as serialnumber, '$default_status$' as status, '$default_org_id$' as org_id FROM hardware AS h JOIN bios AS b ON h.id=b.hardware_id WHERE b.TYPE COLLATE utf8_general_ci NOT IN ('Notebook','Laptop') AND SMANUFACTURER COLLATE utf8_general_ci NOT LIKE 'VMware%'</OCSServerCollector_query>
  <OCSServerPhysicalInterfaceCollector_query>SELECT  n.ID as primary_key,n.DESCRIPTION as name, IF(SPEED REGEXP '^[0-9]+ ', LEFT(SPEED, LOCATE(' ', SPEED)), SPEED) as speed, MACADDR as macaddress, IPADDRESS as ipaddress, IPMASK as ipmask,IPGATEWAY as ipgateway,h.NAME as connectableci_id FROM networks AS n JOIN hardware AS h ON n.hardware_id=h.id JOIN bios AS b ON h.id=b.hardware_id WHERE SMANUFACTURER COLLATE utf8_general_ci NOT LIKE 'VMware%' AND b.TYPE COLLATE utf8_general_ci NOT IN ('Notebook','Laptop')</OCSServerPhysicalInterfaceCollector_query>
  <OCSPCModelCollector_query>SELECT DISTINCT CONCAT(SMANUFACTURER,SMODEL) AS primary_key,SMANUFACTURER as brand_id,SMODEL as name, 'PC' As type FROM bios WHERE TYPE COLLATE utf8_general_ci IN ('Notebook','Laptop') AND SMANUFACTURER NOT LIKE 'VMware%'</OCSPCModelCollector_query>
  <OCSPCCollector_query>SELECT b.SSN as primary_key,h.ID as ocsid, h.NAME as name, h.OSNAME as osfamily_id,h.OSVERSION as osversion_id, h.PROCESSORT as cpu, h.MEMORY as ram, b.SMANUFACTURER as brand_id,b.SMODEL as model_id,b.SSN as serialnumber, '$default_status$' as status, '$default_org_id$' as org_id FROM hardware AS h JOIN bios AS b ON h.id=b.hardware_id WHERE b.TYPE COLLATE utf8_general_ci IN ('Notebook','Laptop') AND SMANUFACTURER COLLATE utf8_general_ci NOT LIKE 'VMware%'</OCSPCCollector_query>
  <OCSPCPhysicalInterfaceCollector_query>SELECT  n.ID as primary_key,n.DESCRIPTION as name, IF(SPEED REGEXP '^[0-9]+ ', LEFT(SPEED, LOCATE(' ', SPEED)), SPEED) as speed, MACADDR as macaddress, IPADDRESS as ipaddress, IPMASK as ipmask,IPGATEWAY as ipgateway,h.NAME as connectableci_id FROM networks AS n JOIN hardware AS h ON n.hardware_id=h.id JOIN bios AS b ON h.id=b.hardware_id WHERE SMANUFACTURER COLLATE utf8_general_ci NOT LIKE 'VMware%' AND b.TYPE COLLATE utf8_general_ci IN ('Notebook','Laptop')</OCSPCPhysicalInterfaceCollector_query>
  <OCSVirtualMachineCollector_query>SELECT h.ID as primary_key,h.ID as ocsid, h.NAME as name, h.OSNAME as osfamily_id,h.OSVERSION as osversion_id, h.PROCESSORT as cpu, h.MEMORY as ram,h.IPADDR as managementip, '$default_status$' as status, '$default_org_id$' as org_id FROM hardware AS h JOIN bios AS b ON h.id=b.hardware_id WHERE SMANUFACTURER COLLATE utf8_general_ci LIKE 'VMware%'</OCSVirtualMachineCollector_query>
  <OCSLogicalInterfaceCollector_query>SELECT  n.ID as primary_key,n.DESCRIPTION as name, IF(SPEED REGEXP '^[0-9]+ ', LEFT(SPEED, LOCATE(' ', SPEED)), SPEED) as speed, MACADDR as macaddress, IPADDRESS as ipaddress, IPMASK as ipmask,IPGATEWAY as ipgateway,h.NAME as virtualmachine_id FROM networks AS n JOIN hardware AS h ON n.hardware_id=h.id JOIN bios AS b ON h.id=b.hardware_id WHERE SMANUFACTURER COLLATE utf8_general_ci LIKE 'VMware%'</OCSLogicalInterfaceCollector_query>
Principles
-
For each class of object to import into iTop (PC, Server, VM, Brand, Model, OSVersion OSFamily), a Synchro Data Source is created by the collector application.
-
Each collector is associated with an SQL query (via the parameter
<name_of_the_collector>_query). -
This query must return column where aliases (i.e. “name” of the columns) correspond to the expected fields for the corresponding Synchro Data Source.
-
These queries can be adapted to suit your needs (for example to better differentiate PCs and Servers or to change/set some default values for some columns)
-
Since the synchronization of PCs, Servers and Virtual Machines all rely on their own SQL query, it is important to make sure that the results of these 3 queries do no overlap. Otherwise the same “system” will be imported several times in itop (for example as both a PC and a Server).
| Parameter | Meaning |
|---|---|
| default_org_id | Define the default organization for the synchronized CIs |
| default_status | Define the default status for the synchronized CIs |
| PCCollection | Define wether PC collection is active (yes) or not (no) |
| ServerCollection | Define wether Server collection is active (yes) or not (no) |
| VMCollection | Define wether Virtual machine collection is active (yes) or not (no) |
| OCSBrandCollector_query | SQL query to retrieve from OCS NG server the list of known Brands |
| OCSOSFamilyCollector_query | SQL query to retrieve from OCS NG server the list of known OS Families |
| OCSOSVersionCollector_query | SQL query to retrieve from OCS NG server the list of known OS Version |
| OCSServerModelCollector_query | SQL query to retrieve from OCS NG server the list of known Physical server models |
| OCSServerCollector_query | SQL query to retrieve from OCS NG server the list of physical servers |
| OCSServerPhysicalInterfaceCollector_query | SQL query to retrieve from OCS NG server the list of physical network interfaces for servers |
| OCSPCModelCollector_query | SQL query to retrieve from OCS NG server the list of known PC models |
| OCSPCCollector_query | SQL query to retrieve from OCS NG server the list of PCs |
| OCSPCPhysicalInterfaceCollector_query | SQL query to retrieve from OCS NG server the list of physical interfaces for PCs |
| OCSVirtualMachineCollector_query | |
| OCSLogicalInterfaceCollector_query | SQL query to retrieve from OCS NG server the list of logical network interfaces for virtual machines |
These queries can be redefined in the file conf/params.local.xml in order to take into account your specific needs (For instance change de status of created Server, PC, Virtual Machine, as well as de default organisation). By default, only VMWare virtual machines are created. The Virtualmachine query has to be adapted if you want to handle other type of VMs
params.distrib.xml contains the default values for the
parameters. Both files (params.distrib.xml and
params.local.xml) use exactly the same format. But
params.distrib.xml is considered as the reference and
should remain unmodified. Should you need to change the value of a
parameter, copy and modify its definition in
params.local.xml. The values in
params.local.xml have precedence over the ones in
params.distrib.xmlIPs and IP Interfaces collection
The collector automatically detects if TeemIp is present on the remote iTop application (as a module or even as a stand-alone application) and if TeemIp Zone Management extension is installed. Should that be the case, then the following parameters may trigger IP addresses and IP interfaces collection.
<?xml version="1.0" encoding="UTF-8"?>
  <parameters>
    ...
    <!-- TeemIp options -->
    <collect_ips>yes</collect_ips>
    <default_ip_status>allocated</default_ip_status>
    <manage_ipv6>no</manage_ipv6>
    <default_view_name></default_view_name>
    ...
  </parameters>
| Parameter | Meaning | Sample value |
|---|---|---|
| collect_ips | Triggers IP addresses collection | yes |
| default_ip_status | Satus of newly created IP addresses | allocated |
| manage_ipv6 | Triggers IPv6 collection - not working yet | no |
| default_view_name | View of the newly created IP addresses | <empty string> |
Usage
To launch the data collection and synchronization with iTop, run the following command (from the root directory where the data collector application is installed):
php exec.php
The following (optional) command line options are available:
| Option | Meaning | default value |
|---|---|---|
| --console_log_level=<level> | Level of output to the console. From -1 (none) to 9 (debug). | 6 (info) |
| --collect_only | Run only the data collection, but do not synchronize the data with iTop | false |
| --synchro_only | Synchronizes the data previously collected (stored
in the data directory) with iTop. Do not run the
collection. |
false |
| --configure_only | Check (and update if necessary) the synchronization data sources in iTop and exit. Do NOT run the collection or the synchronization | |
| --max_chunk_size=<size> | Maximum number of items to process in one pass, for preserving the memory of the system. If there are more items to process, the application will iterate. | 1000 |
The execution of the command line will:
-
Connect to iTop to create the Synchronization Data Sources (or check their definition if they already exist, updating them if needed)
-
Connect to OCS NG to collect the information about the Servers, PC, Virtual Machines
-
Upload the collected data into iTop (this is the configuration parameter
<name_of_the_collector>_query -
Synchronize the collected data with the existing iTop CIs.
Scheduling
Once you've run the data collector interactively, the next step is to schedule its execution so that the collection and import occurs automatically at regular intervals.
The data collector does not provide any specific scheduling
mechanism, but the simple command line php exec.php
can be scheduled with either cron (on
Linux systems) or using the Task Scheduler on Windows.
full_load_interval to make it consistent with the
frequency of the scheduling.