ITSM Designer: What's New
ITSM Designer - Combodo's customers only
History of the new features introduced
April 2024
Sort list of objects
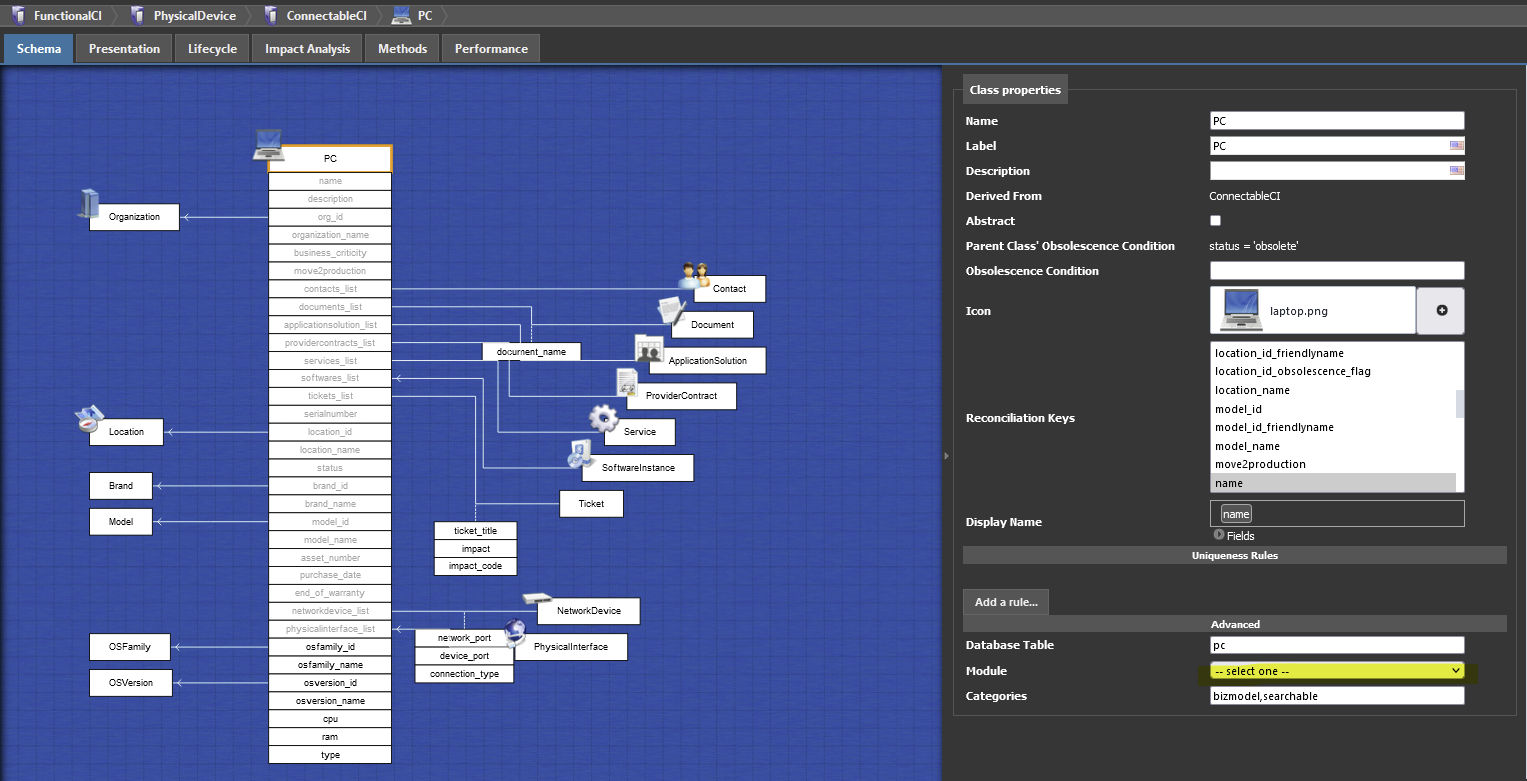
It's now possible to choose in the class properties, one attribute and the sorting direction to specify the default ordering of any list of objects of that class.

Supported attributes for ordering:
-
'Date'
-
'Date and Time'
-
'Duration'
-
'Email address'
-
'Enumeration (List)'
-
'IP Address'
-
'Number (Decimal)'
-
'Number (Integer)'
-
'Percentage'
-
'String'
-
'URL'
-
When no sorting is explicitly provided, then objects of a class are displayed by ascending alphabetic order of friendlyname
Limitations
-
iTop is not able to sort on a typology or any external key such as the contact's organization, the person's location or the server's brand
-
iTop is not able to sort on a field from a foreign class, such as the organization_name
-
iTop display does not handle well multi-columns sorting in paginated list, this is why the Designer does not yet propose multi-attributes sorting
-
If you have specified more than one attribute to sort a particular class (through a past request to Combodo which was XML injected), the display will only show the first attribute.
-
In that case, don't touch those new properties or “Undo” with the Designer button any change you made by mistake, otherwise you will loose your previous multi-columns setting.
-
Event & callback
Since iTop 3.1.0, there is a mechanism of event listeners, which you can configure directly in the ITSM Designer, if you have PHP Developer profile.
-
What is an event?
-
What are the possible events?
To create a listener, in the Designer,
-
Create a new method on a class
-
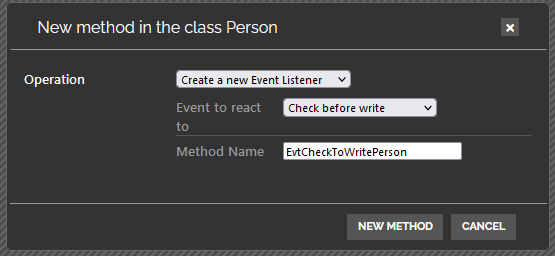
In the pop-up:
-
field: Operation choose Create a new Event Listener
-
field: Event to react to choose the event on which you want to act
-
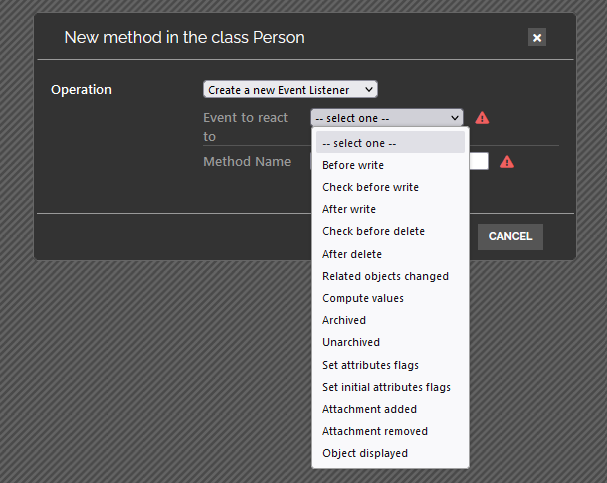
-
field: Method Name it proposes a default method name based on current class and selected event, but you can name it differently
-
In the method panel, enter your PHP code
-
On the right panel, set the callback rank, this allow to ensure the final ordering of the various callbacks brought by different extensions.
You can change the rank of extensions provided callbacks as long as they have been created in XML…
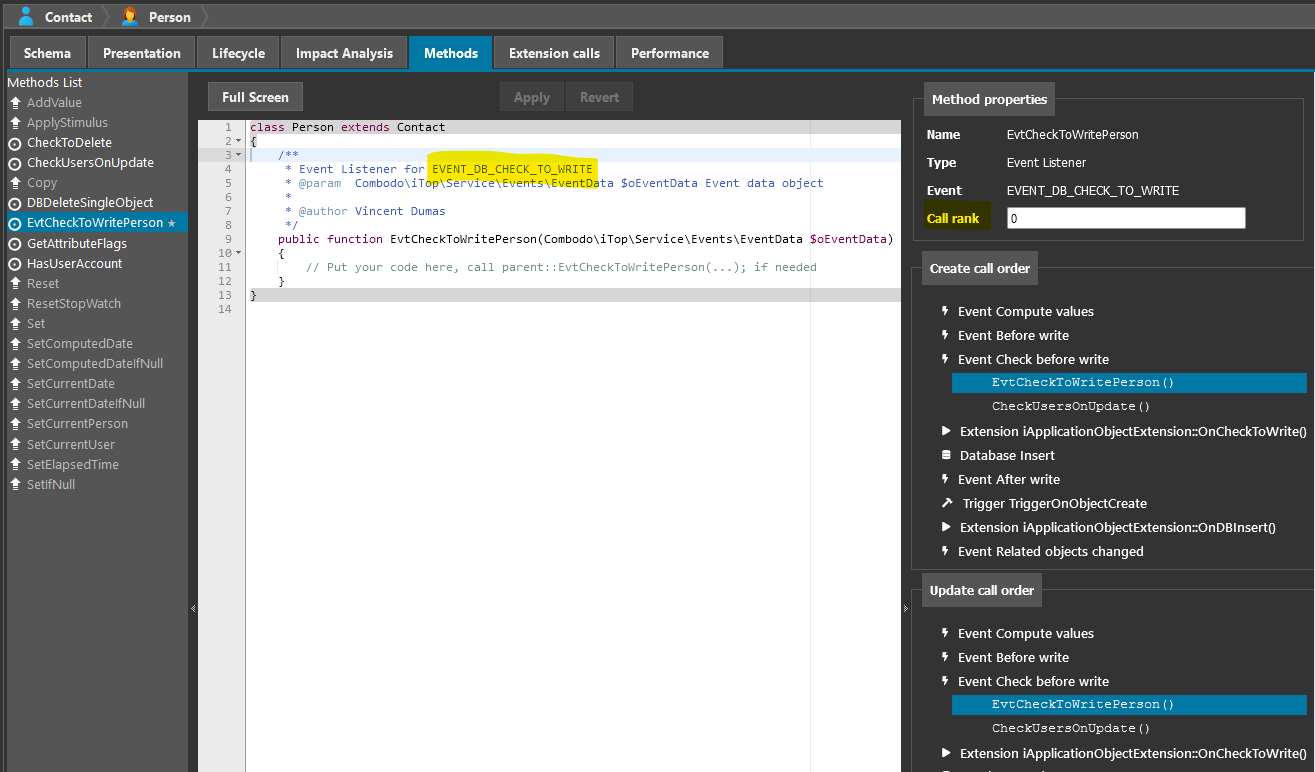
Feedback en methods
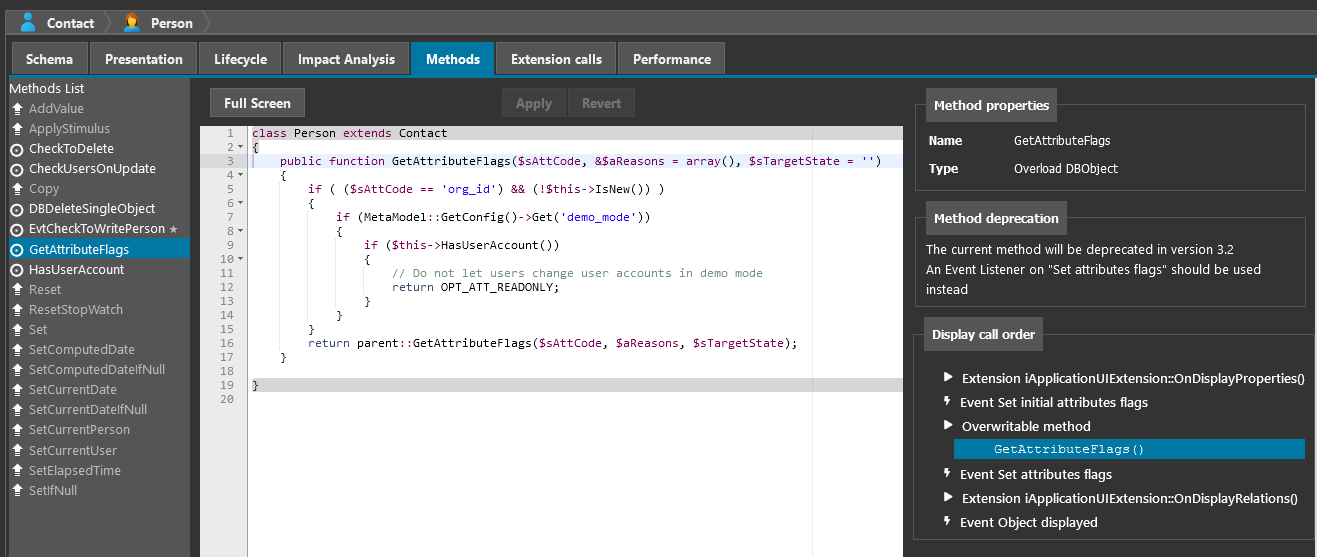
When opening the Methods tab of a class, you will notice that the inherited methods have their name greyed, the methods which have been defined or overwritten in the Designer do have a star next to their name, so you can quickly know if they have been touched or not.
When selecting a particular method, you get a new right panel, which at least will display the type of method and in some case, the sequence order, when those methods are related to the creation and update of the object itself.
Overwritable method
For methods which are impacting the object Creation and Modification, the sequence of calls are displayed in the right panel, so you can understand in which order they will be called
Lifecycle method
For methods which can be called from the object lifecycle, the right panel displays the state and stimuli which are calling this method as an action
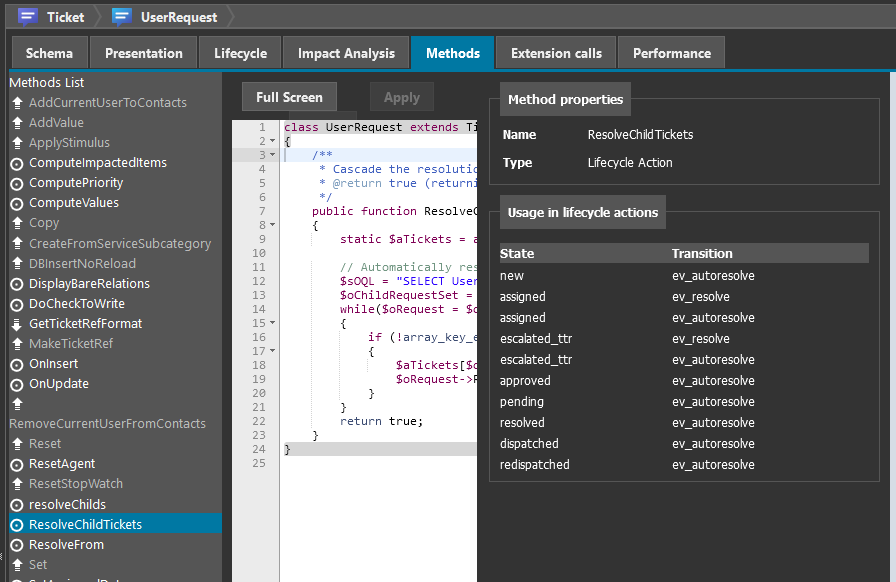
Hide core methods
Multiple core methods, which code was anyhow not displayed, are no more in the list of methods, as they are not expected to be overwritten. Nevertheless, they are still usable in any lifecycle actions.

New XML assembly logic
Maintenance
operation.This revision has no effect on your iTop, it's just different XML ways of modeling a datamodel.
New "_delta" logic
-
If you had/have a _delta=“define_if_not_exists” on a XML node which is present, then this tag and all tags below, will be automatically removed from the delta.xml.
-
Before the _delta was kept, and the the branch injected below, was replaced by the datamodel one, so removing it has no effect as they were the same.
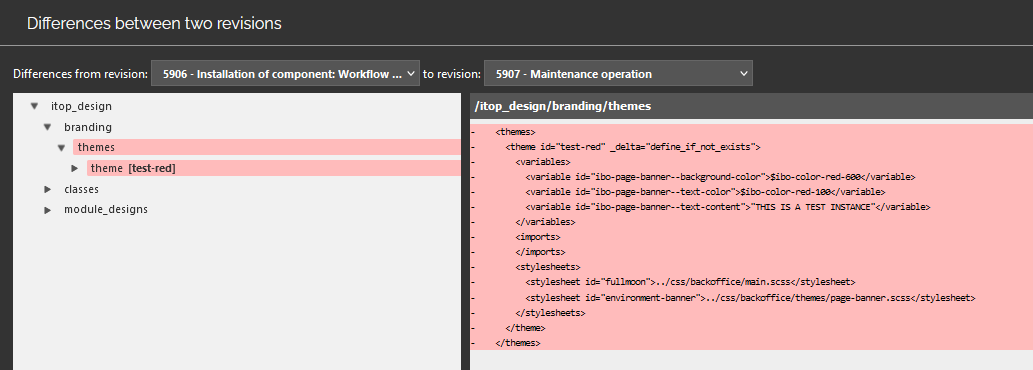
In this example, the “test-red” theme was first created locally on this license, then included into the iTop package, as a result, this information is no more useful and was removed from the delta during the “maintenance operation”.
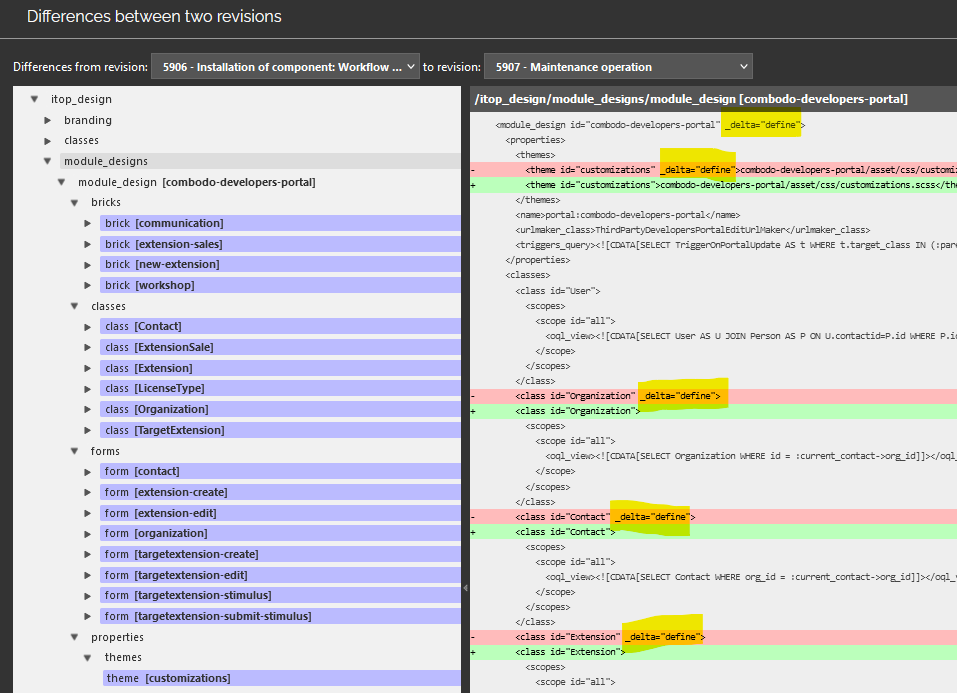
-
If you have a _delta=“define” flag on a node below one which already has a “define”, “define_if_not_exists”, “redefine” or “force”, then that delta flag below is totally useless and will be removed automatically after a direct edition of the XML (injection, portal editor,…). You may see such cases comparing your “Maintenance operation” revision and the previous one.
-
If you specify a _delta=“delete_if_exists” on a XML node, this tag and its delta are kept in your delta.xml regardless of the existence or absence of that XML node.
Note that such _delta=“delete_if_exists” value is not supported on class node by iTop prior to version 3.2.0. -
If you have not specified any _delta information on an XML node,
-
prior to this Designer version, the default was “merge”. It is still the case for assembling XML provided by iTop extensions, which are compiled in “lax mode”.
-
now, the default is “must_exist”. When doing an XML injection, such as a portal edition, the assembly is executed in “strict mode”, so missing delta flag on new node will generate an error.
-
Assembly mode
-
What if I inject an XML node with an explicit _delta=“merge”, this delta will not be kept (as before),
-
if the node was not yet present, it's replaced by “define”
-
if the node was already present, it's suppressed (so equivalent to “must_exist”)
-
-
What if I inject an XML node with no _delta=“” and that node does not exist in the current model (=assembly of an itop package and my extensions)?
-
In “lax”, no error, it will merge. It behaves as if you had entered _delta=“merge”
-
In “strict” I get an error, asking me to specify a _delta=“” on that not yet present XML node.
-
-
What if I inject an XML branch with no _delta=“” and that branch already exists in the current model (=assembly of an itop package and my extensions)?
-
In the past no error, it was merged and the values from the delta were ignored
-
Now an XML tree being totally equivalent in terms of nodes hierarchy to the current datamodel, it is purely removed from the delta.
-
Existing branches with no new leaves in an injected XML are purely ignored and removed.
-
XML class hierarchy
We changed the way the classes are organized within the delta.xml. They are no more in hierarchy, but flat.
For a human reader, it's easier to detect if a class was added or just modified in the delta.xml, because now any class node which has no _delta=“” was for sure not created in the Designer. In the past, maybe its parent was defined in Designer.
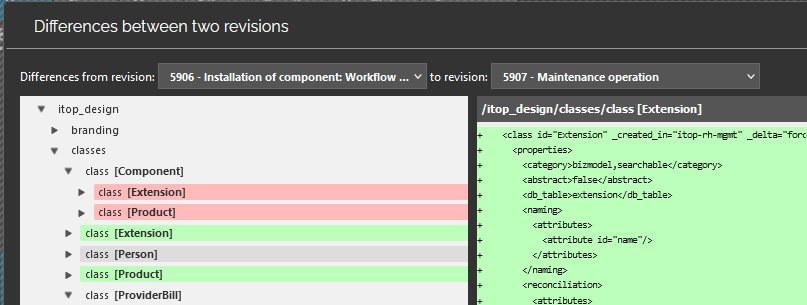
In this example, the classes “Extension” and “Product” which are sub-classes of “Component” were
-
deleted from itop-design/classes/class[@id=“Component”]/classes
-
and recreated under itop-design/classes/
November 2023
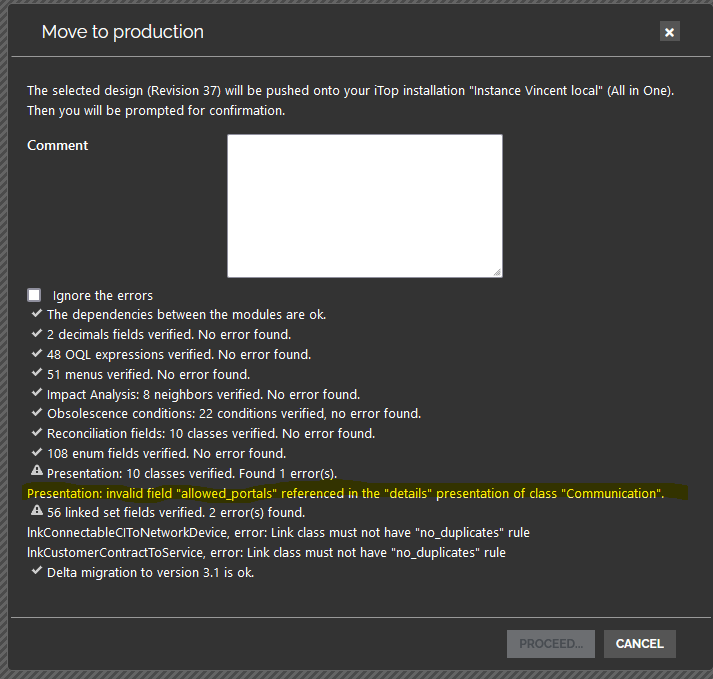
This Designer version brings support for iTop 3.1 new features, with two identified side effects
Side effects
For all
This Designer version, introduce a temporary side effect, as your first modification done after November the 14th at noon, will change massively all your delta.
Here is what will be visible after your first change while looking at the differences with a previous revision.
-
When checking any particular node, you will see that all those changes are identical.
-
It's just a _delta=“must_exist” information which is gone.
This has no effect at all.
 |
 |
 |
Read the following if you want to understand
why it has no effect:
The _delta=“must_exist” information forces the
Setup, Move To Test and Move To Production, to crash with an error
message if that node does not exist. Without this
delta, the Setup would go on without error and iTop
will probably not behave as expected. The Designer checks already
the coherence of the delta, so this protection was useless. It is
only needed when writing manually a delta XML, without being sure
of the iTop current Datamodel.
For 3.1.0 only
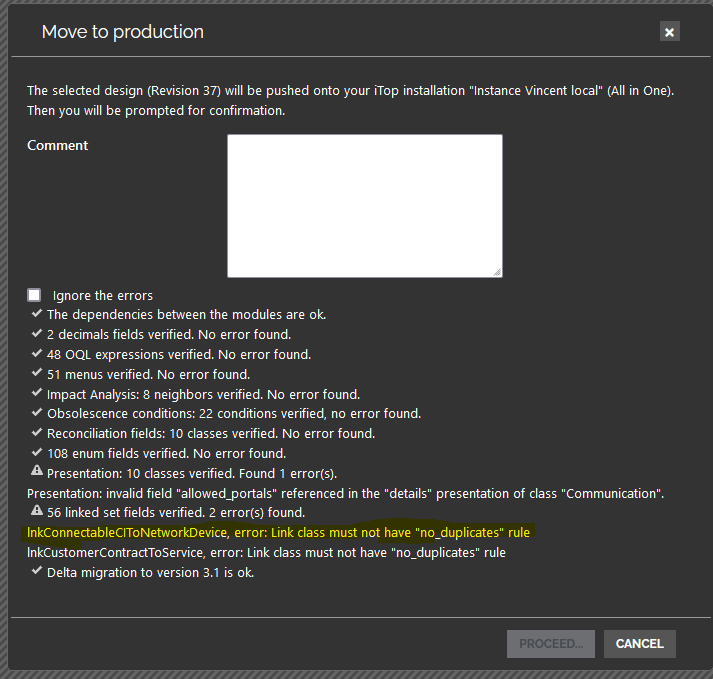 You can
-
ignore it,
-
upgrade to version 3.1.1 as soon as available (recommended)
-
get rid of it by deleting the “no_duplicates” uniqueness rule on the lnkConnectableCIToNetworkDevice class if you have sufficient rights (Power Designer User profile and Admin mode on are required) - Side effect, the day you upgrade your iTop to version 3.1.1 or above, you will get an delta error, that only Combodo can fix
3.1 features
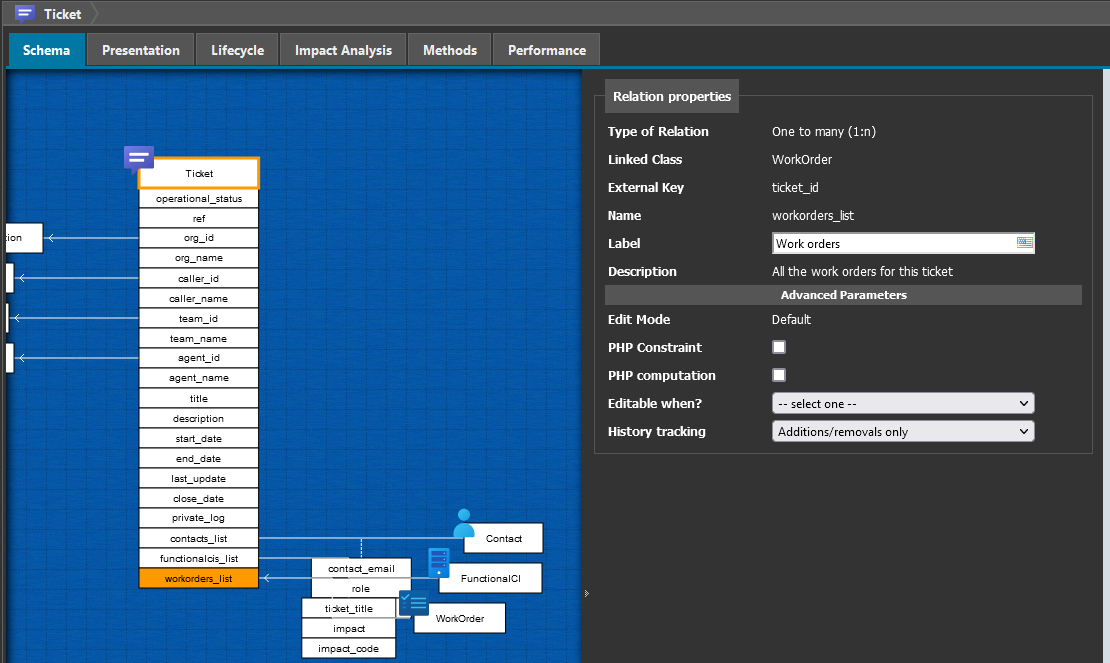
Tags to control how relationships behave in iTop:
| Many to many relation | One to many relation |
|---|---|
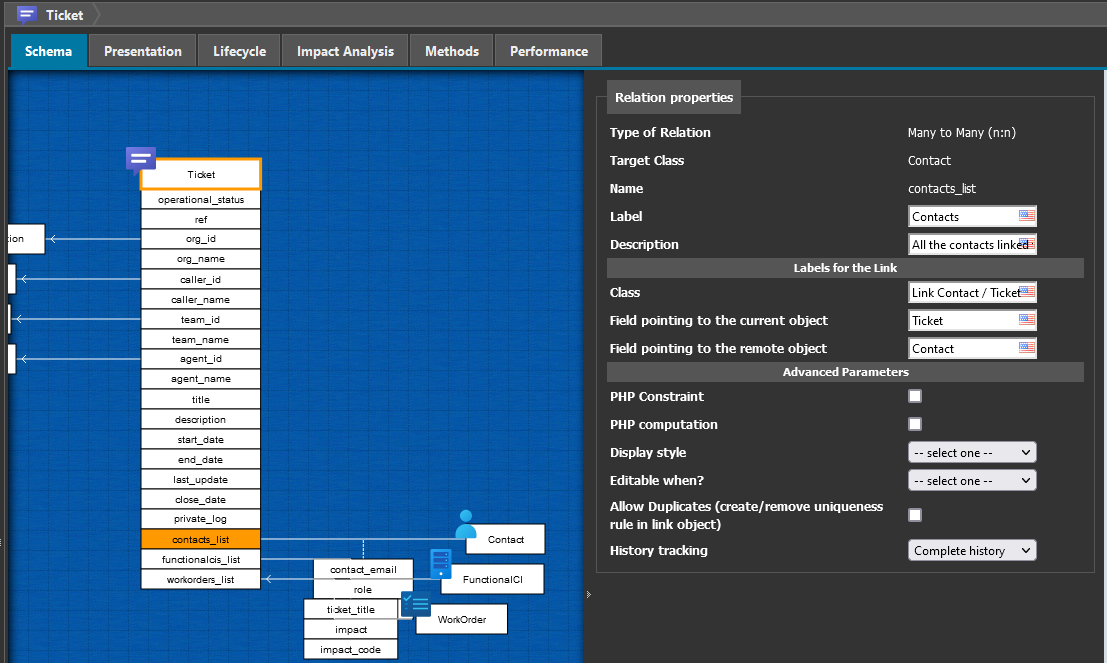 |
 |
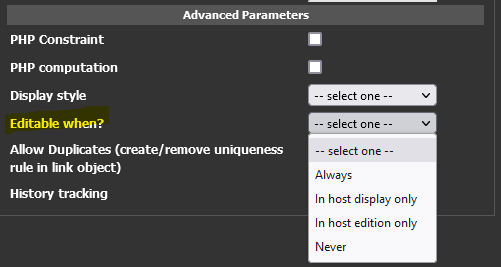
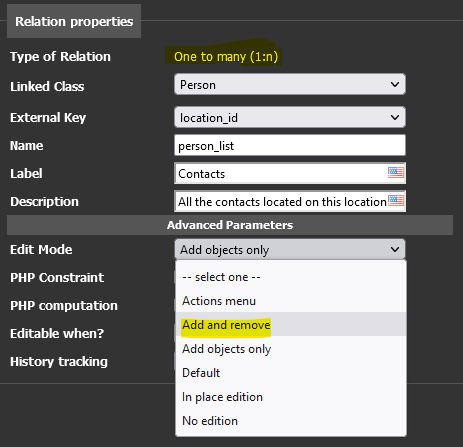
Editable when?
This flag only works from an iTop 3.1.1, otherwise:
-
with a 3.1.0 it behaves as in the third option: editable with and without host edition
-
before 3.1.0, the flag is not proposed but it behaves as in the first option: editable with host edition only
When the one-to-many or a many-to-many relation can be edited (add-remove-edit):
-
Only when you edit the host object, meaning not when the host object is displayed
-
Only when the host object is displayed, not when it is edited
-
Always from the host object, in display and in edition of the host, you can modify the relation (default and current situation for n:n relationship in iTop 3.1.0)
-
Never from the host object
Allow duplicates
Now when you create a many-to-many relationship it automatically
creates a uniqueness rule using the two external keys on the link
class, unless you Allow duplicates on any side of the
relation.
For your own existing many-to-many relationships, if you are not
sure that the uniqueness rule exist, just check then
uncheck this flag.
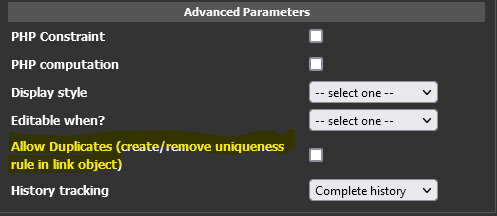
By default, duplicates are not allowed on many-to-many relationship.
lnkConnectableCIToNetworkDevice, error: Link class must not have "no_duplicates" rule
You can
-
ignore it,
-
upgrade to version 3.1.1 as soon as available (recommended)
-
get rid of it by deleting the “no_duplicates” uniqueness rule on the lnkConnectableCIToNetworkDevice class if you have sufficient rights (Power Designer User profile and Admin mode on are required) → Side effect, the day you upgrade your iTop to version 3.1.1 or above, you will get an delta error, that only Combodo can fix
Display style
On many-to-many relationship starting from iTop 3.1, it is
possible to display that relation using a multi-values field,
similar to a Tag Set or a Multi values
enumeration attribute.
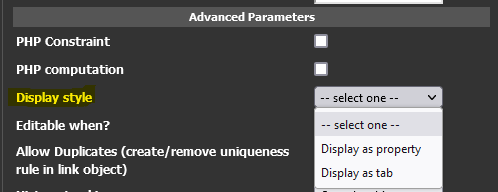
When nothing is selected, the value used is Display as tab.
Edit mode
On one to many relationship, the existing XML
add_remove choice was enabled in the Designer (It
was already possible in XML, but not proposed in Designer)
PHP constraint & computation
Also those tags are visible in the screenshots and in the XML reference, they have been removed from the Designer User Interface, since they have no effect on iTop yet.
Ranking enum values
You can now specify on any enumeration field, the way you want its values to be ordered in the user interface. The flag for driving this behavior is Sort type (for display)
-
Codes: orders the values by alphabetic increasing order of the codes. It's the default value if none is specified.
-
Labels: orders the values by alphabetic increasing order of the labels, which means it can be different depending on the user language
-
Values order: orders the values by numerical increasing order of their rank. It requires to specify a rank for each value, for values without rank they will be displayed by alphabetic increasing order of the code after the values having a rank.
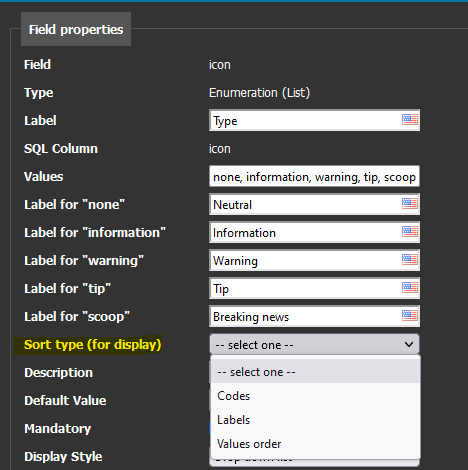
Editing the rank
Editing rank of each value, is proposed with the style.
| 1) Select a value | 2) In the pop-up window, set a rank number |
 |
Any data other than a number ends up as being 0.
Cautious when editing the colors, you cannot set a single color, it will be ignored without warning at submission. If one color is defined then the complementary must be defined as well.
More autonomy
Multiples features were added to make you more autonomous, avoiding a ticket to Combodo and the delay and coordination required…
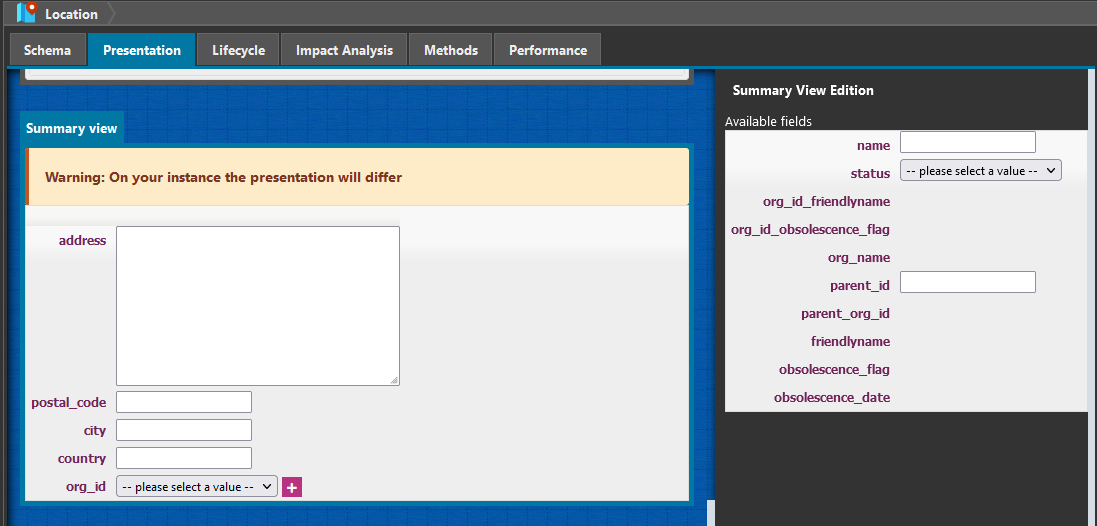
Summary view
An iTop 3.1 feature, which you can now configure in the Designer, in the class Presentation tab
Complementary name
An iTop 3.0 feature, which you can now configure in the Designer, in the class Schema tab
Open the class properties, by clicking on the class name in the
Schema tab 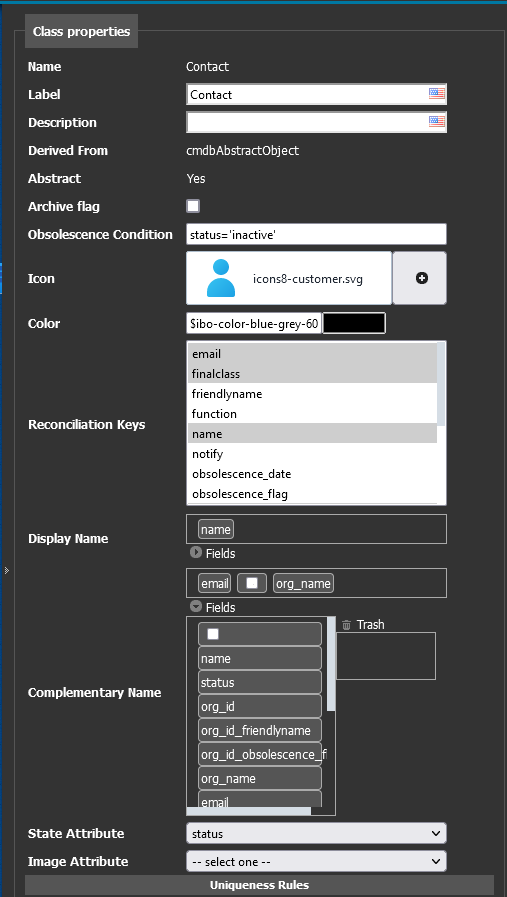
To configure the Complementary name click on the arrow before
Fields to open the fields selector, then drag and drop
the fields you want and order them the way you want. The empty
field allow to enter a fixed string of characters within the
complementary name building. This uses the same logic as building
the friendlyname.

If you want a different order or defined a different separator within the Complementary name depending on the language, note that the dictionary entry for class Person is: Class:Person/ComplementaryName.
Dependency on any attribute
An iTop 2.0 feature, which you can now configure yourself in the Designer. It's mainly useful for PHP developers.
-
For example, if you are computing automatically the zip code based on the city with a PHP ComputeValues method.
-
Other use case where a dependency is required: it's when you want to force the field to be read-only based on the value of another field, through the GetAttributeFlags PHP method.
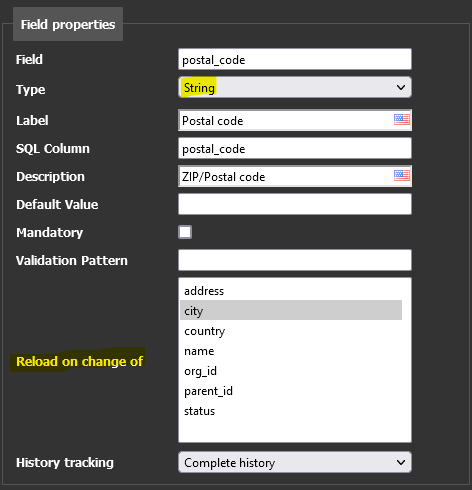
Dependencies are not proposed on relationship as it's not handled by iTop.
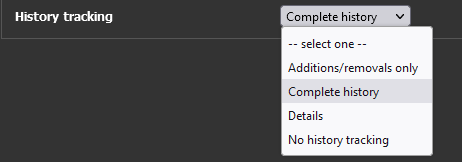
History tracking
History tracking can now be changed with the designer, for the following type of fields where it was missing:
-
on many-to-many relationship
-
on File
-
on Image
-
on CustomFields (such as
service_detailsin UserRequest used to display Customized request form)
Default if empty is Complete history
Working time
On a Stopwatch with a goal, you can select a class computing the
Working Time.
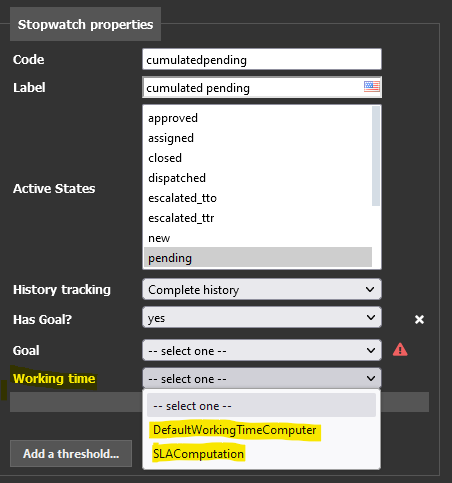
-
DefaultWorkingTimeComputer means 24 * 7 with no vacations. This class is native in iTop.
-
SLAComputation means counting time only during business hours, taking holidays into account, as documented here. This class is native in iTop products.
-
Define your own: working time can be customers dependent, service depended, support team dependent,… or any other logic you may need. In that case, if you are PHP developer or Component developer, you need to implement your own class. You can do this in a Snippet or in an iTop extension.
Working time, but has a goal then
SLAComputation is used.Less constraints
When you edit fields brought by the standard datamodel, without being Power Designer User and having toggled the Admin mode
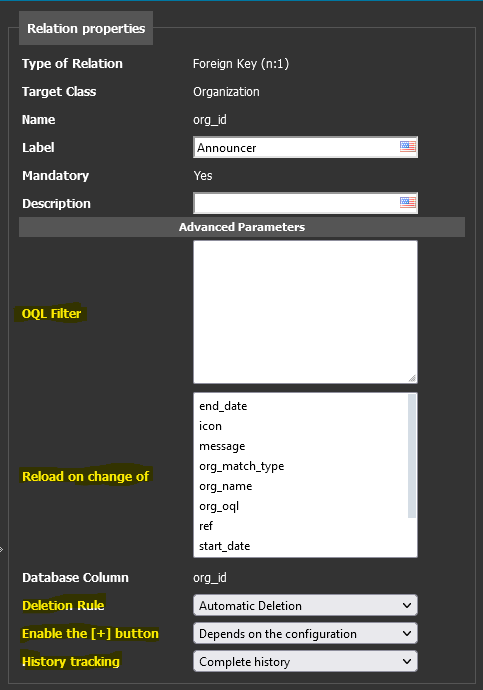
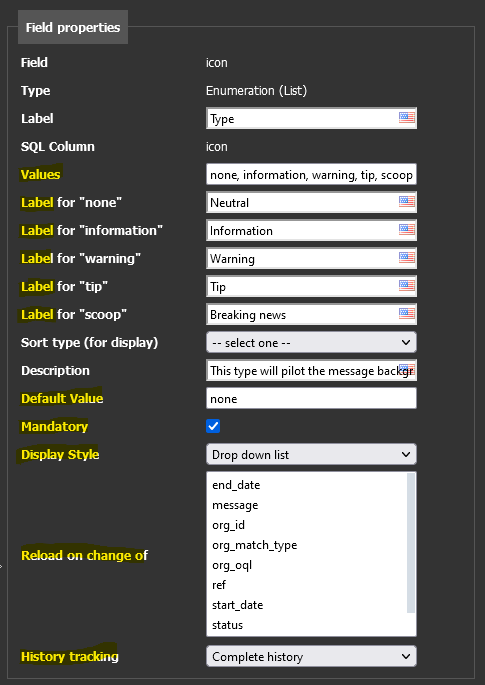
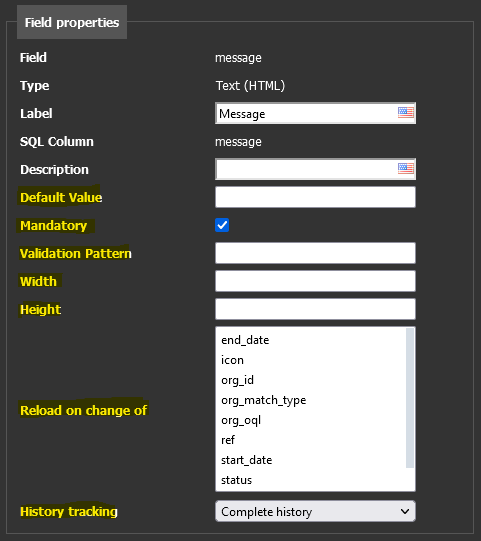
On class fields, you now can modify:
| ✅ Mandatory (except on foreign key
(n:1)) ✅ Default value ✅ Reload on change of ✅ History tracking ✅ OQL Filter on foreign key (n:1) ✅ Deletion Rule on foreign key (n:1) ✅ Enable the [+] button on foreign key (n:1) ✅ Values on enumeration (list) ✅ Display style on enumeration (list) ✅ Labels on enumeration (list) ✅ Validation pattern on Text (HTML) ✅ Width / Heigth on Text (HTML) |
 |
 |
 |
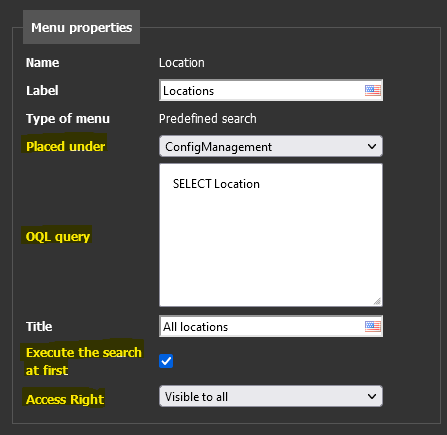
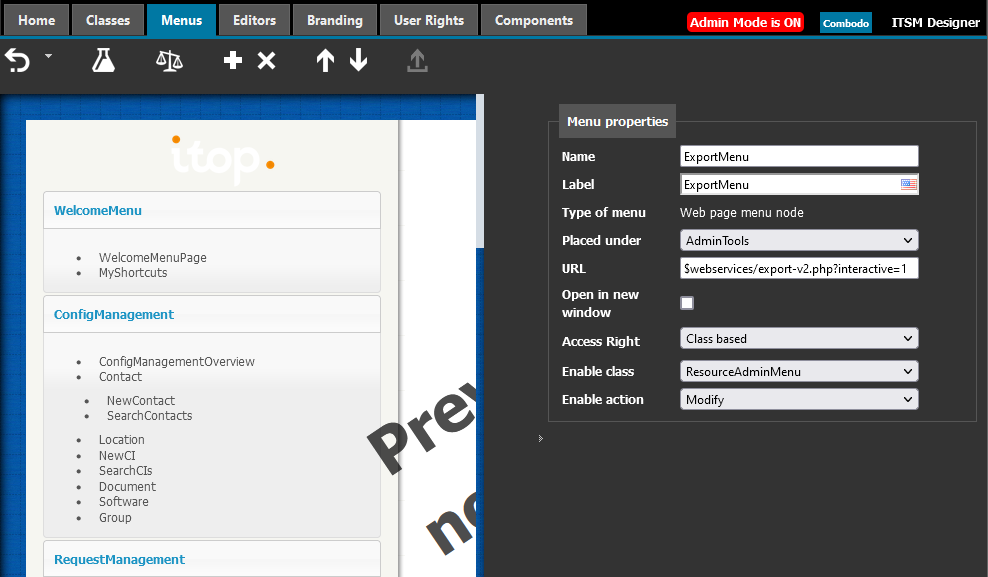
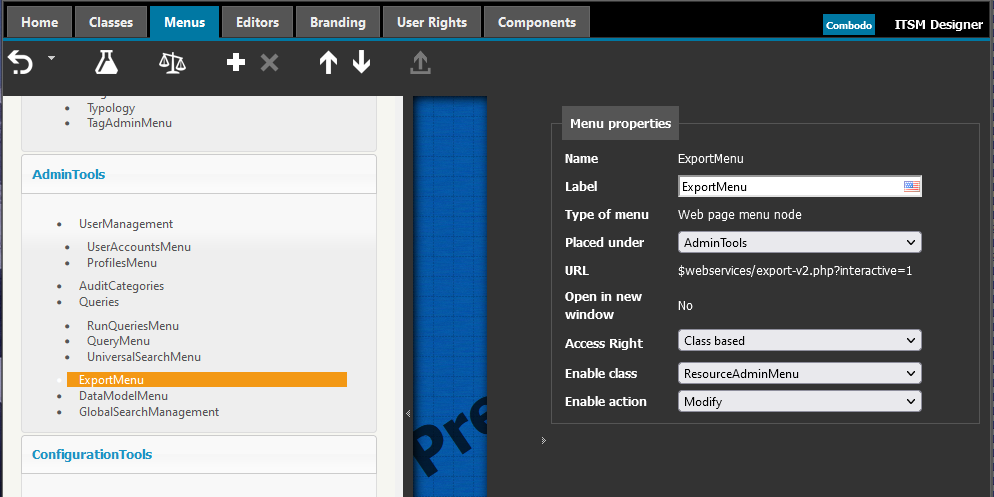
On menus, you can now modify:
| ✅ Place under ✅ Access Right ✅ OQL on OQL menu ✅ execute the search at first |
 |
Presentation errors
| Presentation / Details | MTT / MTP errors |
|---|---|
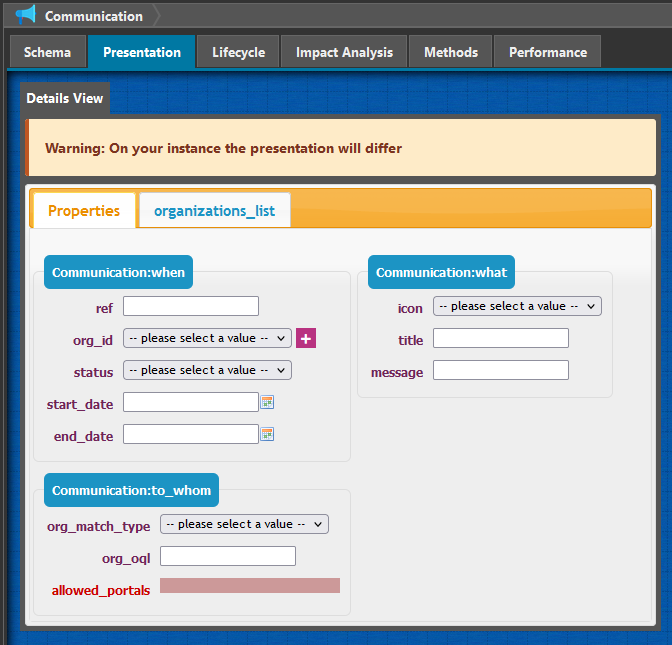 |
 |
Such errors can be removed by adding meta information, ask Combodo for help on this
Examples of past errors which are solved with new versions of iTop and extensions :
-
When customizing the RequestTemplate class, most fields of that class were reported in error
-
When customizing the LDAP user, some fields
Just ignores it, until a fix is available in the Designer
Person:user_list
Fix issue with user_list tab which was lost when
changing the Person presentation/details with an iTop 3.1.0
More user friendly
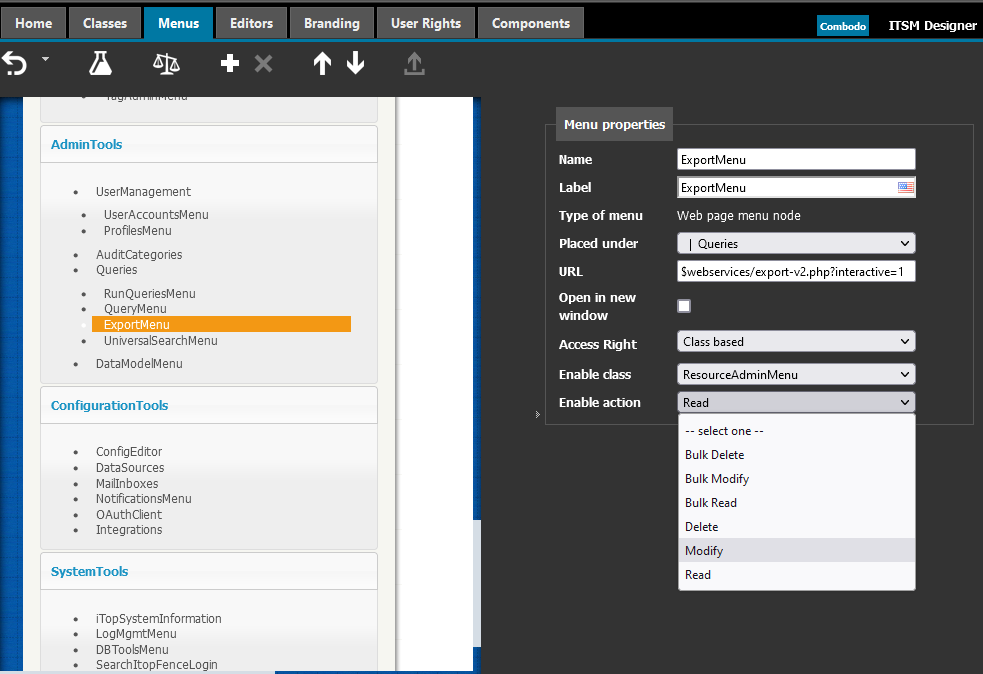
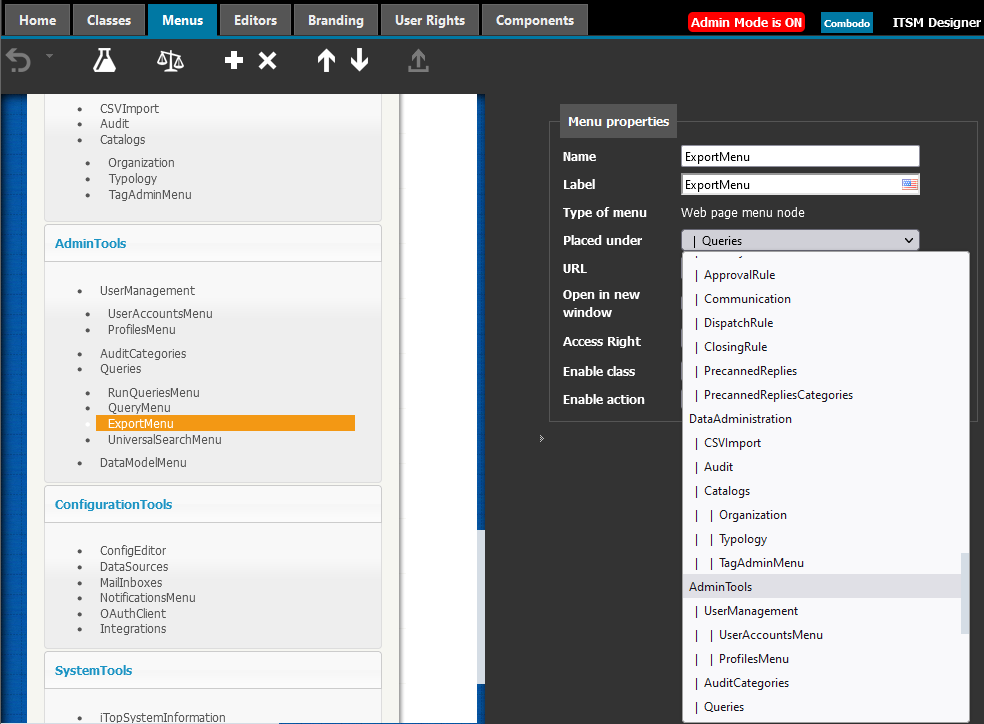
Menu edition
When adding a menu or editing an existing one, the menu
selector, after the action, had scrolled up to the top of the list,
which was quite a pain when adding/modifying multiple menus in a
row.
It's no more the case, the selector remains where it was.
| Step 1 | Step 2 | Result before | Result now |
 |
 |
 |
 |
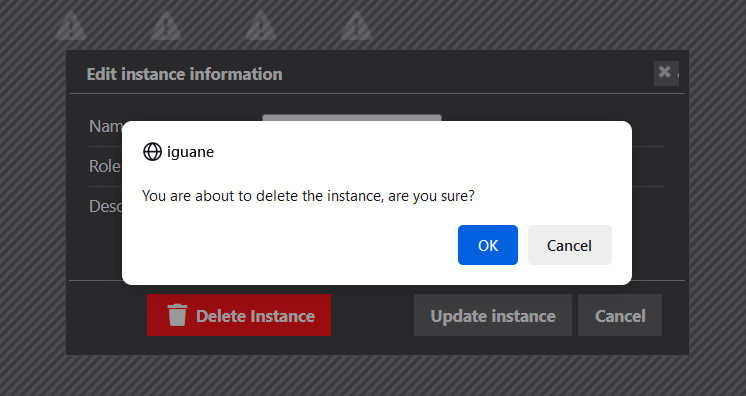
Instance deletion
A confirmation pop-up window was added to avoid unwanted instance deletion
Extension navigation
A missing scrollbar was added when previewing the existing versions of an extension, in case there are more versions than what fit the pop-up height.
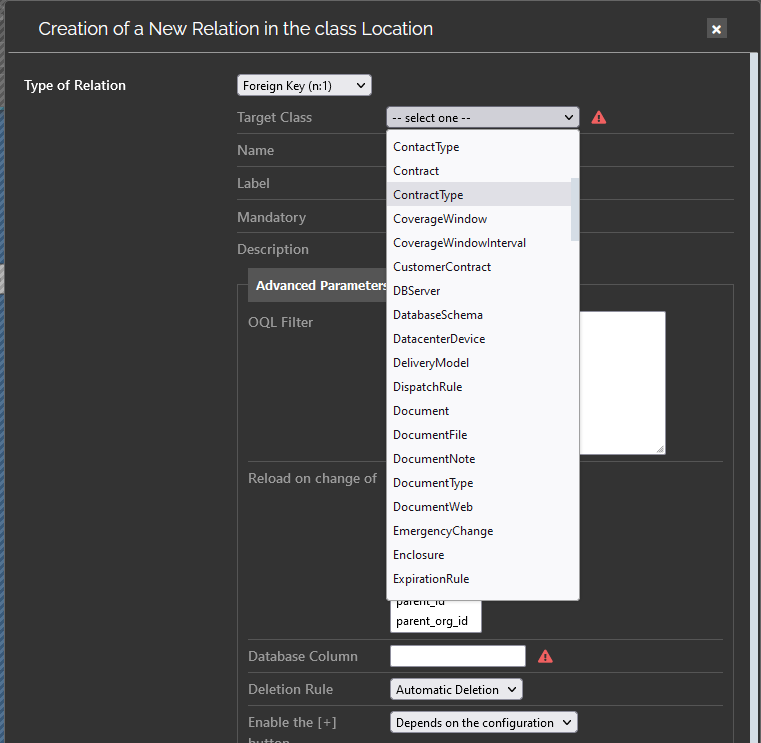
Foreign key
When creating a n:1 relationship, also called Foreign
key (AttributeExternalKey in XML), the list of
proposed classes was reduced to be limited to pertinent
classes.
The following classes are no more proposed: AbstractRessource and other Ressource classes, CMDBObject, DBObject, cmdbAbstractObject, Trigger, Action, Audit, and other technical classes
Class without module
When a class is created without module, it's not possible in the Designer to add fields or relation to that class. It sometimes seems possible but the fields are created on the wrong class. The module tag was not editable, even if empty, so there was no easy fix to this unexpected situation.
Now it is editable, but only for classes created directly in the Designer. Changing a class module, should be done with care. If it's a child class, the best solution is to put it under the same module as its direct parent class, otherwise MTT, MTP and Setup might just fail due to wrong module loading order.
October 2022
New logging page and visual identity


Case Logs ordering
Only available if your iTop is in version 3.0.0 or above
For classes which do have more than a one Case Logs, you can define in which order they should be displayed in iTop 3.x. It can be quite important when migrating to 3.x as your users will be used to see *all* logs at once, while in 3.x, by default the first one is selected.
-
Go to the class presentation, click on the
Detailsand reorder the caselogs as you wish. -
You can also hide some Case Logs except the last one, because if you do so, for backward compatibility reasons, iTop will consider that all caselogs must be displayed and order is the one used prior to 3.0.0, which is the order of the caselog fields in XML declaration.
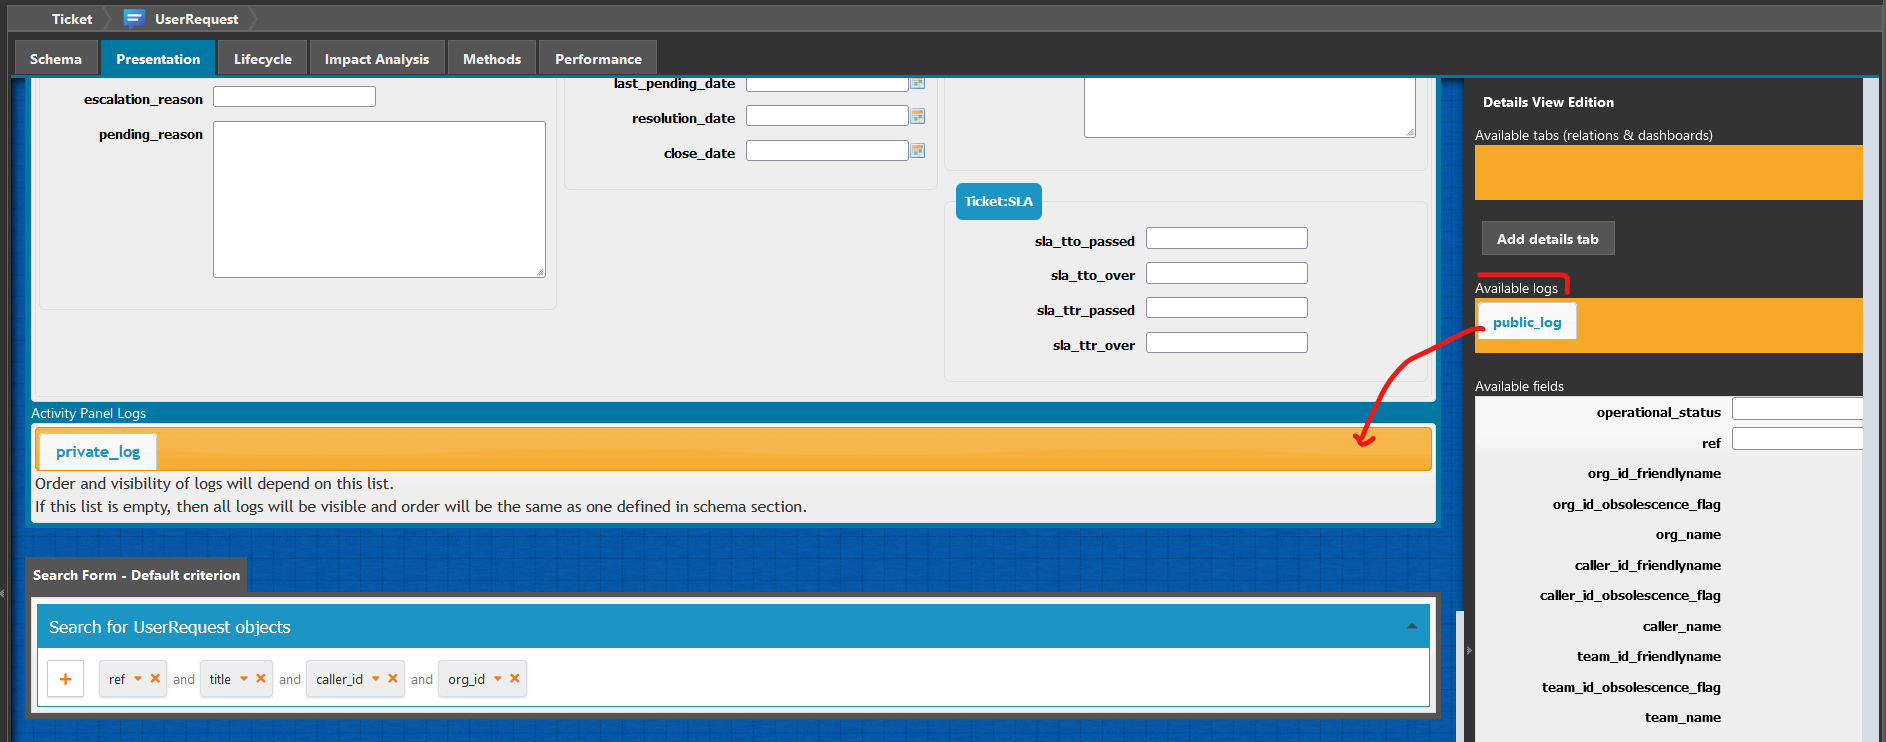
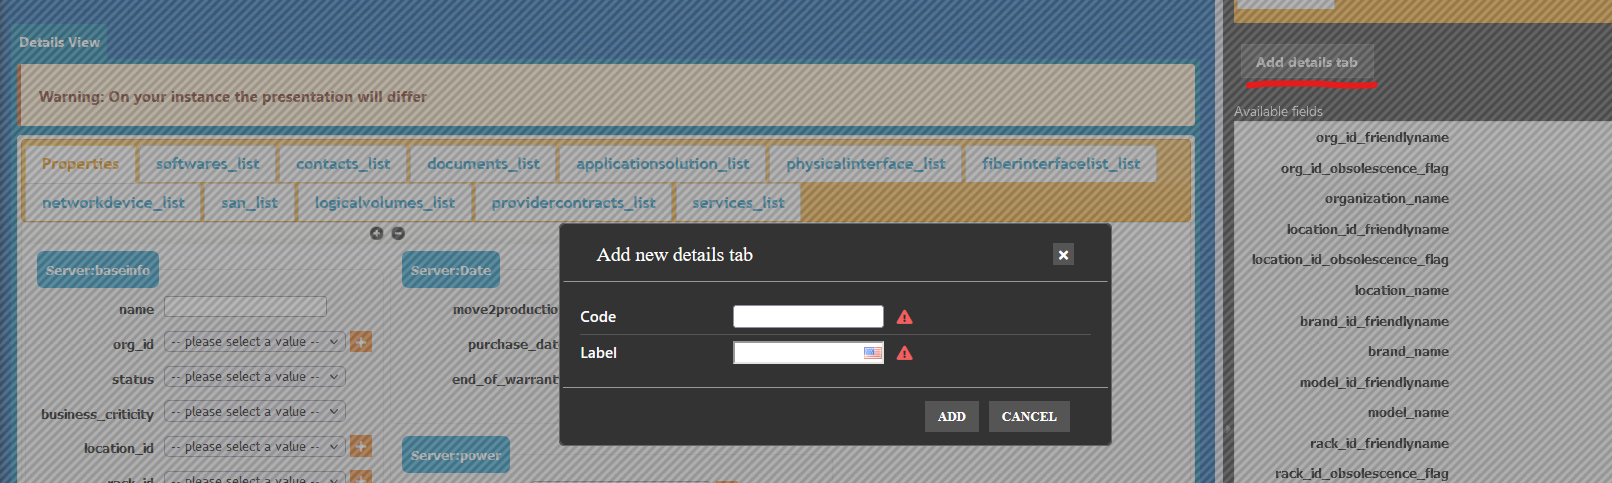
Multiple properties tab
The Designer now supports a feature included in iTop, which is to split the Properties tab of a class into multiple tabs. A field can only be added to a single tab. It is not proposed if already present in another one.
Add
In order to add a new tab, to the “Details View”, first select it, then on the right area a “Add details tab” button appear. Enter a code and a label in the pop-up, then drag and drop the fields you want to to in it. The proposed fields are limited to those not yet displayed in other tab.
Rename tab label
As for any label, you can change the label and translate it in
other language, through the Editors / Dictionary page,
by searching for the tab code. 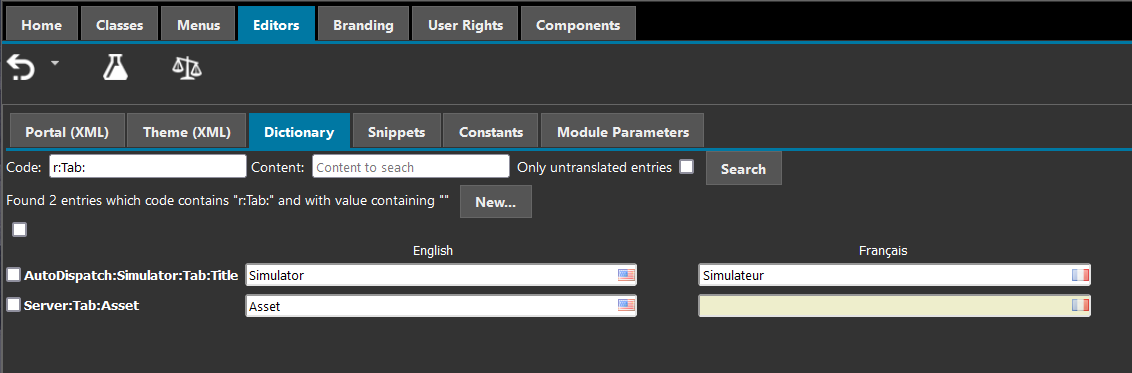
Edit tab
To move a field from the default Properties tab to
the newly created tab:
-
move that field back to right column, as if you wanted to remove it from the presentation
-
switch to the newly created tab
-
Drag and drop the field from the right column to the new tab

You can add Column and Fieldset to that new tab as on the
Properties one.
Fieldset code should build with the class code, maybe “Fieldset”
value, and a code
Delete tab
To delete such additional details tab, just drag and drop its title in the “available tabs” area. The fields it contains aren't immediately available, if you haven't removed them one by one before. But they will come back after moving somewhere else within the Designer and back to that class presentation again.
Tab order
The additional tabs, even if you seems to be able to order it the way you want, will be presented this way
-
Properties
-
Additional details Tabs in the order defined in the Designer
-
Tabs created by method
DisplayBareRelations, added before calling the parent method parent::DisplayBareRelations($oPage, $bEditMode); -
LinkedSets of the object, in order defined in the Designer
-
Tabs created by method
DisplayBareRelations, added after calling the parent method parent::DisplayBareRelations($oPage, $bEditMode);
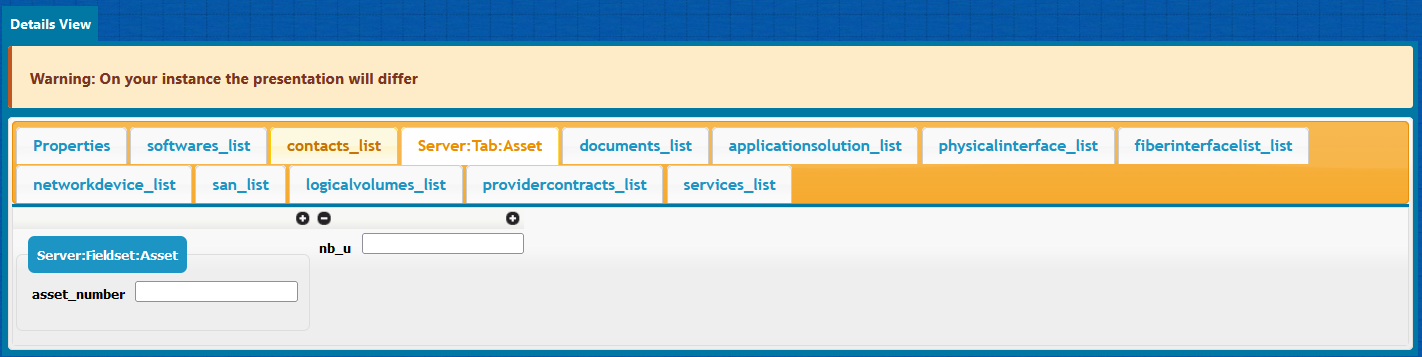
In this example, “Server:Tab:Asset” will be in reality displayed in 2nd position before “Softwares” and “Contacts” tabs
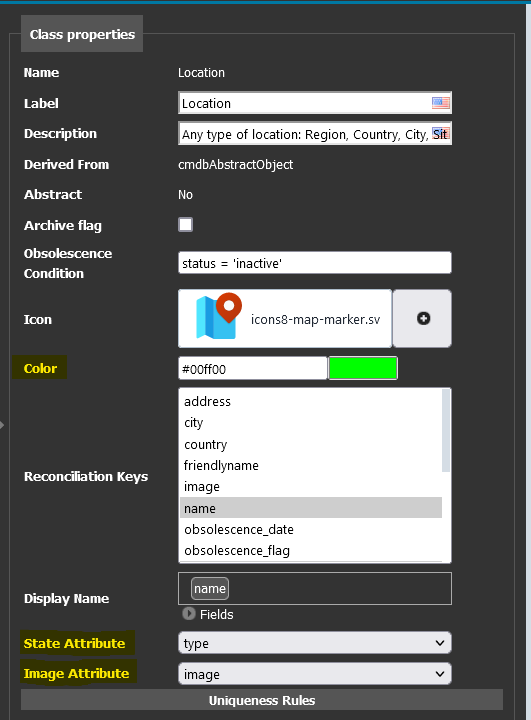
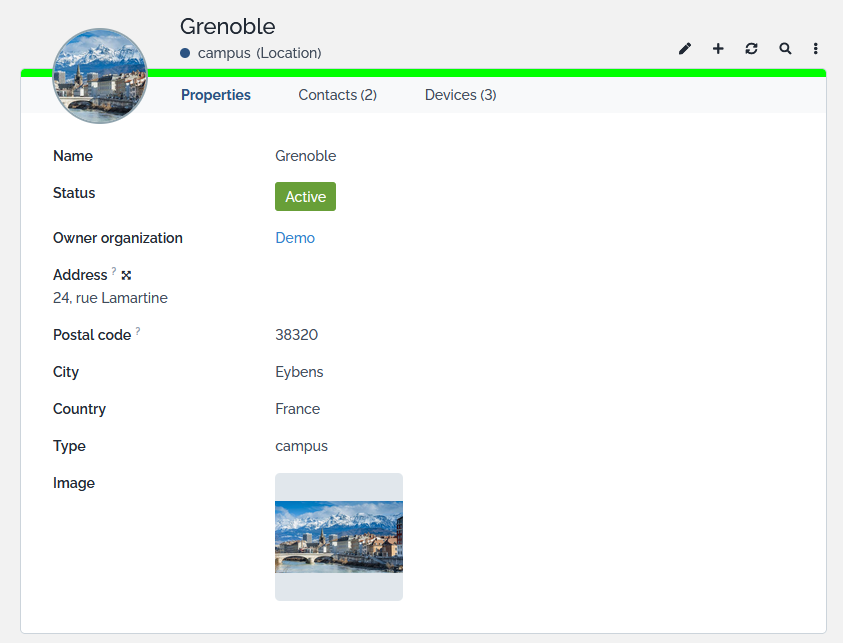
color, state and icon on class
Only available if your iTop is in version 3.0.0 or above
To define
-
a class Color for the line separator between object header and tabs/fields,
-
the State Attribute: enumeration field displayed just below the object title (for class with a lifecycle, this can't be changed, the states being automatically used)
-
the Image Attribute: this must be an Image attribute defined on the class. That image when filled, will be displayed instead of the class icon (default image is not used!)
To change it, go to the class editor, on the properties of a
class:
This is the result you will get in iTop (for this particular example, an enumartion and an Image attributes were added to the Location class)
March 2022
All the features below brought by this version of the ITSM Designer, are only available if your iTop is in version 3.0.0 or above
Edit style of enum
To configure the 3.0.0 highlighting of enum values, the ITSM Designer allow to edit style information for each enum value
Example of what it looks like for the status of a UserRequest:
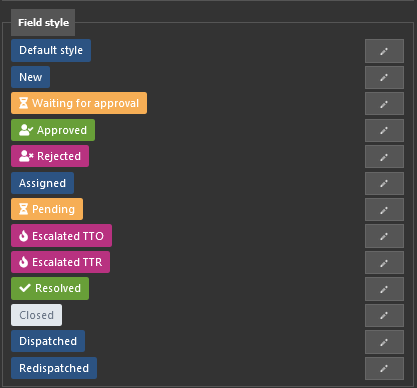
On any enum value, using the pen icon near its value, a pop-up
window allow to edit 
-
a background color (Main color)
-
the text color (Complementary color)
-
an icon (Decoration icon) amoungst fontawesome free icons in version 5, eg: far fa-address-book
Supported format for a color code
-
hexa: #FF0000
-
RGB: rgb(123, 123, 132)
-
RGBA: rgba(123, 123,123, 0.5)
-
HSL: hsl(123, 50%, 50%)
-
HSLA: hsla(123, 50%, 50%, 0.23)
-
SCSS variables: $ibo-color-transparent, $ibo-body-text-color,…
Colors are mandatory, but if you only wants to set an decoration icon, you can use
-
Main color = $ibo-color-transparent
-
Complementary color = $ibo-body-text-color
For selecting a color, you can use the color selector, by
clicking on the square color area or entering directly a color code
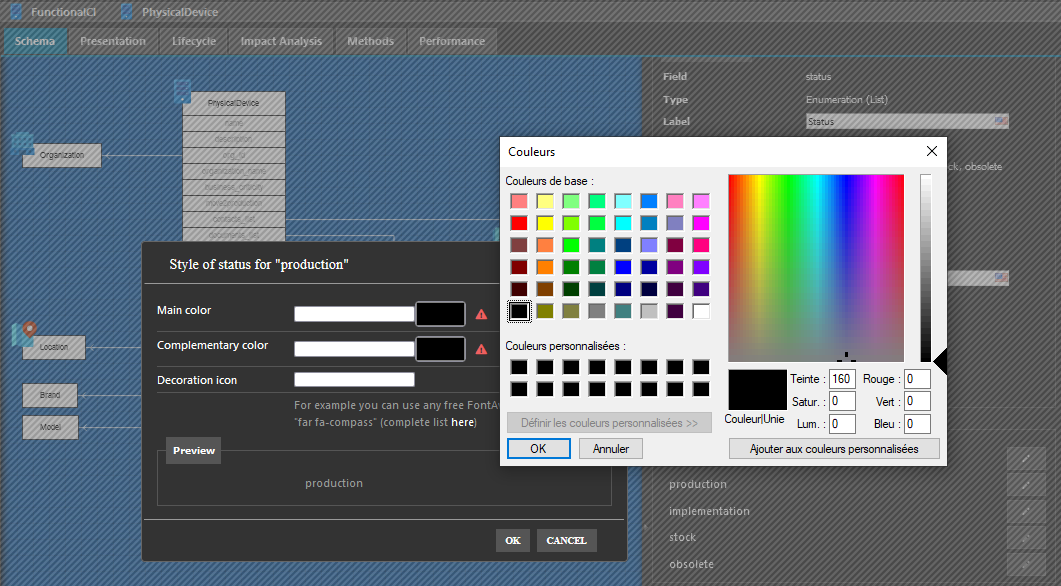
To use an existing iTop color code, check the existing values within a 3.0+ iTop with the browser development tool. Then transform it following one of those 2 possible syntax:
-
$ibo-lifecycle-success-state-primary-color
-
var(--ibo-lifecycle-success-state-primary-color)
The advantage of using those existing colors, is that a theme
creation or modification would apply to your setting/new classes,
so you keep consistency within your iTop. 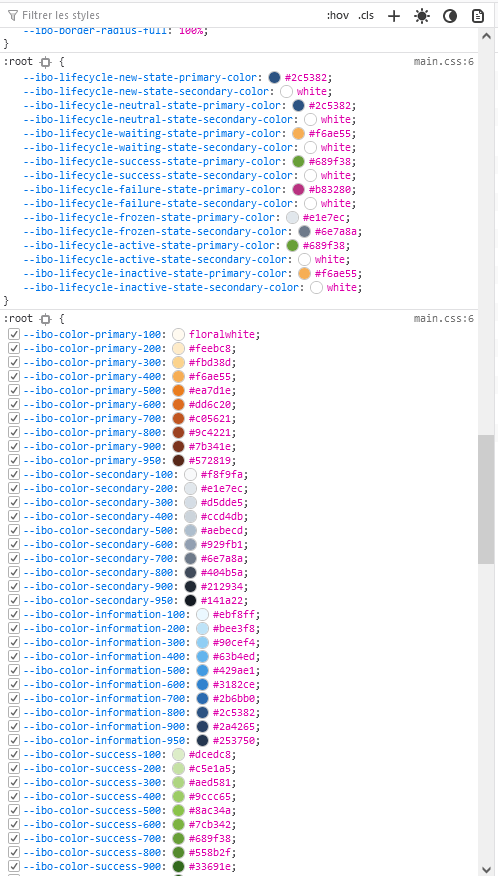
Use one or the other but apply the same logic for both colors, otherwise if the user change for a dark theme, the text might not be readable anymore
Add an icon to a menu
Only available if your iTop is in version 3.0.0 or above
When editing a new root menu, you can specify a fontawesome icon to make it nicer especially when the main menu is shrinked.
![]()
Define "status" field on a class
Any enum field of the class can be used as the
“status” displayed under the friendly-name within the Details of an
object in 3.0 iTop console. For classes with lifecycle, it sounds
more logical to keep the lifecycle handling field, but for other
classes you may want another field to be used. For now this need to
be requested to Combodo.
Set a color on a class
When editing class properties, you can specify a particular color for a class, which will be used as top bar color when
-
displaying an object of that class
-
displaying a list of objects of that class
-
displaying a dashlet (List, GroupBy, Pie, Chart) returning just objects of that class
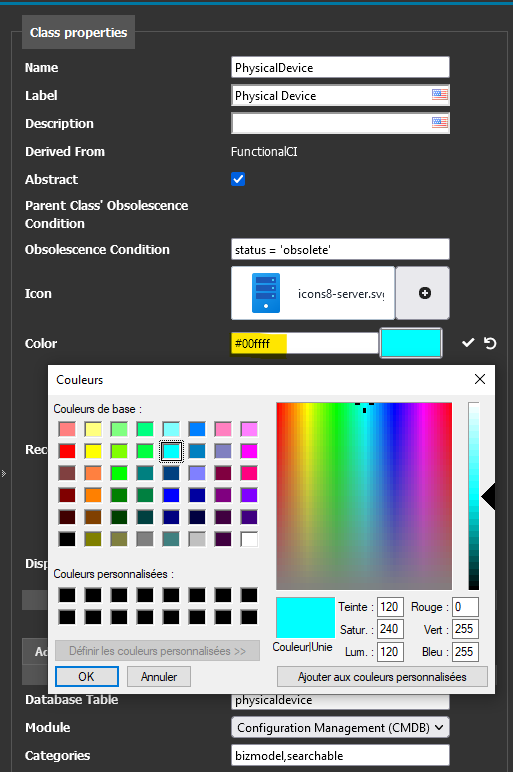
You can also enter manually the same type of color codes as for the enum values.
Branding logo compact
The 3.0 uses a new square compact logo when displaying only the icons of the menu. Change it with your own company square logo.
![]()
Enum values handling
From iTop 3.0.0, when you change the allowed values of an enum on the ITSM Designer and push it to your iTop instance, if there are some objects in your iTop instance which do not respect the datamodel allowed values for that enum, the Move To Production will no more fail.
-
The result is that the database allowed values for the enum, will be the union of the datamodel values and the values in use when the last Setup / MTP was performed. So as long as a value is in use, even if not in the datamodel defined values, it will be kept in database.
-
In the iTop User Interface,
-
when viewing an object using a no more valid value for an enum, that value label will be correctly displayed.
-
when editing that object, the invalid value is removed and only datamodel allowed values are proposed,
-
so if the field is mandatory, the user will have to select a value.
-
if it's not mandatory, it will be emptied, and the user will probably not notice it.
-
-
when updating by CSV or REST, other fields of that object, this will be transparent and the invalid value will be kept.
-
-
The
Database integritytool will reports those objects having an invalid value on one of their enum
low,medium,high into
1-high,2-medium,3-low to get a nice automatic order in
list and dashlets-
Define the same labels for both set of values
-
Move to Production
-
CSV export your objects fields:
id (primary
key)
and the enum label -
No mapping required if you defined the exact same labels, otherwise transform the old values into new values
-
CSV import the
id (primary key)and the enum label -
Run the
Database integritymenu to ensure you have completed the data migration
June 2020
Download package
Available versions
The display of the published versions by branch is much more readable, so you can quickly see if a more recent version on your branch was published (fixing regressions, blocking issues and security holes)
Grayed versions are older than your current version, which is bold. Branches except the current one, are closed by default showing just the latest version of the branch.
Then the way to download the package was changed to be much more
visible 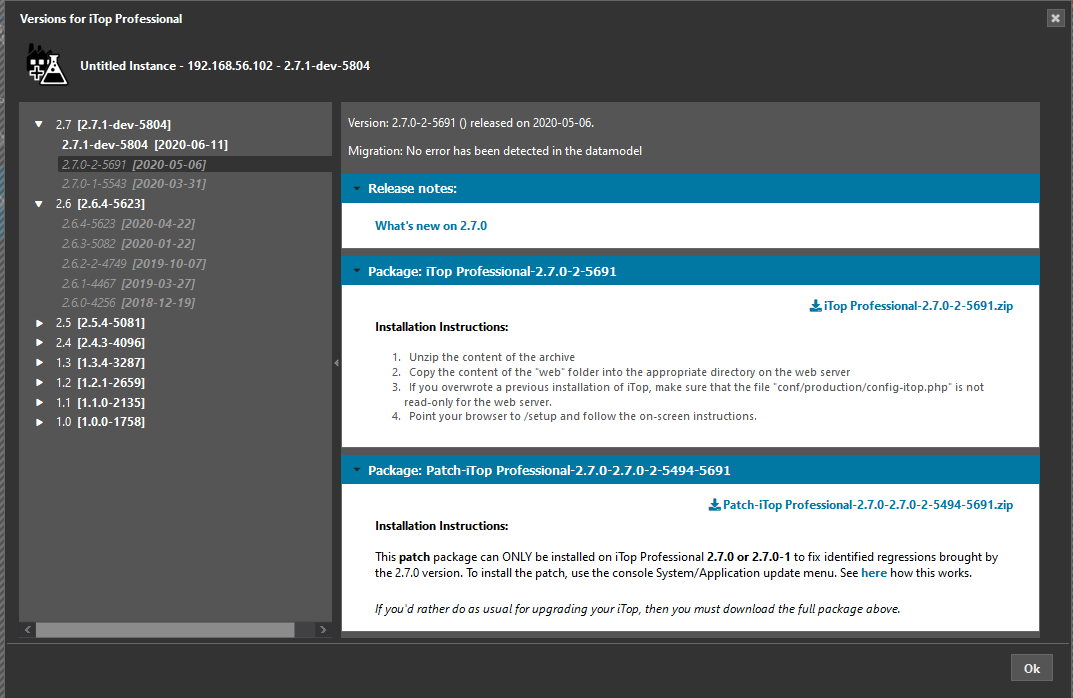
Dictionnary Editor
Search for untranslated
You can now search for entries which would not be translated:

Delete entries
If you want to delete/remove dictionnary entries, retrieve and select them, then press the button.

May 2020
Multi-value attribute
iTop 2.7 brought a new type of attribute: Multi-value
enumeration (List), which looks like an Enumeration
(List) from a definition perspective, but the users will be
able to select multiple values and not just one.

In iTop this new field will look this way:

-
values can be translated
-
values are common to all iTop instances,
-
values can be tested in PHP methods and used to trigger behavior
Icons resizing
When loading icons image associated with a class, we have changed the way the ITSM Designer handle those icons:
-
If its size is between 32 and 60, it is left unchanged
-
If one dimension is smaller than 32, then it is expanded to 32 (keeping proportions)
-
If one dimension is bigger than 60, then it is shrunk to 60 (keeping proportions)
Component loading
Users with Component Developer profile can
no more upload Combodo extensions found on iTop Hub.
Component Developer is targetted for organizations developing and
supporting their own extensions.
Get in contact with sales@combodo.com if you are interrested by
Combodo extensions not included in your iTop Professional.
March 2020
Ready for supporting 2.7 new features
Themes editor
In conjunction with the new capability to customize iTop console colors, we have added the capability to do this in the Designer
The various themes includes in iTop are proposed for
customization: 
The customization tools works exactly as the Portals editor

Note: each of your iTop instances can use a different theme
Web page menu
Specify on a web page menu node, if the url must
open in a new window or not (default not).

Reminder: to specify an external url (not within your iTop), you must start its URL with $$
Downloading Patch
Starting with the 2.7.0 iTop version, Combodo may propose to
download patch package, which must be deploy on
your iTop using the System / Application
Upgrade menu.
Here is how it looks like:

June 2019
-
Many new capabilities to be more autonomous.
-
More accurate and usable tool to analyse changes made to your datamodel
-
Improve troubleshooting of ITSM Designer issues
Moving menu
You can now move a menu under a different parent or group.
New Branding
It's now very easy to define 3 different icons: one for the console, one for the Portal and one for the Login screen

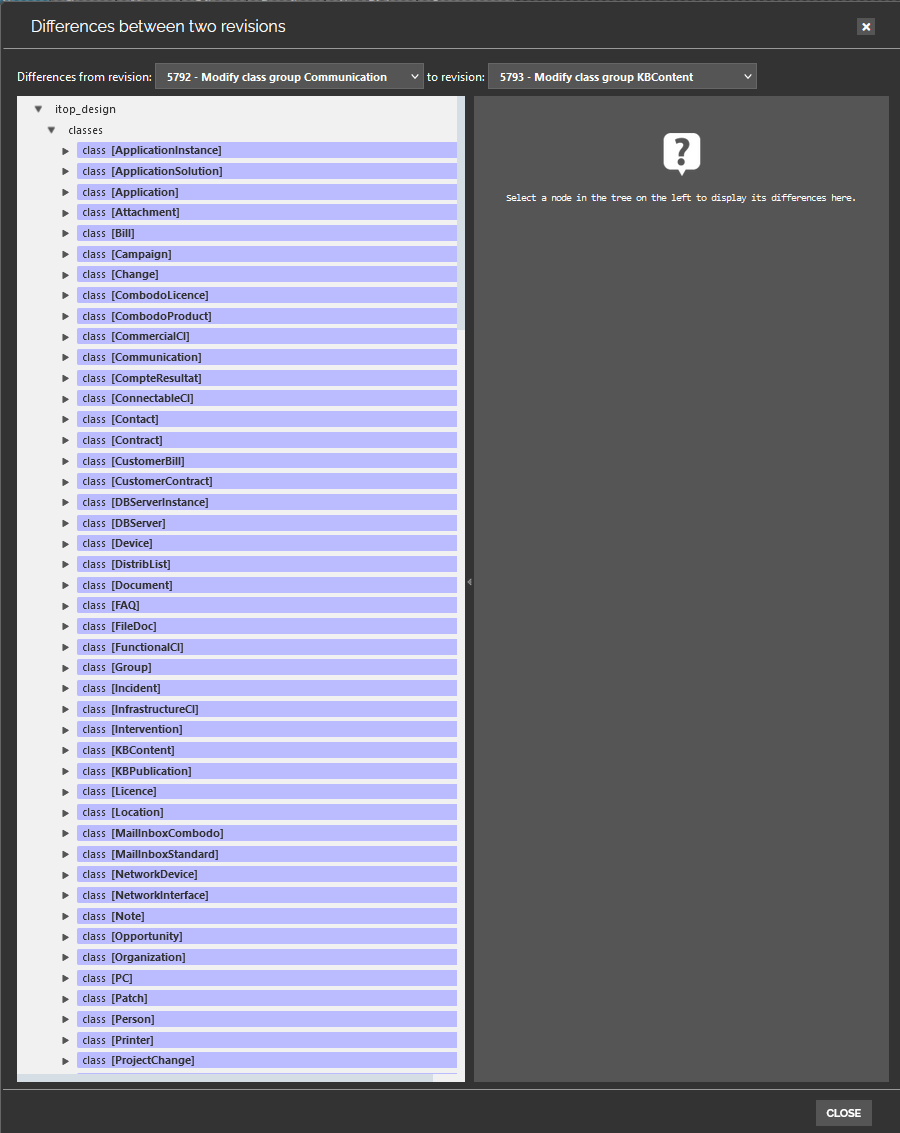
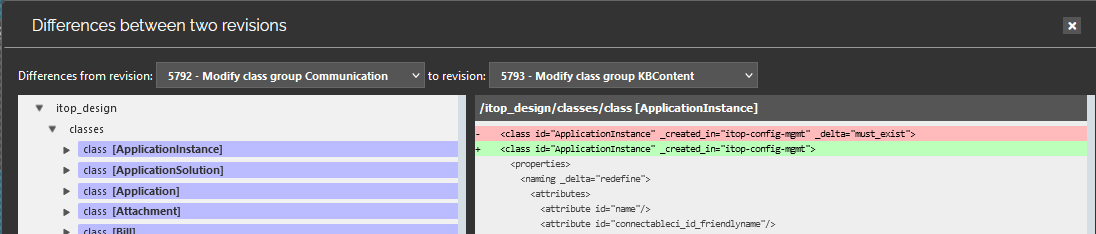
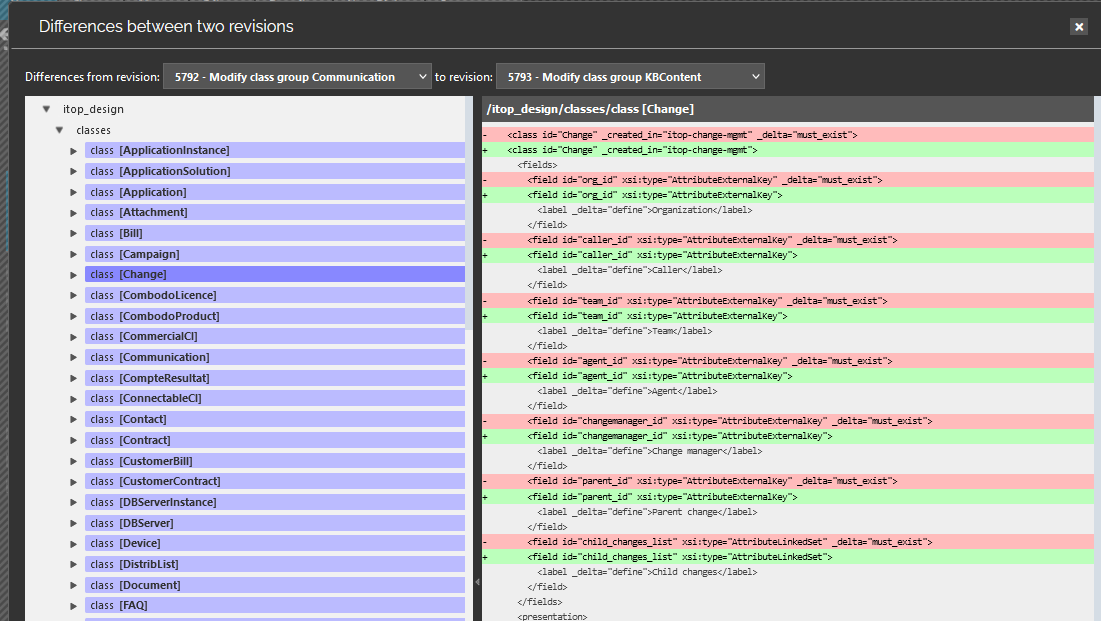
Differences display
The tool to analyses difference between revisions was completely redesigned to offer accurate information.

XML tags now supported
Tracking History
The Tracking History is now available on all field
types which supports it, including stopwatches and relationships.
If you leave it to – Select one – nothing will be
changed from what you are used to. You can force a particular field
not to be tracked in the history, because for example it is
changing daily and it is polluting the History tab
with useless information.

Allow duplicates
This tag available on n:n relationship only, tells iTop to propose to add any remote objects, including those already in relation with the current object. By default, it's not selected.

Complete existing (n:n)
Sometimes n:n relations are incomplete, when a
xxxx_list field might be missing at one end. That
situation is quite seldom, unless one end of the n:n relation was
forgotten in the Datamodel or the extension bringing that relation.
But it can also happen on classes which link more than 2
objects.
One example in the default Datamodel is the class
lnkCustomerContractToService which links 4 classes:
CustomerContract, Service, SLA and CoverageWindow

Editing relation classes
Designer
Power User
It's now possible to edit n:n relations classes, which means:
-
add relations to those classes
-
edit the presentation (main usage: order of the attributes in a list)
-
edit the PHP methods on that class for those with PHP developers profile.
Lifecycle cannot be defined on a relation class
Relations classes are displayed at the end of the
A-Z and Modified list of classes. They
are not displayed within Modules:
Adding a lifecycle to a class
Designer
Power User
It is now possible to add a lifecycle to a class which does not have one yet
Step 1: Select the class, check the Lifecycle tab
and press Add State icon:

Step 2: Select the Enumeration field which will be
used to store the lifecycle state.

Step 3: Once your press Initialize the existing
values of the enumeration field will be created as
States. If your enum had a default value, it will be
used as the Initial state, otherwise, the first value
will be used. In all case that can be changed easily.

Step 2.1: You have no enumeration field on your
class, then create one first.

Recording issues
In order to greatly improve our efficiency to understand and reproduce issues you may encounter within the ITSM Designer, the Combodo support team may propose you to register the sequences of entries you are making while working on the ITSM Designer.
-
You can activate it just for a short period of time, as you encounter an issue and wish to record it for us, then stop just after.
-
This registration is made on an external tool located in the US, and data are kept for one month.
-
The registered data are limited to your clicks and the characters your typed, so we can replay the sequences of events and reproduce the issue.
-
It is limited to the main screen of the ITSM Designer, it does not include the login and change password screens.
New editors (PHP developers)
New Editors are available for PHP developers (in read-only mode for others) to edit:
-
Snippets
-
Constants
-
Module parameters
Component management
Component management was enrich to allow Component Developer to:
-
Obsolete out-dated version of a component,
-
Visualize usage of each component version,
Ordering of components was changed to list first those which are enabled, then the others.
December 2018
New editing capabilities for an iTop version 2.6.0 or above:
Uniqueness rules
You can create uniqueness rules on any class. Uniqueness rules are part of the class properties. These rules are used to define a combination of attributes which combined values must be unique in iTop.
An uniqueness rule is made of:
-
a list of fields defining the unique key,
-
a condition (a simple OQL expression) allowing to exclude some objects from this unicity constraint,
-
whether or no not the rule is blocking (i.e. prevents recording the object) or is just an indication to the end-user (non-blocking).
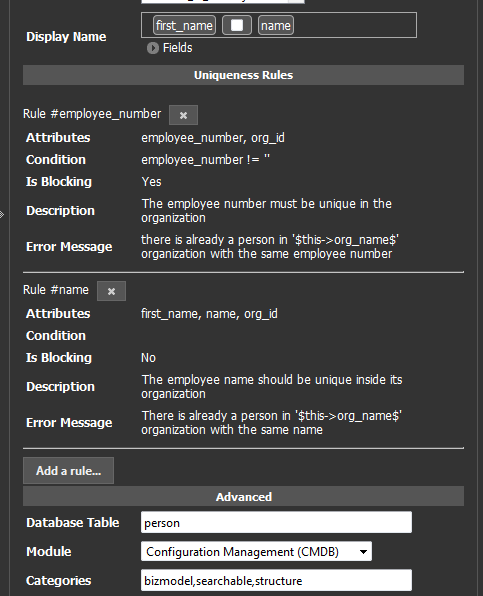
-
It is currently not possible in the ITSM Designer to modify a Uniqueness rule, if you made a mistake on
Attributes,ConditionsorIs blocking, you have to delete your rule and create it again. -
Use the
Conditionfield with care, as it is currently only working to exclude empty value. Filtering on non-obsolete objects for example won't work, as obsolete object themselves will trigger the rule and generate false positive error. -
ErrorandDescriptionare dictionnary entries.Erroris build this way: Class:<class-name>/UniquenessRule:<rule id> , whiledescriptionis identical but with a + at the end. The description is currently not used by iTop.
Description or the Error message go to
the Editors tab, then Dictionnary and
search for code containing UniquenessRuleBe cautious while creating new blocking uniqueness rules with
existing data.
-
If a user tries to modify an object which is not respecting a blocking uniqueness rules, she/he won't be able to modify this object until the rule is respected.
-
The rules are checked at Move To Production and will tell you if some of your data is not compliant with the uniqueness rules.
-
The
DB toolsunder MenuAdmin toolsalso performs that check.
Attribute Dashboard
A Dashboard Attribute is a dashboard displayed as an extra tab on a object. The queries used in such a dashboard can use the context of the current object.
Dashboard attributes can be added and all their parameters can be set and modified within the ITSM Designer.
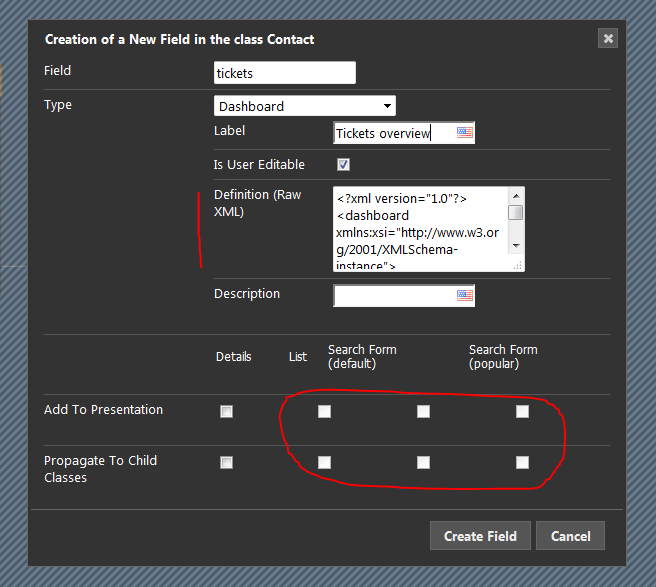
-
You can allow normal users to create a customized version of such a dashboard by checking the field
Is User
Editable
. -
Even if it is not user editable,
Administratorsare always allowed to customize a dashboard. This allows for designing dashboards at run time (using real data) before injecting their definition in the Designer.
Definition (Raw
XML)
of the Attribute dashboard:
-
just leave the default XML at creation,
-
do a
Move to TestorMove To Production, -
once in iTop, edit and modify that dashboard as you want,
-
use the action
Export to a file -
open that file with any text editor and copy its content
-
return into the ITSM Designer
-
paste the dashboard XML in the Attribute Dashboard
Definition (Raw XML)
Calendar Dashlet
You have 2 possibilities to add a Calendar Dashlet to a Welcome or Overview Menu for users :
-
Design the whole dashboard in iTop and Import it in the designer
-
Initiate the Calendar Dashlet in the Designer, designe it in iTop and import the content from iTop to the Designer
-
in iTop, edit and modify a Dashboard with adding a Calendar Dashlet,
-
use the action
Export to a file -
import the XML file in the Designer with the import icone on the Menus tab.


-
Add a Calendar Dashlet in the regarding Menu in the Designer.

-
in iTop, edit and modify a Dashboard with adding a Calendar Dashlet,
-
use the action
Export to a file -
open that file with any text editor and copy its content after <dashlet id=“11” xsi:type=“CalendarDashlet”> and before </dashlet>
-
return into the ITSM Designer
-
paste the dashboard XML in the Calendar Dashlet
Configuration (shown as raw XML)

Attribute TagSet
TagSet attributes can be added to any class as any other type of field. All their parameters can be managed within the ITSM Designer.
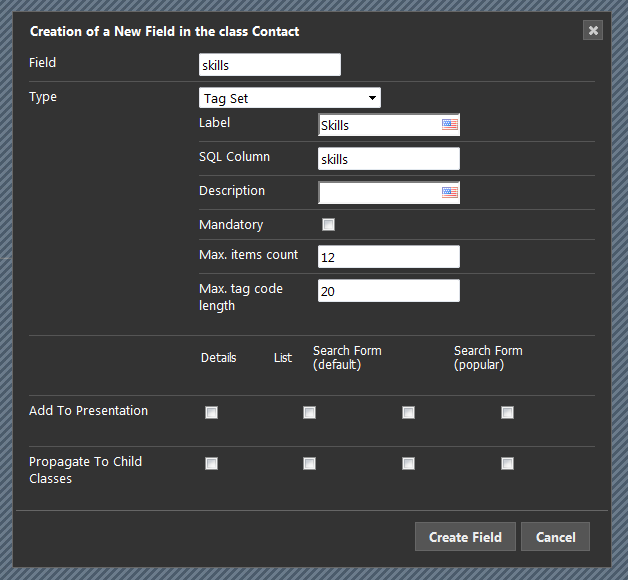
-
Max. items count: for performances reason, it is better to specify how many different Tags can be set on one particular object. If not specified 255 is used. This is not the maximum different Tag values that you can define, there is no limit on that. -
Max. tag code length: for performances reason, it is better to specify a maximum size of a tag code value. If not specified 255 is used. There is no limit on the length of the displayedlabel, the limit is just on the length ofcode
Tag code is used only in OQL queries and in the
database. The label is used in the iTop user interface so most
users will never see the codes. code cannot contain
any other characters than letters and numbers. There are no allowed
separator (no blank, dashet, dot, underline and whatsoever), so it
is kind of a single word.
Data
Administration entry Tags configuration. If the
mennu is not available in your specific configuration, use the
Universal Search on class Tag Set Field
Data.November 2018
Manage your License
If your License expires within 30 days: then a yellow triangle icon will warn you with the remaining number of days before expiration in a tooltip.
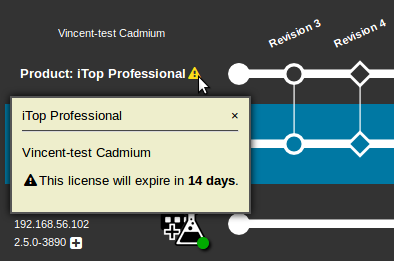
Your License has expired:
-
Recently: you may still have access to your license in read-only mode, with a red message and most buttons greyed out.
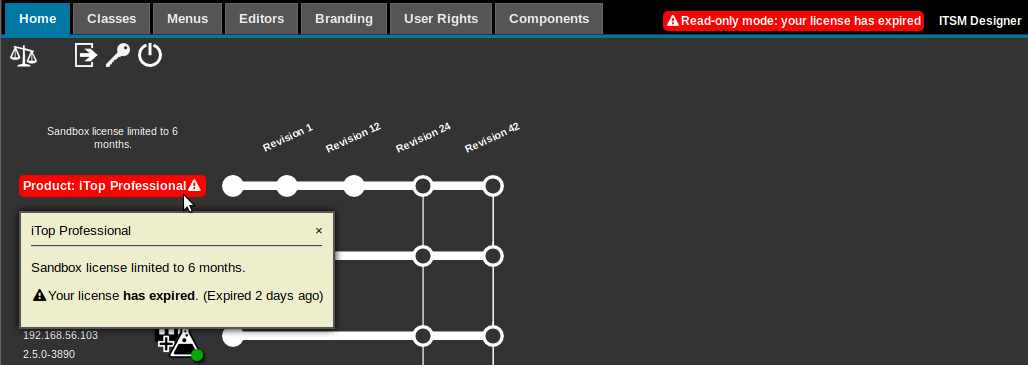
-
Some time ago: your connection to the ITSM Designer will be totally rejected with a warning message.

If you have multiple licenses, then a Combodo-entered description should help you differentiating them.
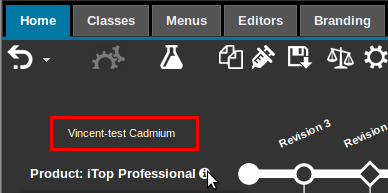
Manage your Instances
You have a lot of instances connected to your ITSM Designer License and it's getting confusing?
-
Give them a name and a description
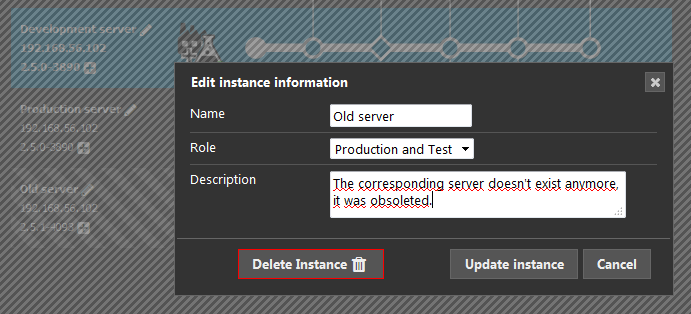
-
You can delete an instance. There is no risk to this deletion as if it still exist, just connecting to the ITSM Designer from that instance will recreate it completely, except the history of Move To Production made on this instance.
-
Notice the colored bullet which tells since when an instance last connected to the ITSM Designer
-
Grey: we don't know, so for sure older than November 2018
-
Yellow: last connection occurred more than 6 months ago
-
Blue: between 6 month and one month
-
Green: less than a month ago
-
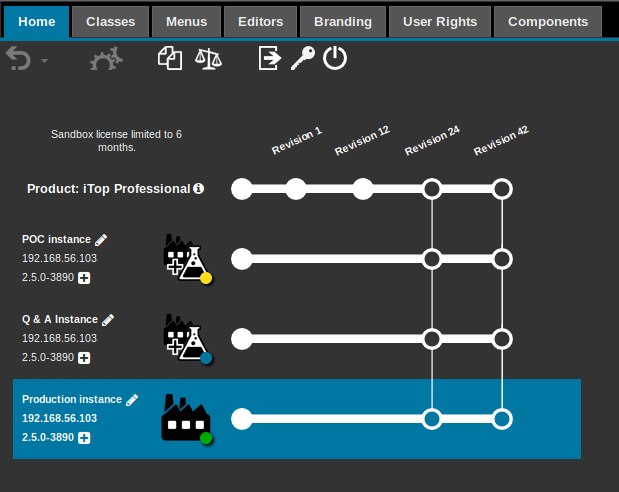
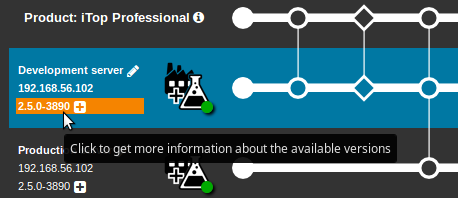
You want to download the latest versions of your iTop Product, we made the link to do it more visible, with the + icon
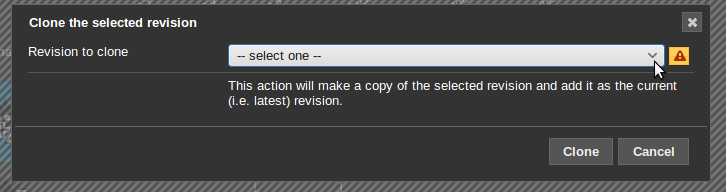
Clone a revision
You have made changes to your datamodel but you are not happy with the result and want to go back to a previous stable version of your Datamodel. If you have made a Move To Production after those undesired changes, then you cannot undo your changes, but you can clone the stable revision and make it the current one.
-
Click on the clone icone
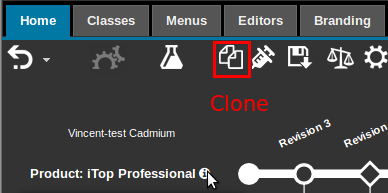
-
In the pop-up window, select the revision which you want to make the current one
-
Clone: It will create a new revision, with the content of the selected one.
-
the changes will be those made on the datamodel at that time,
-
the activated components will be those defined at that time with the version they had,
-
the iTop version itself might be different.
Cloning a revision is considered as a simple change and can be undo as long as no Move To Production was executed after the cloning.
-
Move To Production your under-design datamodel on a Test instance,
-
Give this revision a comprehensive name,
-
Clone the revision of your production datamodel,
-
Make a few changes to the production datamodel,
-
Move To Production your modified production datamodel to the Production Instance (in between you can also use another Test instance)
-
Clone the revision of the under-design datamodel.
-
Of course, after the second cloning, you will have to apply again the few changes you have made on the production datamodel (assuming they are applicable)