Display and Modification of an object
Display
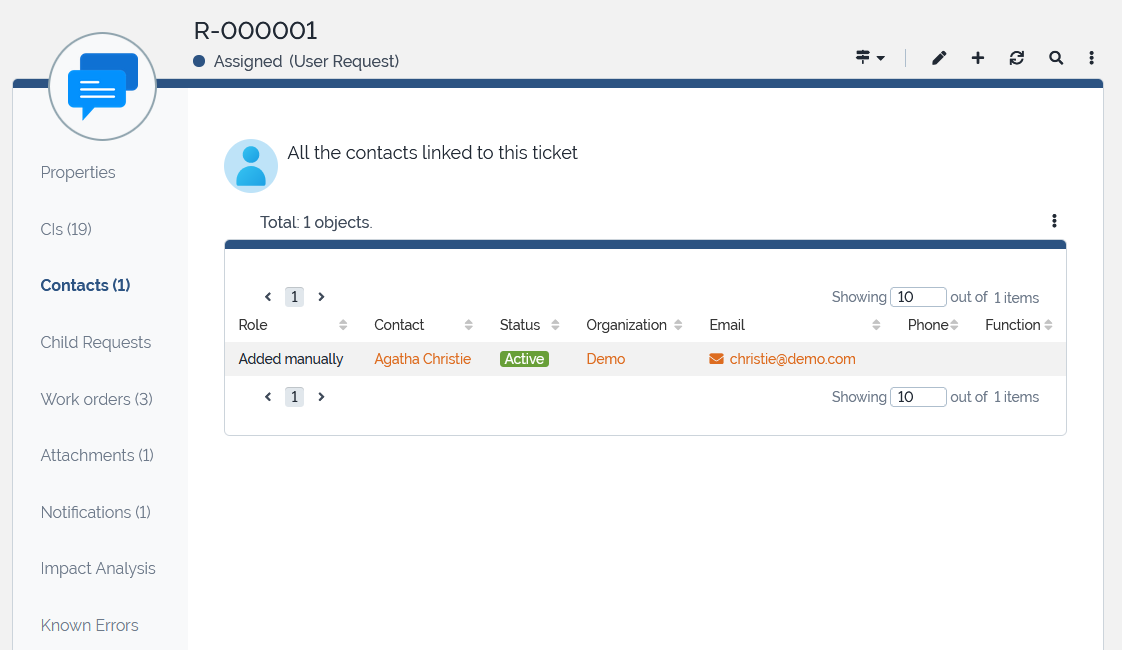
The details of an object are always displayed in the same manner in iTop, as shown below:

Header
The header part contains multiple critical information:
-
The object friendlyname, which can be a single object field, like the name or a combination of object fields, like firstname + lastname of a Person.
-
The object class
-
The object status with a state specific color if any is defined for that class of object
-
Each class of objects has its own border color, to make it clearer where you are at any time.
-
An optional object icon with can be specific to the displayed instance, or common to all objects of the class
Actions

The actions allowed for this object are listed at the top-right. The most frequent actions are displayed as icons.
-
 allow
to modify the current object. Not available if you are not allowed
to edit the current object.
allow
to modify the current object. Not available if you are not allowed
to edit the current object. -
 allow
to create an object of the same class as the current object. Not
available if you are not allowed to create object of the current
class.
allow
to create an object of the same class as the current object. Not
available if you are not allowed to create object of the current
class. -
 allow to refresh the display of the current object, in case it was
modified since you displayed it.
allow to refresh the display of the current object, in case it was
modified since you displayed it. -
 allow to
search for objects of the current class.
allow to
search for objects of the current class. -
 allow to list the remaining actions which
can be specific to the object:
allow to list the remaining actions which
can be specific to the object:
In this example, the Create a user request…
action on the details of a Person, is brought by the extension
User action
Configurator
-
The transitions actions are grouped under the transition icon

When you scroll down, the banner is reduced but stay visible on top, so actions remain accessible all the time
Tabs
-
The Properties tab displays the actual properties of the object.
-
Depending on the class of the object displayed (Tickets for example), an extra Notifications tab may be available, showing all the notifications sent in response to events on this object.
-
The other tabs display the relationships between the selected object and other objects in the database.
-
For example, the tab Teams displays all the teams for which the selected person is a member of. The Tickets tab displays the tickets for which the selected person is the requester.
-
If there are not enough room to display all tabs, the rest is accessible under the
located at the end of the tabs row.

There are two ways to display the contents of an object, the choice being made in the user preference. This navigation setting applies on all objects of iTop, in read and edit modes.
Classic:
-
only one tab at a time is displayed.
-
You click on a tab title to switch to that other tab.
Scrollable:
-
all tabs are displayed in the same page
-
you can scroll through them with your mouse or click on the tab title
Modification of an object
To modify an object, click on the ![]() action, from the
details of the object (The same action is also available on a list
containing only one object).
action, from the
details of the object (The same action is also available on a list
containing only one object).
The form used to modify an object is quite similar to its details. The only difference is that the fields are editable. For example, the form to modify a Person is displayed as shown below:

For some of the fields, the value is not a free-text but instead must be picked from a drop-down list:

The treeview button ( ) is available
for values that are organized as a hierarchy.
) is available
for values that are organized as a hierarchy.
The plus button ( ) is a shortcut to
create an object and add it to the list. The button is only
available for users who are allowed to create this type of object.
For example, when creating or modifying a ticket, click on the
() button of the field
Caller. The form is displayed to enable to create
a new Person:
) is a shortcut to
create an object and add it to the list. The button is only
available for users who are allowed to create this type of object.
For example, when creating or modifying a ticket, click on the
() button of the field
Caller. The form is displayed to enable to create
a new Person:

A red message appears when a mandatory field is left blank, or when a field does not follow the expected format for the field (for example for an email address). The modifications to the object can only be saved (using the Apply button) if all the fields are properly filled.
When the number of possible values for a given field exceeds a configured value (50 by default), the drop-down list is replaced by an autocomplete field, as shown below:

Type at least three letters to trigger the search and
pick from the list of objects matching the typed letters, or use
the magnifying glass button ( ) to open a searchdialog:

The search dialog lists all the objects. To narrow the search you can use the form at the top before selecting an object and click on Ok to return to the main form.
When editing an HTML field, (Caselog entry are HTML field), an embedded editor is included, check CKEditor site for its possibilities.
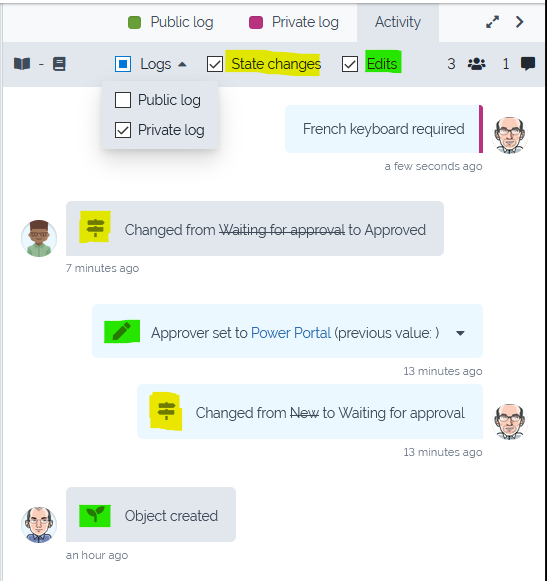
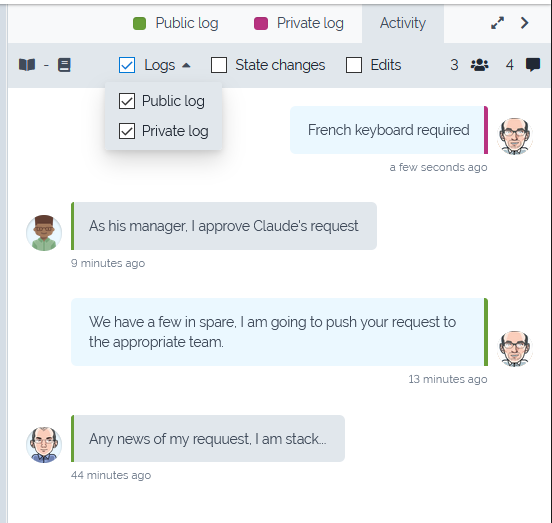
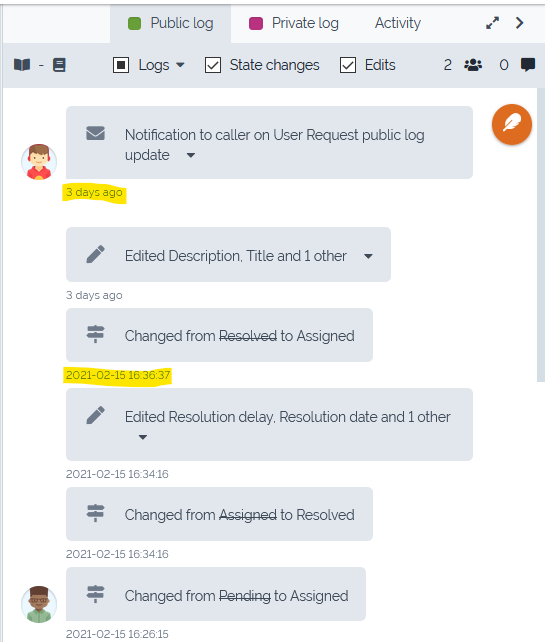
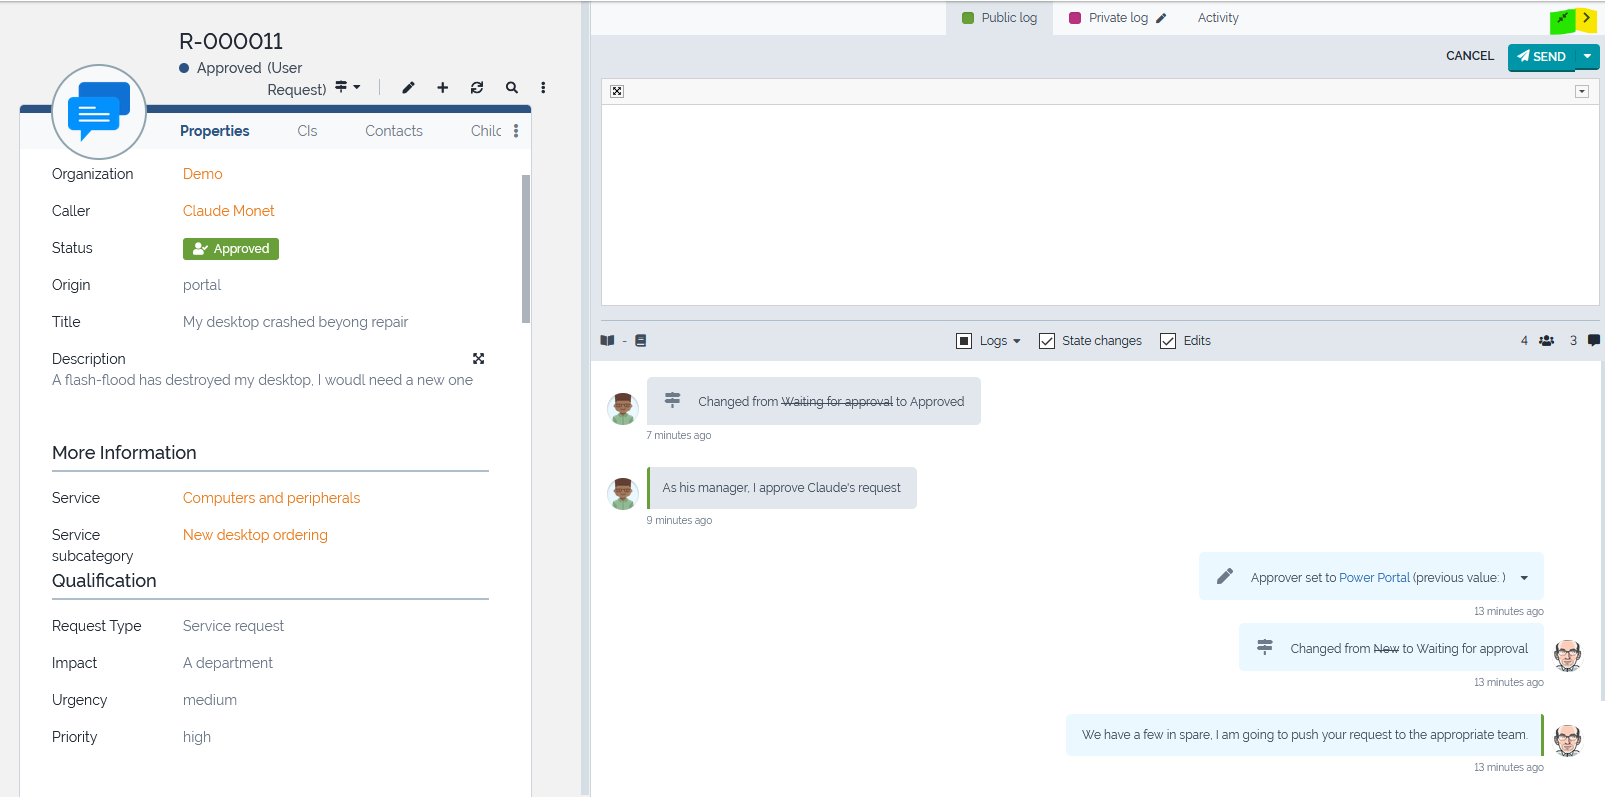
Activity Panel
Caselog edition alone
A new panel has been added, to speed-up a pretty common situation in which the agent just need to provide a reply within a log entry and maybe apply a transition.
-
For this, instead of modifying the Ticket, he can directly enter his reply and send it, while applying in a single click a transition if required.
-
This new option exists within the console only, for all objects having a caselog.
-
For objects having multiple caselogs a confirmation is requested if more than one has been modified.
![]()


History filtering
In this part of the screen, that we have named the “activity panel”, you retrieve the logs and the history, all merged in a single timeline, which makes it more efficient to understand the full history.
-
You can filter this panel, to view:
-
log entries, which you can filter more, to view only the public or the private log
-
state changes whenever the object has changed state
-
edit when the object was created or modified (includes notification sent as well)
-
-
Next to the entry, the user picture, if they have one, is displayed, otherwise it is their initials.
The history timestamps are relative when
recent, eg: 3 days ago and
absolute when older than a week, unless
configured differently on your iTop.
Mention user
In the console an agent may want to quickly notify someone within a caselog to get their attention.
-
That person may not be linked to the Ticket, but still we want to notify them.
-
Just type @ and the beginning of the person name, you will be prompt with available persons.
-
Then at submission of the caselog entry containing a
mention, the person will receive an email notification. -
Multiple persons can be mentioned in the same caselog.
-
The proposed persons to be mentioned on a Ticket are by default those belonging to
-
the customer organization of the Ticket
-
or to same organization as the current user.
-
-
That logic can be changed by modifying the Notification
description of tickets) does
not send an e-mail notification.

Expand & collapse
The activity panel can be collapsed or expanded ![]()
Depending if the agent work requires to read and edit the
caselog(s) or to modify the Ticket it-self

Concurrent access
This topic only applies, if you have activated the concurrent_lock_enabled parameter to prevent multiple users modifying at the same time, the same object.
-
If a user enter some text or just try to edit a caselog in the activity panel of an object currently under edition, or simply under caselog edition by another user, then the first user receive a small message to let him know that he will only be able to submit his entries once the other user will have finished. Notice that the
Sendbutton is greyed for that first user. -
iTop will check every activity_panel.lock_watcher_period seconds, if the lock was released or not, and if it was, it will lock it again but for the first user this time and activate the
Sendbutton, without loosing the text already entered in the caselog(s)


Handling Tickets Attachments
Attachments allow to upload a document (any file or image) into iTop and “attach” it to a given object in iTop. This is very similar to email attachments.
To manage the attachments to a Ticket, click on the Attachments tab while creating or modifying a Ticket:

To upload a new attachment, click on the Select a file button and select the desired file. Note that the maximum size for a single uploaded file is displayed next to the Select a file button. If a file is bigger than this value, it cannot be uploaded into iTop. This maximum size depends on several settings on the server and can be changed only by an administrator.
Once attachments have been uploaded they are listed in the tab, with one icon per file. The name of the attachment is an hyperlink to download it.
Use the trash icon, at the end of the row to delete an
attachment. It is not only removed from the current object (here a
ticket) but fully deleted from iTop. 
When the attachments is an image, then a preview will be shown anytime the mouse moves over the attachment icon.

Drag and drop
Attachments can also be added by performing a drag drop of the files to attach, directly over the browser's window. When files are dragged over the “Attachments” tab, a blue shadow appears around the area where attached files are normally displayed:

If the “Attachments” tab is not the active one when dragging, files can still be attached to the ticket and the tab itself shows the blue shadow during the drag operation:

Managing Objects Relations
In iTop, most of the tabs displayed on the details of an object
represent relations between objects. All these relations are
managed in the same manner.
But there are two flavors of relationships, which are handled slightly differently in the background:
-
A multiple such as the “team-person” relationship: in which a Team usually contains multiple Persons and a Person can belong to multiple Teams
-
A simple such as the “manager-person” relationship: in which the Manager can manage multiple Persons, but a Person has never more than one Manager
Multiple relationship
The form to modify the members of a “Team” looks like this:
Change

To change a team member by another one, just edit the name of the member to-remove and replace it by the name of the member to-add.
Add
In order to add members to the team:
-
click on the “Add Persons…” button at the bottom. This displays - as a popup - the search form to select Persons.
-
Check the desired persons in the list
-
and click “Add” to go back to the main form.

Remove
To remove objects from the relation, check the corresponding line in the form, then click on the “Remove selected objects” button at the bottom.

But if you have created a new object using the + icon, that object is created regardless of what you do on the current object edition.
Simple relationship
On Tickets also we have the equivalent of the Manager-Person
relationship with a “parent-child” relation. A Ticket can have
zero or one parent, while a parent can have from
zero to many children.
Another flavor of simple relationship is the Interfaces sub-objects
on a ConnectableCI, where each sub-object must
have one parent and cannot exist without it.
-
Such sub-object can only be linked to a single parent object, so if there was one already it will be changed and not only added

-
Press the “Add xxxx” button which displays a pop-up window to search for the remote objects
-
Set optional filtering criterion
-
Press the
 button to refresh the list.
 -
Make your choice by checking the checkboxes at the beginning of the row you want to add,
-
Press the “Add” button to validate your choice(s) and dismiss the dialog.
-
The selected objects will be modified and will point to the current object and that situation will be visible in the corresponding tab.

To detach related tickets from the current ticket, just select them by checking the corresponding checkbox and click on “Remove”.