Creating a new dashlet for console dashboards: iFrame
- learning:
- Add a new type of dashlet
- level:
- Advanced
- domains:
- PHP, Presentation
- min version:
- 2.1.0
This document explains, step by step, how to create your own iTop module in order to add a new dashlet to the console dashboards: an iFrame.
Goals of this tutorial
In this step-by-step tutorial you will learn to:
-
create your own extension module for iTop 2.5
-
create a new class of dashlet
-
add a new entry into an existing dashboard
For the purpose of this tutorial we will create a new class of Dashlet, called IFrameDashlet, that will be very simple and embed a external webpage.

What you will need
-
iTop installed on a development machine, on which you can easily access/edit the files.
Customization process
The customization process is the following:
-
Install a development instance of iTop. It is always better not to experiment in production !!
-
Install the toolkit to assist you in the customization
-
Create a new (empty) module using the module creation wizard
-
Copy this new module to the
extensionsfolder on iTop and run the setup again to install the empty module -
Modify the module in
extensionsand use the toolkit to check your customizations
Repeat the last point until you are satisfied with your
customization. When you are done, your new module is ready to be
deployed. Copy the module folder in the extension
directory on your production iTop instance and run the setup to
install it.
Step by step tutorial
Create your customization module
Use the module creation wizard. Fill the form with the following values:
| Label | Value | Remarks |
|---|---|---|
| Module name | sample-add-dashlet | Names starting with itop- and
combodo- are reserved for use by Combodo. It is
recommended not to put spaces or accentuated characters in the name
of the module. Two modules with the same name cannot co-exist in
the same iTop instance. |
| Module Label | Add Dashlet Sample | This label will be displayed in the setup wizard. Localized characters and spaces are allowed |
| Module Version | 1.0.0 | The convention is to use a 3 digits numbering scheme: X.Y.Z |
| Category | business | Modules that provide modifications to the data model should be in the category 'business' |
Click Generate ! to download the empty module as a zip file.
Install the empty module
Expand the content of the zip into the extensions
folder of your development iTop instance. You should now have a
folder named sample-add-dashlet inside the
extensions folder. this folder contains the following
files:
-
datamodel.sample-add-dashlet.xml
-
module.sample-add-dashlet.php
-
en.dict.sample-add-dashlet.php
-
model.sample-add-dashlet.php
Make sure that the file
conf/production/config-itop.php is writable for the
web server (on Windows: right click to display the file properties
and uncheck the read-only flag; on Linux change the rights of the
file), then launch the iTop installation by pointing your browser
to http://your_itop/setup/

Click “Continue »” to start the re-installation.

Make sure that “Update an existing instance” is selected before clicking “Next »”.

Continue to the next steps of the wizard…

Your custom module should appear in the list of “Extensions”. If it's not the case, check that the module files were copied in the proper location and that the web server has enough rights to read them.
Select your custom module before clicking “Next »” and complete the installation.
Add the IFrameDashlet class
Using you favorite text editor, create the file
iframedashlet.class.inc.php in your extension
folder.
Add the following piece of code:
<?php
class DashletIFrame extends Dashlet
{
        public function __construct($oModelReflection, $sId)
        {
                parent::__construct($oModelReflection, $sId);

        }

        static public function GetInfo()
        {

        }

        public function GetPropertiesFields(DesignerForm $oForm)
        {

        }

        public function Render($oPage, $bEditMode = false, $aExtraParams = array())
        {

        }
}
This is the base code to create a dashlet. As you can see, the methods are empty for now, we will have to implement them, but first let see what their purposes are.
-
“GetInfo” is used to retrieve basic informations on the dashlet such as its label, description and icon. This is mainly used in the dashboard un der the “Available dashlets” menu.
-
“GetPropertiesFields” is used to build the configuration form fo the dashlet. It is where we will have to put the parameters the user will fill to set the dashlet up.
-
“Render” is used to make the HTML rendering of the dashlet, which is where most of the logic happen.
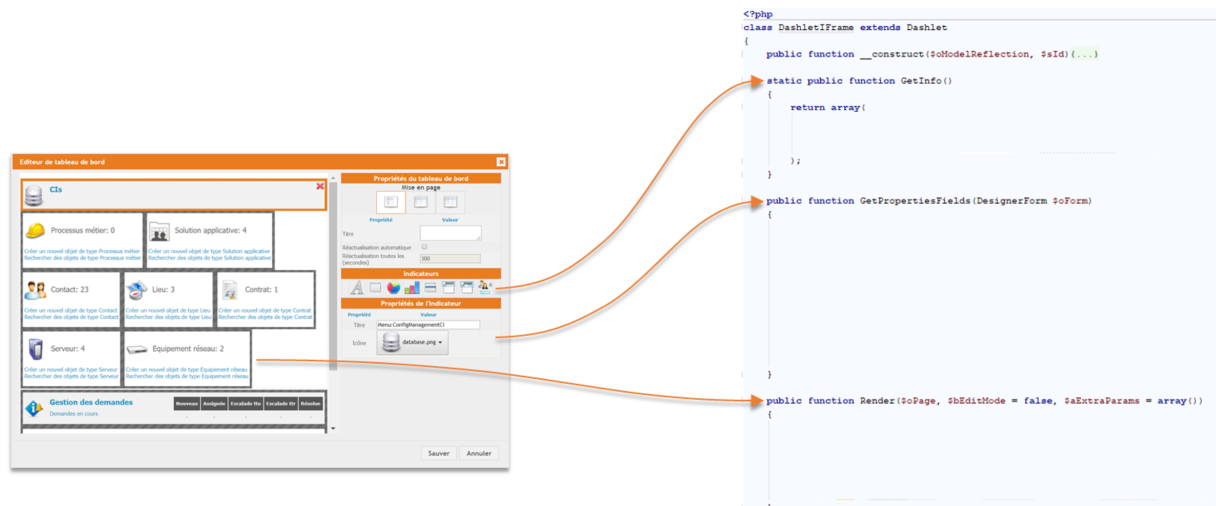
Let's start with the GetInfo method. Replace the
empty method with the following piece of code:
-
“label” will be used as a tooltip in the dashlet palet when editing a dashboard.
-
“icon” will also be used in the dashlet palet. The path must be relative to the application root folder.
-
“description” is not displayed for now, but should be soon.
        static public function GetInfo()
        {
                return array(
                                'label' => Dict::S('UI:DashletIframe:Label'),
                                'icon' => 'env-'.utils::GetCurrentEnvironment().'/sample-add-dashlet/images/iframe.png',
                                'description' => Dict::S('UI:DashletIframe:Description'),
                );
        }
Then replace the GetPropertiesFields method with
the following:
        public function GetPropertiesFields(DesignerForm $oForm)
        {
                $oField = new DesignerLongTextField('url', Dict::S('UI:DashletIframe:Prop-Url'), $this->aProperties['url']);
                $oField->SetMandatory();
                $oForm->AddField($oField);

                $oField = new DesignerIntegerField('width', Dict::S('UI:DashletIframe:Prop-Width'), $this->aProperties['width']);
                $oField->SetMandatory();
                $oForm->AddField($oField);

                $oField = new DesignerIntegerField('height', Dict::S('UI:DashletIframe:Prop-Height'), $this->aProperties['height']);
                $oField->SetMandatory();
                $oForm->AddField($oField);
        }
As you can see, we add one DesignerXXXField for
each parameter we need the user to fill and that is it. iTop will
handle the form processing and interactions with the dashboard.
DesignerFormField class and its
derivated classes in
application/forms.class.inc.phpFinally replace the Render method with the
following code:
        public function Render($oPage, $bEditMode = false, $aExtraParams = array())
        {
                $sUrl = $this->aProperties['url'];
                $iWidth = (int) $this->aProperties['width'];
                $iHeight = (int) $this->aProperties['height'];

                $oPage->add('<div class="dashlet-content">');

                $sId = utils::GetSafeId('dashlet_iframe_'.($bEditMode? 'edit_' : '').$this->sId);
                $oPage->add('<iframe id="'.$sId.'" width="'.$iWidth.'" height="'.$iHeight.'" frameborder="0" src="'.$sUrl.'"></iframe>');

                if($bEditMode)
        {
            $oPage->add('<div style="width: 100%; height: 100%; position: absolute; top: 0px; left: 0px; cursor: not-allowed;"></div>');
        }

        $oPage->add('</div>');
        }
In this case, the code is pretty simple as we just want to display an iframe tag pointing to an URL. But this is where you should do your dashlet's logic, retrieving objects through OQL, computing stuff and all. As you have access to the $oPage element, you can even bring CSS or JS files/snippets. Sky is the limit!
Now, your file should look like this:
<?php
class DashletIFrame extends Dashlet
{
        public function __construct($oModelReflection, $sId)
        {
                parent::__construct($oModelReflection, $sId);
                $this->aProperties['url'] = '';
                $this->aProperties['width'] = 600;
                $this->aProperties['height'] = 650;
                $this->aCSSClasses[] = 'dashlet-inline';

        }

        public function Render($oPage, $bEditMode = false, $aExtraParams = array())
        {
                $sUrl = $this->aProperties['url'];
                $iWidth = (int) $this->aProperties['width'];
                $iHeight = (int) $this->aProperties['height'];

                $oPage->add('<div class="dashlet-content">');

                $sId = utils::GetSafeId('dashlet_iframe_'.($bEditMode? 'edit_' : '').$this->sId);
                $oPage->add('<iframe id="'.$sId.'" width="'.$iWidth.'" height="'.$iHeight.'" frameborder="0" src="'.$sUrl.'"></iframe>');

                if($bEditMode)
        {
            $oPage->add('<div style="width: 100%; height: 100%; position: absolute; top: 0px; left: 0px; cursor: not-allowed;"></div>');
        }

        $oPage->add('</div>');
        }

        public function GetPropertiesFields(DesignerForm $oForm)
        {
                $oField = new DesignerLongTextField('url', Dict::S('UI:DashletIframe:Prop-Url'), $this->aProperties['url']);
                $oField->SetMandatory();
                $oForm->AddField($oField);

                $oField = new DesignerIntegerField('width', Dict::S('UI:DashletIframe:Prop-Width'), $this->aProperties['width']);
                $oField->SetMandatory();
                $oForm->AddField($oField);

                $oField = new DesignerIntegerField('height', Dict::S('UI:DashletIframe:Prop-Height'), $this->aProperties['height']);
                $oField->SetMandatory();
                $oForm->AddField($oField);
        }

        static public function GetInfo()
        {
                return array(
                                'label' => Dict::S('UI:DashletIframe:Label'),
                                'icon' => 'env-'.utils::GetCurrentEnvironment().'/itop-iframe-dashlet/images/iframe.png',
                                'description' => Dict::S('UI:DashletIframe:Description'),
                );
        }
}
Check your modification by running the toolkit. Point your browser to http://your_itop/toolkit.

If any error is reported at this stage, fix it by editing the XML file and check again your modifications by clicking on the “Refresh” button in the toolkit page.
Once all the errors have been fixed, you can apply the modifications to iTop by using the second tab of the toolkit. Click on the button Update iTop Code and Database! to:
-
Compile the XML data model to PHP classes
-
Update the database schema (creation of the monitor table).
At this point, if you navigate in iTop and click on the “Edit this page” in the “Welcome page”, you can see that “iFrame” is available in the dashlet list:
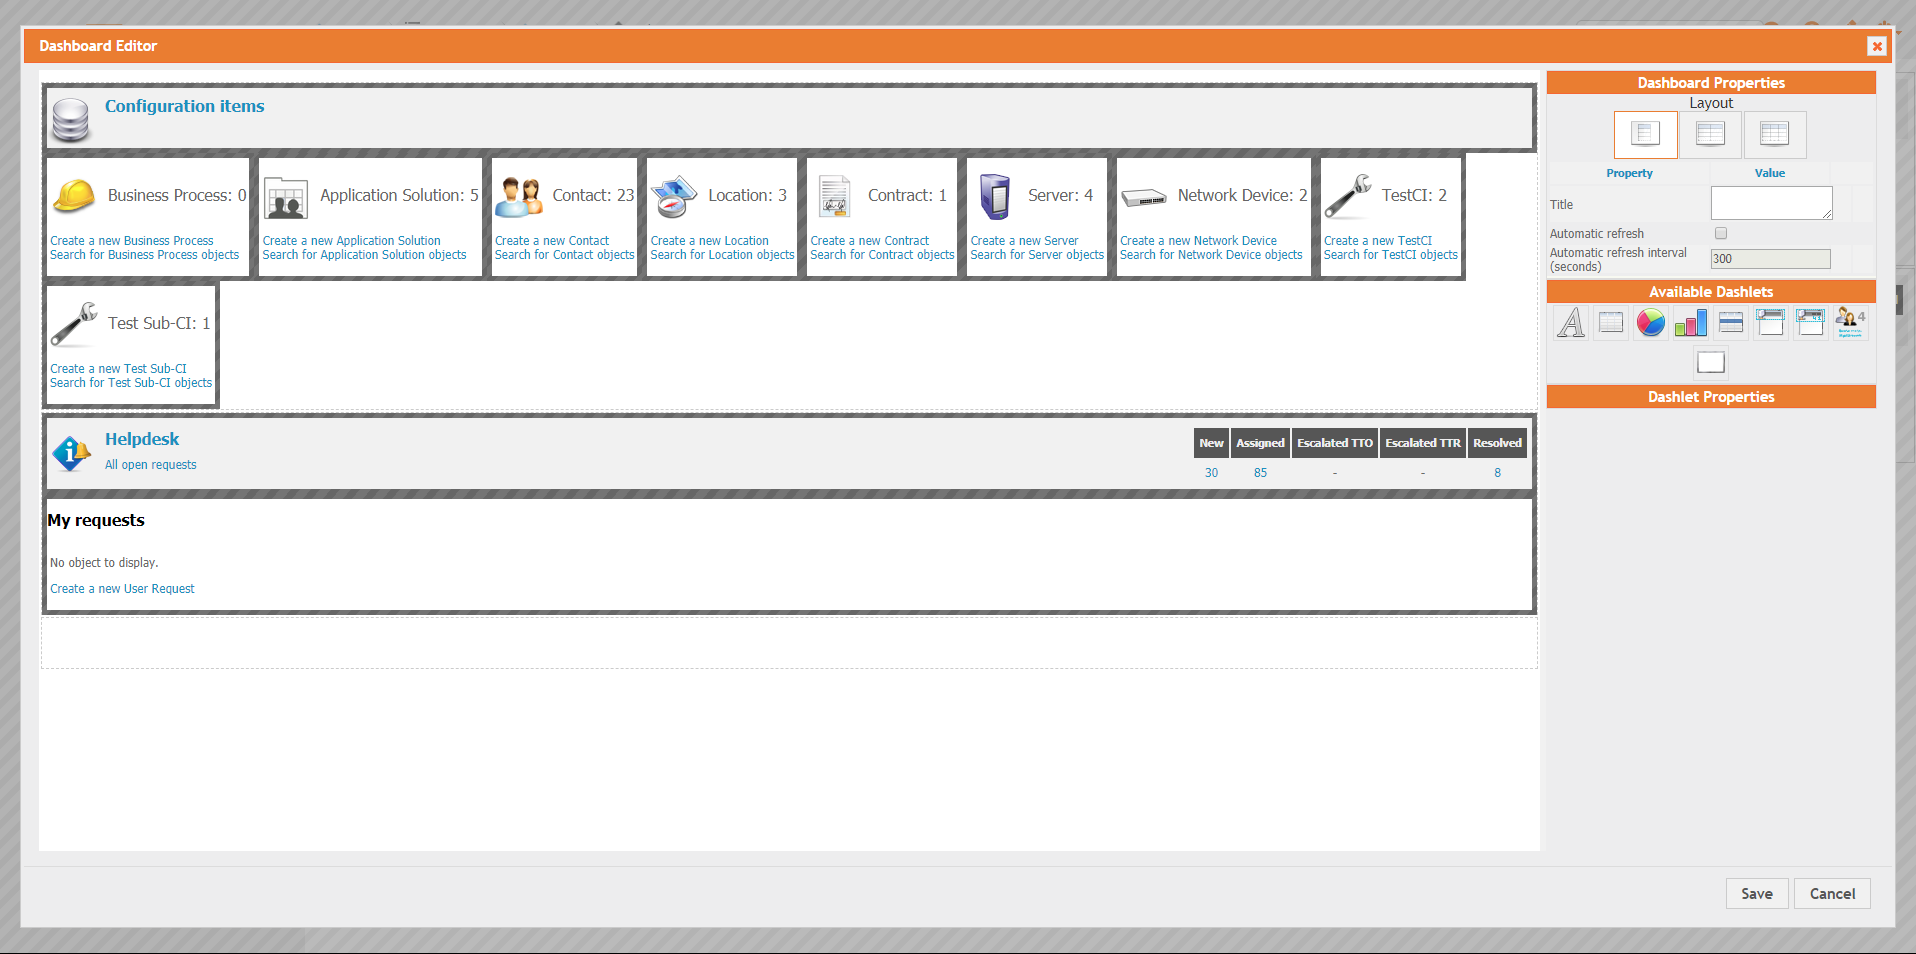
The following form gets displayed when you drag & drop the dashlet to the dashboard:

Fill the parameters, save and you will see your dashlet in the dashboard!
Add meta informations
Meta informations are useful when you want to use your dashlet with the ITSM Designer as they will enable it to be used for configuring dashboards.
To do so, edit the datamodel.sample-add-dashlet.xml
file of your extension and create a tag
/itop_design/meta/dashlets/dashlet[@id=“IFrameDashlet”].
Note that the dashlet tag id MUST be the class name of your
dashlet. You should have the following:
<?xml version="1.0" encoding="UTF-8"?>
<itop_design xmlns:xsi="http://www.w3.org/2001/XMLSchema-instance" version="1.0">
  <meta>
        <dashlets>
          <dashlet id="DashletIFrame" _delta="define">
          </dashlet>
        </dashlets>
  </meta>
</itop_design>
Now, put the dashlet meta information within the
dashlet tag:
-
“label”, the label of your dashlet.
-
“icon”, the icon to appear in the “Available dashlets” menu. Note that the path is relative to the extension folder and not the app root!
-
“description”, the description of the dashlet.
-
“configuration”, this is the main difference with the
Dashlet::GetInfomethod. It should contain a sample XML configuration of the dashlet to help the user know what is to be configured. This is necessary as the ITSM Designer will not be able to render the properties form due to security reasons.
You should now have the following:
<?xml version="1.0" encoding="UTF-8"?>
<itop_design xmlns:xsi="http://www.w3.org/2001/XMLSchema-instance" version="1.0">
  <meta>
        <dashlets>
          <dashlet id="DashletIFrame" _delta="define">
                <label>iFrame</label>
                <icon>itop-iframe-dashlet/images/iframe.png</icon>
                <description>Embed external web page as a dashlet.</description>
                <configuration>
                        <url>http://via.placeholder.com/600x300</url>
                        <width>600</width>
                        <height>300</height>
                </configuration>
          </dashlet>
        </dashlets>
  </meta>
</itop_design>
Next Steps
To deploy your customization to another iTop server, simply copy
the folder “sample-add-dashlet” to the extensions
folder of iTop and run the setup again.