Managing your Preferences
 The Preferences
menu allows each user to configure:
The Preferences
menu allows each user to configure:
-
The User interface preferences, such as language, display choices…
-
The list of favorite Organizations to be displayed in the context menu
-
The Personal shortcuts created by the user
-
The Application keyboard shortcuts
User interface groups multiple simple settings:
Favorite Language
This allow you to change the language of iTop,
-
For this, select the desired language from the drop-down list and click on the Apply button.
-
The selected language is used to translate the field labels, menus and messages.
-
It does not translate the data stored in your iTop.
Lists
The default length is used to limit the displayed number of objects at once, for example, when performing a search.
-
If the number of elements in a list exceeds this value, iTop will display only a subset of the objects and the rest will be available through a paging system.
-
Each page is configured by default to display the default length number of objects.
-
Displaying more objects per page may be more convenient but will slow down the display.
-
A saved list in a dashlet can have its own
lengthindependent of the default, see Configuring list -
This length is also used to limit the history of CSV imports (truncated view).
To modify the default value, change the number then click on the Apply button.
Tabs


Those 2 parameters layout & navigation controls how an object is displayed
-
Layout defines where the tabs titles of an object are displayed:
Horizontalas before andverticalon the left part of the object display. -
Navigation defining how you can switch from one tab to another:
classicas before, only one tab at a time is displayed,scrollableall tabs are displayed in the same page and you can scroll through them with your mouse. The scrollable mode do not display tabs which are time consuming, but just an image on which you need to click to get the content.
Those modes applies on all objects of iTop, as well as on the edit mode
Rich Text Editor
 This option
allow to have the toolbar open each time you edit an HTML field
This option
allow to have the toolbar open each time you edit an HTML field
Activity panel

![]()
This option specify how a caselog is displayed in the details of
an object
a Ticket in general, but it applies to all object having at
least one caselog
The 2 possible modes are:
-
you can add an entry, by first clicking on the icon

-
you directly have the possibility to enter something in the caselog and sent it (Entry form opened by default).
Other settings
-
The option Show obsolete data unchecked by default, allow to display obsolete objects in drop-down lists and search results
Favorite organizations
In large companies, not all users are interested by all
organizations documented in iTop, for example if a given user works
only for a given set of customers.
This setting let each user tailor the list of organizations that
appear in the context menu at the top-left of their iTop pages, in
order to ease the navigation in the application.
Shortcuts
Use this to rename or delete user-created shortcuts.
-
See User shortcuts for how to create shortcuts.
-
The shortcuts appear in the main menu immediately below the Welcome menu.
-
To rename a shortcut, check the checkbox in front of its name and click on Rename.
-
To delete shortcuts, check the checkboxes in front of their name and click on Delete (A popup confirmation message is displayed).
Application keyboard shortcuts
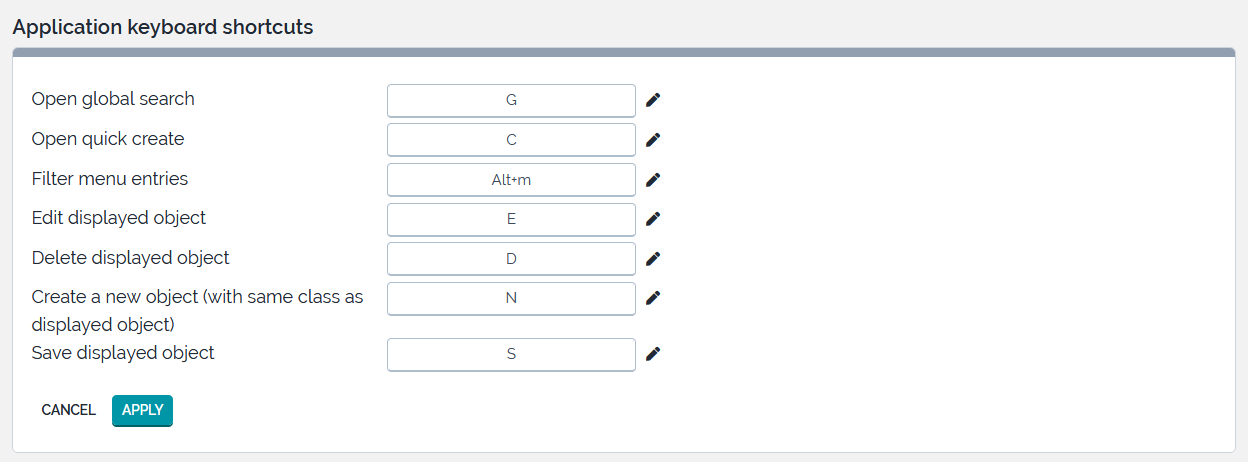 If you
like to navigate quickly just with the keyboard, we have added
shortcut for frequent actions.
If you
like to navigate quickly just with the keyboard, we have added
shortcut for frequent actions.
-
Default shortcuts keys that we have set may collide with shortcuts of your browser, operating system, you can change them.
-
Click on the pen icon,
-
then press the shortcut keys you want to set for that action on your keyboard and that's it.
-
The resulting pressed keys are displayed as feedback to confirm your change.
-
If you change your mind, start again from step 1
-
You can check on the internet, existing shortcuts for most popular web applications.
User placeholder image
Can be used to associate an avatar to your user.