Creating a new class of CI: Monitor
This document explains, step by step, how to create your own iTop module in order to add a new class of CIs: a Monitor.
Goals of this tutorial
In this step-by-step tutorial you will learn to:
-
create your own extension module for iTop 2.0
-
create a new class of object
-
add a new entry into an existing dashboard
For the purpose of this tutorial we will create a new class of CI, called Monitor, that will be very similar to the Peripheral class, with the addition of an extra field “technology” to distinguish CRT and LCD monitors.

What you will need
-
iTop installed on a development machine, on which you can easily access/edit the files.
Customization process
The customization process is the following:
-
Install a development instance of iTop. It is always better not to experiment in production !!
-
Install the toolkit to assist you in the customization
-
Create a new (empty) module using the module creation wizard
-
Copy this new module to the
extensionsfolder on iTop and run the setup again to install the empty module -
Modify the module in
extensionsand use the toolkit to check your customizations
Repeat the last point until you are satisfied with your
customization. When you are done, your new module is ready to be
deployed. Copy the module folder in the extension
directory on your production iTop instance and run the setup to
install it.
Step by step tutorial
Create your customization module
Use the module creation wizard. Fill the form with the following values:
| Label | Value | Remarks |
|---|---|---|
| Module name | sample-add-class | Names starting with itop- and
combodo- are reserved for use by Combodo. It is
recommended not to put spaces or accentuated characters in the name
of the module. Two modules with the same name cannot co-exist in
the same iTop instance. |
| Module Label | Add Class Sample | This label will be displayed in the setup wizard. Localized characters and spaces are allowed |
| Module Version | 1.0.0 | The convention is to use a 3 digits numbering scheme: X.Y.Z |
| Category | business | Modules that provide modifications to the data model should be in the category 'business' |
| Dependencies | itop-config-mgmt/2.0.0,itop-endusers-devices/2.0.0 | Our customization module depends on the modules: iTop Configuration Management (version 2.0.0) in which the Physical Device class is defined and iTop End User Devices (version 2.0.0) in which the “End User Devices” menu is defined |
Click Generate ! to download the empty module as a zip file.
For example if you want to create a new class, dervied from the
class VirtualMachine, your custom module must depend on
itop-virtualization-mgmt/2.0.0
Install the empty module
Expand the content of the zip into the extensions
folder of your development iTop instance. You should now have a
folder named sample-add-class inside the
extensions folder. this folder contains the following
files:
-
datamodel.sample-add-class.xml
-
module.sample-add-class.php
-
en.dict.sample-add-class.php
-
model.sample-add-class.php
Make sure that the file
conf/production/config-itop.php is writable for the
web server (on Windows: right click to display the file properties
and uncheck the read-only flag; on Linux change the rights of the
file), then launch the iTop installation by pointing your browser
to http://your_itop/setup/

Click “Continue »” to start the re-installation.
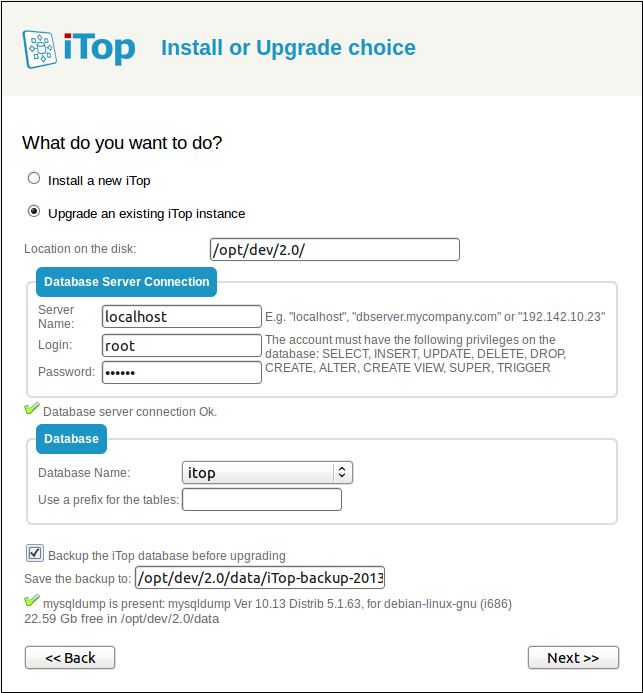
Make sure that “Update an existing instance” is selected before clicking “Next »”.

Continue to the next steps of the wizard…

Your custom module should appear in the list of “Extensions”. If it's not the case, check that the module files were copied in the proper location and that the web server has enough rights to read them.
Select your custom module before clicking “Next »” and complete the installation.
Add the Monitor class
Using you favorite text editor, open the file
datamodel.sample-add-class.xml.
Remove the tags <profiles></profiles> since the module will not contain any profile definition.
Inside the classes tag, add the following piece of
code:
    <class id="Monitor" _delta="define">
      <parent>PhysicalDevice</parent>
      <properties>
        <category>bizmodel,searchable</category>
        <abstract>false</abstract>
        <key_type>autoincrement</key_type>
        <db_table>monitor</db_table>
        <db_key_field>id</db_key_field>
        <db_final_class_field/>
        <naming>
          <format>%1$s</format>
          <attributes>
            <attribute id="name"/>
          </attributes>
        </naming>
        <display_template/>
        <icon>images/monitor.png</icon>
        <reconciliation>
          <attributes>
            <attribute id="name"/>
            <attribute id="org_id"/>
            <attribute id="organization_name"/>
          </attributes>
        </reconciliation>
      </properties>
      <fields>
        <field id="technology" xsi:type="AttributeEnum">
          <values>
            <value>crt</value>
            <value>lcd</value>
          </values>
          <sql>technology</sql>
          <default_value/>
          <is_null_allowed>true</is_null_allowed>
          <display_style>radio_horizontal</display_style>
        </field>
      </fields>
      <methods/>
     </class>
This instructs iTop to define a new class derived from PhysicalDevice. An extra table “monitor” will be added in SQL to store the class specific data. The “Monitor” class adds one extra field “technology” to the PhysicalDevice class. This field is an enumerated value with two possible values “lcd” and “crt”. This field is to be stored in the column “technology” in the SQL database.
The <presentation> tag must also be defined
to describe how the object should be displayed in iTop. There are
three “presentations” to define:
-
The “details” defines the form used to display and edit an instance of the object
-
The “list” defines the default columns to be used for displaying a list of objects of this class
-
The “search” defines the available fields in the search form for this class of objects
Add the following piece of code just after the closing
</fields> tag:
      <presentation>
        <details>
          <items>
            <item id="name">
              <rank>10</rank>
            </item>
            <item id="org_id">
              <rank>20</rank>
            </item>
            <item id="status">
              <rank>30</rank>
            </item>
            <item id="business_criticity">
              <rank>40</rank>
            </item>
            <item id="location_id">
              <rank>50</rank>
            </item>
            <item id="brand_id">
              <rank>60</rank>
            </item>
            <item id="model_id">
              <rank>70</rank>
            </item>
            <item id="technology">
              <rank>75</rank>
            </item>
            <item id="serialnumber">
              <rank>80</rank>
            </item>
            <item id="asset_number">
              <rank>90</rank>
            </item>
            <item id="move2production">
              <rank>100</rank>
            </item>
            <item id="purchase_date">
              <rank>110</rank>
            </item>
            <item id="end_of_warranty">
              <rank>120</rank>
            </item>
            <item id="description">
              <rank>130</rank>
            </item>
            <item id="contacts_list">
              <rank>140</rank>
            </item>
            <item id="documents_list">
              <rank>150</rank>
            </item>
            <item id="tickets_list">
              <rank>160</rank>
            </item>
            <item id="providercontracts_list">
              <rank>170</rank>
            </item>
            <item id="services_list">
              <rank>180</rank>
            </item>
          </items>
        </details>
        <search>
          <items>
            <item id="name">
              <rank>10</rank>
            </item>
            <item id="org_id">
              <rank>20</rank>
            </item>
            <item id="status">
              <rank>30</rank>
            </item>
            <item id="business_criticity">
              <rank>40</rank>
            </item>
            <item id="location_id">
              <rank>50</rank>
            </item>
            <item id="brand_id">
              <rank>60</rank>
            </item>
            <item id="model_id">
              <rank>70</rank>
            </item>
            <item id="technology">
              <rank>75</rank>
            </item>
            <item id="serialnumber">
              <rank>80</rank>
            </item>
            <item id="asset_number">
              <rank>90</rank>
            </item>
            <item id="move2production">
              <rank>100</rank>
            </item>
            <item id="purchase_date">
              <rank>110</rank>
            </item>
            <item id="end_of_warranty">
              <rank>120</rank>
            </item>
          </items>
        </search>
        <list>
          <items>
            <item id="org_id">
              <rank>10</rank>
            </item>
            <item id="status">
              <rank>20</rank>
            </item>
            <item id="business_criticity">
              <rank>30</rank>
            </item>
            <item id="location_id">
              <rank>40</rank>
            </item>
            <item id="brand_id">
              <rank>50</rank>
            </item>
            <item id="model_id">
              <rank>60</rank>
            </item>
            <item id="serialnumber">
              <rank>70</rank>
            </item>
          </items>
        </list>
      </presentation>
You should now have the following XML file:
- datamodel.sample-add-class.xml
-
<?xml version="1.0" encoding="UTF-8"?>
<itop_design xmlns:xsi="http://www.w3.org/2001/XMLSchema-instance" version="1.0">
  <classes>
    <class id="Monitor" _delta="define">
      <parent>PhysicalDevice</parent>
      <properties>
        <category>bizmodel,searchable</category>
        <abstract>false</abstract>
        <key_type>autoincrement</key_type>
        <db_table>monitor</db_table>
        <db_key_field>id</db_key_field>
        <db_final_class_field/>
        <naming>
          <format>%1$s</format>
          <attributes>
            <attribute id="name"/>
          </attributes>
        </naming>
        <display_template/>
        <icon>images/monitor.png</icon>
        <reconciliation>
          <attributes>
            <attribute id="name"/>
            <attribute id="org_id"/>
            <attribute id="organization_name"/>
          </attributes>
        </reconciliation>
      </properties>
      <fields>
        <field id="technology" xsi:type="AttributeEnum">
          <values>
            <value>crt</value>
            <value>lcd</value>
          </values>
          <sql>technology</sql>
          <default_value/>
          <is_null_allowed>true</is_null_allowed>
          <display_style>radio_horizontal</display_style>
        </field>
      </fields>
      <methods/>
      <presentation>
        <details>
          <items>
            <item id="name">
              <rank>10</rank>
            </item>
            <item id="org_id">
              <rank>20</rank>
            </item>
            <item id="status">
              <rank>30</rank>
            </item>
            <item id="business_criticity">
              <rank>40</rank>
            </item>
            <item id="location_id">
              <rank>50</rank>
            </item>
            <item id="brand_id">
              <rank>60</rank>
            </item>
            <item id="model_id">
              <rank>70</rank>
            </item>
            <item id="technology">
              <rank>75</rank>
            </item>
            <item id="serialnumber">
              <rank>80</rank>
            </item>
            <item id="asset_number">
              <rank>90</rank>
            </item>
            <item id="move2production">
              <rank>100</rank>
            </item>
            <item id="purchase_date">
              <rank>110</rank>
            </item>
            <item id="end_of_warranty">
              <rank>120</rank>
            </item>
            <item id="description">
              <rank>130</rank>
            </item>
            <item id="contacts_list">
              <rank>140</rank>
            </item>
            <item id="documents_list">
              <rank>150</rank>
            </item>
            <item id="tickets_list">
              <rank>160</rank>
            </item>
            <item id="providercontracts_list">
              <rank>170</rank>
            </item>
            <item id="services_list">
              <rank>180</rank>
            </item>
          </items>
        </details>
        <search>
          <items>
            <item id="name">
              <rank>10</rank>
            </item>
            <item id="org_id">
              <rank>20</rank>
            </item>
            <item id="status">
              <rank>30</rank>
            </item>
            <item id="business_criticity">
              <rank>40</rank>
            </item>
            <item id="location_id">
              <rank>50</rank>
            </item>
            <item id="brand_id">
              <rank>60</rank>
            </item>
            <item id="model_id">
              <rank>70</rank>
            </item>
            <item id="technology">
              <rank>75</rank>
            </item>
            <item id="serialnumber">
              <rank>80</rank>
            </item>
            <item id="asset_number">
              <rank>90</rank>
            </item>
            <item id="move2production">
              <rank>100</rank>
            </item>
            <item id="purchase_date">
              <rank>110</rank>
            </item>
            <item id="end_of_warranty">
              <rank>120</rank>
            </item>
          </items>
        </search>
        <list>
          <items>
            <item id="org_id">
              <rank>10</rank>
            </item>
            <item id="status">
              <rank>20</rank>
            </item>
            <item id="business_criticity">
              <rank>30</rank>
            </item>
            <item id="location_id">
              <rank>40</rank>
            </item>
            <item id="brand_id">
              <rank>50</rank>
            </item>
            <item id="model_id">
              <rank>60</rank>
            </item>
            <item id="serialnumber">
              <rank>70</rank>
            </item>
          </items>
        </list>
      </presentation>
    </class>
  </classes>
<menus>
</menus>
</itop_design>
Check your modification by running the toolkit. Point your browser to http://your_itop/toolkit.

If any error is reported at this stage, fix it by editing the XML file and check again your modifications by clicking on the “Refresh” button in the toolkit page.
Once all the errors have been fixed, you can apply the modifications to iTop by using the second tab of the toolkit:

Click on the button Update iTop Code and Database! to:
-
Compile the XML data model to PHP classes
-
Update the database schema (creation of the monitor table).
At this point, if you navigate in iTop and click on the “Configuration Management / New CI” menu, you can see that “Monitor” is available in the drop-down list:

The following form gets displayed:

As you can see the new “Monitor” class seems to work fine already. However there are some missing pieces:
-
The class has no icon associated with it,
-
The label of the “technology” field (and its values) are in lowercase,
-
Model can't be assigned to the Monitor type
Add an Icon for the class
In the datamodel.sample-add-class.xml the class
icon is defined as:
<icon>images/monitor.png</icon>
This means that itop expects a file named
monitor.png in the images subfolder of
the module.
To provide the icon, create the images folder
inside the extensions/sample-add-class folder and copy
a nice monitor icon - as monitor.png - inside it.
Fix the labels
In order to have the new technology field display
properly, you need to edit the dictionary.
Using you text editor, open the file
en.dict.sample-add-class.php.
Insert the lines:
  'Class:Monitor' => 'Monitor',
        'Class:Monitor+' => 'A computer display',
        'Class:Monitor/Attribute:technology' => 'Technology',
        'Class:Monitor/Attribute:technology+' => 'Technology used for the display',
        'Class:Monitor/Attribute:technology/Value:crt' => 'CRT',
        'Class:Monitor/Attribute:technology/Value:lcd' => 'LCD',
Just below the comment:
// Dictionary entries go here
The first two lines are the label for the class and a short explanation about the meaning of the class. The other lines provides the translated label for the new field and its values.
You should obtain the following file:
- en.dict.sample-add-class.php
-
<?php
/**
 * Localized data
 *
 * @copyright   Copyright (C) 2013 XXXXX
 * @license     http://opensource.org/licenses/AGPL-3.0
 */

Dict::Add('EN US', 'English', 'English', array(
        // Dictionary entries go here
        'Class:Monitor' => 'Monitor',
        'Class:Monitor+' => 'A computer display',
        'Class:Monitor/Attribute:technology' => 'Technology',
        'Class:Monitor/Attribute:technology+' => 'Technology used for the display',
        'Class:Monitor/Attribute:technology/Value:crt' => 'CRT',
        'Class:Monitor/Attribute:technology/Value:lcd' => 'LCD',
));
?>
One more time, check your modification by running the toolkit.
If errors are reported at this stage, fix them by editing the PHP file and check again your modifications by clicking on the “Refresh” button in the toolkit page.
Once all the errors have been fixed, you can apply the modifications to iTop by using “Update iTop Code” button on the second tab of the toolkit:

If you navigate to the details of a Server in iTop, you should now see the following:
Add Monitor class in Model.type
The Model type is defined in the “type” attribute of the class. This attribute is a AttributeEnum, so we need to add Monitor as one of the possible values. To do so, copy/paste this in the classes node of the XML :
    <class id="Model" _delta="must_exist">
      <fields>
        <field id="type" xsi:type="AttributeEnum">
          <values>
            <value id="Monitor" _delta="define">Monitor</value>
          </values>
        </field>
      </fields>
    </class>
Add a dashboard item
At this stage, the only way to access the Monitors in iTop is either by searching for any CI, or through the “New CI” menu.
Let's add the Monitor object to the “Configuration Management / Overview” dashboard, in the “End User Devices” section.
In order to provide the expected result, our customization
module will have to alter the definition of this dashboard. This
can be achieved by replacing the empty
<menus></menus> tags by the following XML
definition in the file
datamodel.sample-add-class.xml:
<menus>
  <menu id="ConfigManagementOverview" xsi:type="DashboardMenuNode" _delta="must_exist">
    <definition>
      <cells>
        <cell id="2" _delta="must_exist">
          <dashlets>
            <dashlet id="99" xsi:type="DashletBadge" _delta="define">
              <rank>8</rank>
              <class>Monitor</class>
            </dashlet>
          </dashlets>
        </cell>
      </cells>
    </definition>
  </menu>
</menus>
One more time, check your modification by running the toolkit.
If errors are reported at this stage, fix them by editing the PHP file and check again your modifications by clicking on the “Refresh” button in the toolkit page.
Once all the errors have been fixed, you can apply the modifications to iTop by using “Update iTop Code” button on the second tab of the toolkit:
If you navigate to the “Configuration Management / Overview” menu in iTop, you should now see the following:

Final Customization Module
You can download the complete customization module by clicking on the link below:
Next Steps
To deploy your customization to another iTop server, simply copy
the folder “sample-add-class” to the extensions folder
of iTop and run the setup again.