Reports in Excel
How to create an Excel report using an iTop query
Make sure that Excel is properly configured
Click on the menu item “Data” / “From Web”. If you get a dialog similar to the one below (PowerQuery) this is not good.

Instead you should get a dialog similar to this:

To use the old GetExternalDataFromWeb wizard,
follow these steps:
Go to the File / Options menu
Click on the “Customize Ribbon” menu on the left:
In the drop-down list at the top-left, select “Main tabs”, in the tree displayed, open the item “Data” and select the menu item “From Web”
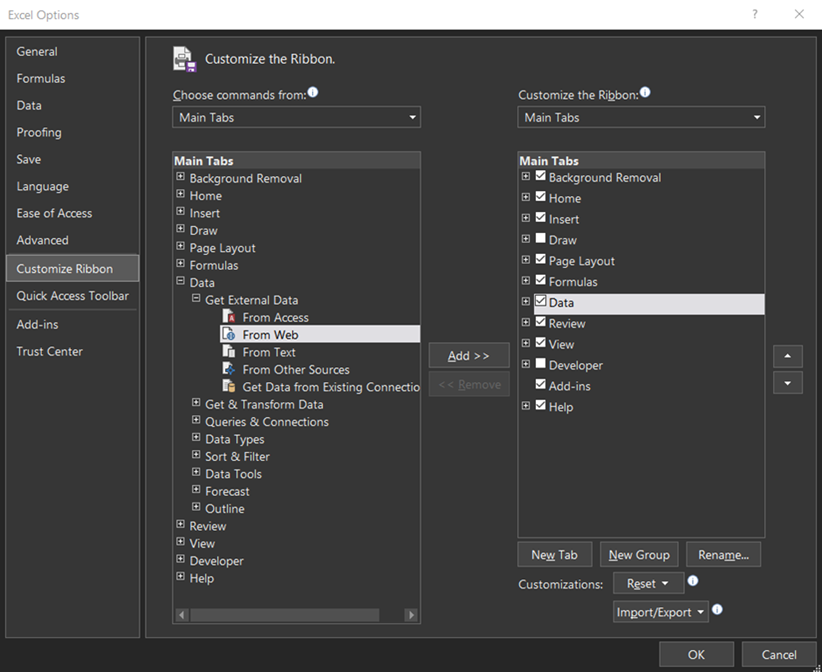

To add the command to your Ribbon you must create a new “Group” (using the button at the bottom of the dialog box). The group is named with a default name, but you can rename it if you like:

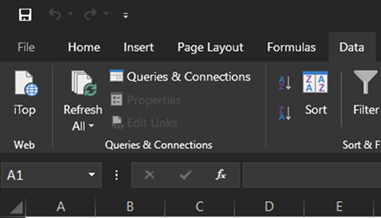
Similarly, you can rename the menu and choose an icon for it. Once your menu has been added to the ribbon, you should see something similar to this:
When you click on the custom menu, the “External Data From Web” wizard should appear:
Importing data from iTop
Administrators can store predefined queries in iTop (menu “Administration / Query Phrasebook”). These queries can then be used to create reports in Excel. A query is identified by a number. It is called in Excel using a URL provided by your iTop administrator. For example, the URL below stored in the query phrasebook, returns a list of User Request:

To use this query in Excel, click on the button From Web in the Excel tab Data

A window is displayed to enter the URL to be called:

Enter the URL provided by the iTop administrator in the Address part and click on Go.
The iTop authentication window is displayed. Enter your user account and your password:

Click on Ok: if you are prompt by security popup windows.

The New Web Query is updated with the list of columns to be imported:

Click the Import button. Excel asks you where you want to insert the data:

If your query contains parameters, Excel will open several successive windows to enter them. Be careful, date parameters only support the format yyyy-mm-dd.
Click the OK button and Excel displays the result of the query. The language used for the display of columns corresponds to the default language of your login in iTop.

To refresh the data, click on the Refresh All button in the Data tab of Excel:
You can use as many iTop queries as you want and use the results to create graphs or charts dynamically using standard Excel features.