Actions
The actions are the means to modify the objects in iTop. Actions can be executed:
-
from a list of objects (Refer to the Chapter Managing Lists), in which case the selected action is applied to all the objects in the list
-
from the details of an object
The actions buttons are only displayed to users with enough rights to execute them.
The standard actions in iTop are:
New
This action is used to create a new object of the same type as the object currently displayed. When clicking on “Create…”, the creation form of the object is displayed.
Modify
This action displays the form to update an object. Both creation and modification forms are very similar, except that when modifying an object, the values in the form are obviously prefilled with the current values of the object being modified.
Delete
The “Delete” action is located in the “Other Actions” popup menu:

This action is used to permanently delete an object from iTop. In order to guarantee the consistency and integrity of the data in iTop, deleting an object may also affect other objects. Depending on the rules defined in the data model, other objects may be modified or deleted automatically, or the deletion may not be possible until some depending object are manually deleted.
In any case, a confirmation screen listing all the impacted objects, is displayed.

For example, if you want to delete the whole organization “Demo”, the following confirmation screen is displayed:

In this particular case, iTop detects that there are several Persons belonging to this Organization. Since the definition of the data model demands that a Person belong to an Organization and that the deletion of a Person is not automatic, the “Demo” Organization cannot be deleted while there are Persons belonging to it.
This is why the “Delete!” button is grayed out. In order to delete the “Demo” Organization, the Persons must be processed first, either by deleting them or by assigning them to a different Organization.
Relations
Depending on the type of object displayed, additional “Relations” menus are available. As an example, for most Configuration Items, tww relations are defined: “Impacts” and “Depends On”. In such a case two extra menus are available in the “Other Actions…” popup menu.

When selecting such an action, the page showing the relation is displayed:

-
You can use the checkboxes with the icons at the top to filter the display (just press “Refresh” after updating the selection).
-
Move the mouse over an object to display a tooltip showing additional information about the object (as well as a link to its details)
-
Click and drag onto an object to re-arrange the chart
-
Click and drag in the background to move the whole chart
-
The + and - buttons, as well as the slider at the top right of the chart (and the mouse wheel) are used to adjust the zoom level
-
The “Grouping threshold” defines the minimum number of similar objects (same type, same status) for creating a group which replaces the individual objects in the chart, in order to simplify the chart. When changing this value, press “Refresh” to re-compute the chart with the new grouping level
-
The “Additional context” drop-down list defines how “Tickets” are taken into account when computing and displaying the chart. When an object in the chart is linked to (at least) one of the “context” tickets, a small icon representing the type of the ticket (Incident, Change…) is displayed next to the icon of the object. The list of tickets linked to a given object is available in the tooltip for this object

Exporting the chart as a PDF document
To export the chart as a PDF document, use the “toolkit” menu at
the top-right of the chart: 
This displays the following dialog box:
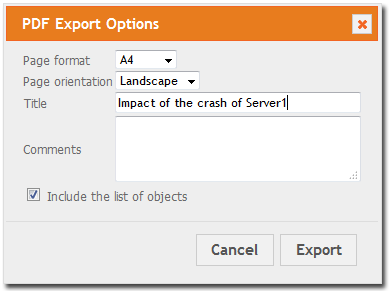
The export generates a printable PDF document where the first page contains the chart (as laid out on the screen), with a legend on the left and an optional comment area at the bottom. The list of objects can be added as a set of tables (one per class of object) on additional pages.
The following options are available:
-
Page format: the dimensions of the PDF document: either A3, A4 or Letter.
-
Page orientation: either horizontally (Landscape) or vertically (Portrait)
-
Title: a title for the document, to be added as a header at the top of each page
-
Comment: A free text area that will be integrated (if not empty) on the first page of the document, below the chart.
-
Include the list of objects: if checked, the list of the objects in the chart will be added as a big table as additional pages in the PDF document.
The “email” action is located in the “Other Actions” popup menu:

This action is for creating a new eMail message containing a link to the selected object in iTop. The email is created and sent from the client mail program configured on the end-user's computer.
The recipient of the message will get an URL to navigate to the details of the object by clicking on the link, but she/he must have an iTop account to view the information, since she/he will be prompted to authenticate for viewing the page.
CSV Export

The CSV export of one object is similar to the CSV export of a list, except that there is obviously only one line of data in the resulting export.
Excel Export

The Excel export of one object is similar to the Excel export of a list, except that there is obviously only one row of data in the resulting export.
Printer Friendly Version

This action opens, in another tab of your browser, a “Printer Friendly” version of the details of the current object. This version of the “details” is optimized for printing: all the tabs are listed as sections inside the page, most of the surrounding elements (menu, search bar…) are removed.
Moreover the page can also be configured by hiding/showing some of its sections before actually printing it, by clicking on the “Eye” icons.

Ticket Specific Actions
Some objects managed in iTop follow a specific life-cycle that correspond to a specific process. This is the case, for example, for the different tickets managed in iTop (incident tickets, change management tickets, etc.). For these objects, additional actions are available, corresponding to process execution workflow.
Life-cycle actions are available either as extra menu items in the “Other Actions” popup menu:

Or directly as extra buttons in the modification form for the object:

In the latter case, clicking on the “Wait for Approval” button is strictly equivalent to clicking on “Apply” to save the current modifications of the object, then selecting “Wait for Approval” from the “Other Actions” drop-down menu.
The actions available on each object depend on:
-
The life-cycle of the object (each type of object may have a different life-cycle)
-
The current state of the object (not all actions are possible in all states)
-
The user-rights as defined by her/his profile(s): some actions are restricted to a given profile.