iTop implementation guide
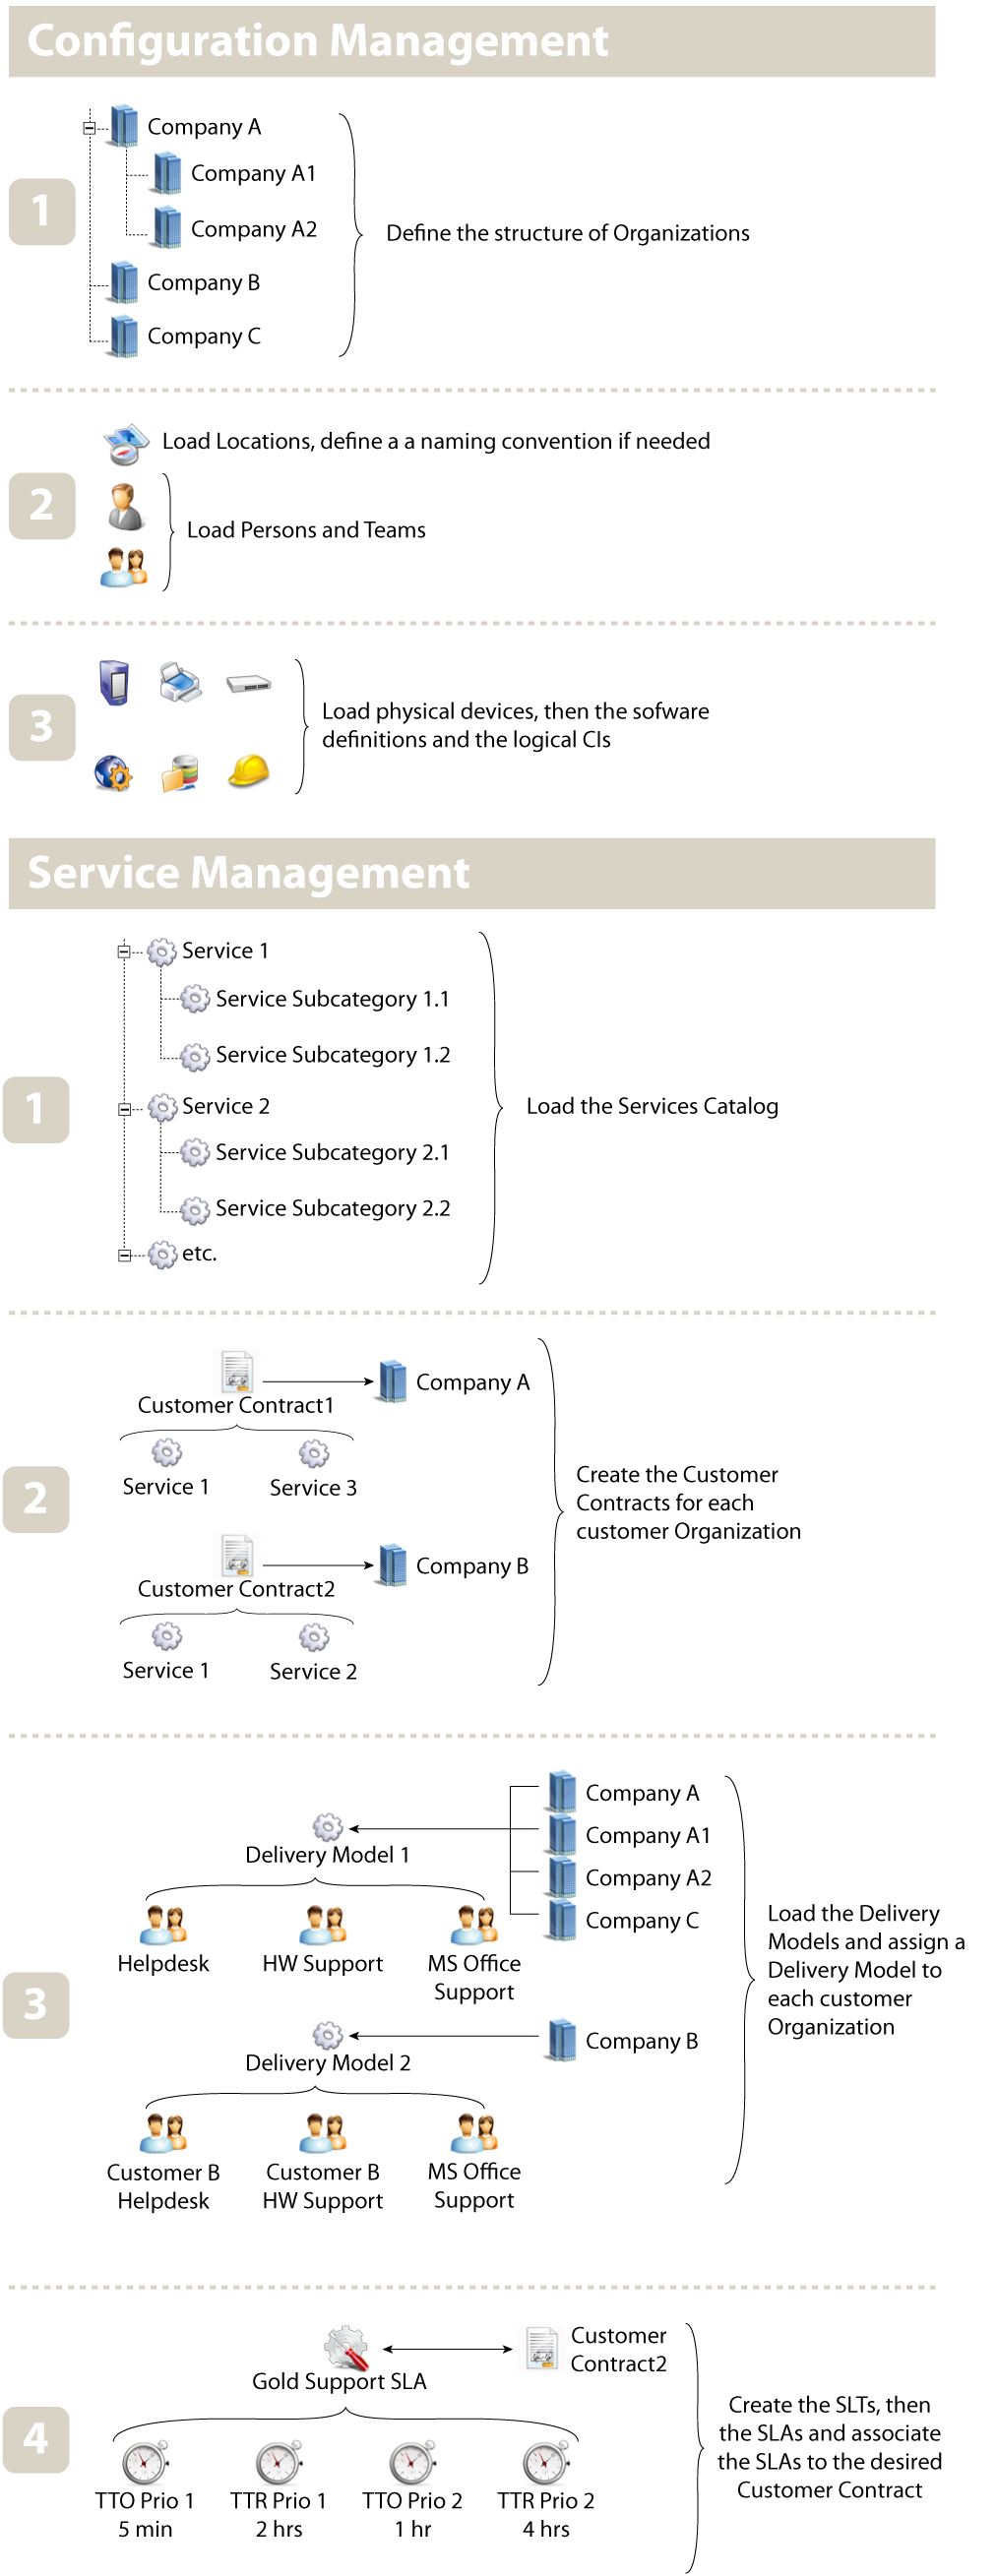
The purpose of this document is to describe, step by step, which iTop objects have to be created to implement iTop for your organization. For instance, in order to create a User Request ticket, you need to make sure that the caller for this request exists, that there is at least one contract documented for this customer defining the services delivered to this customer, etc. This document explains the order to be followed for creating the objects in iTop.
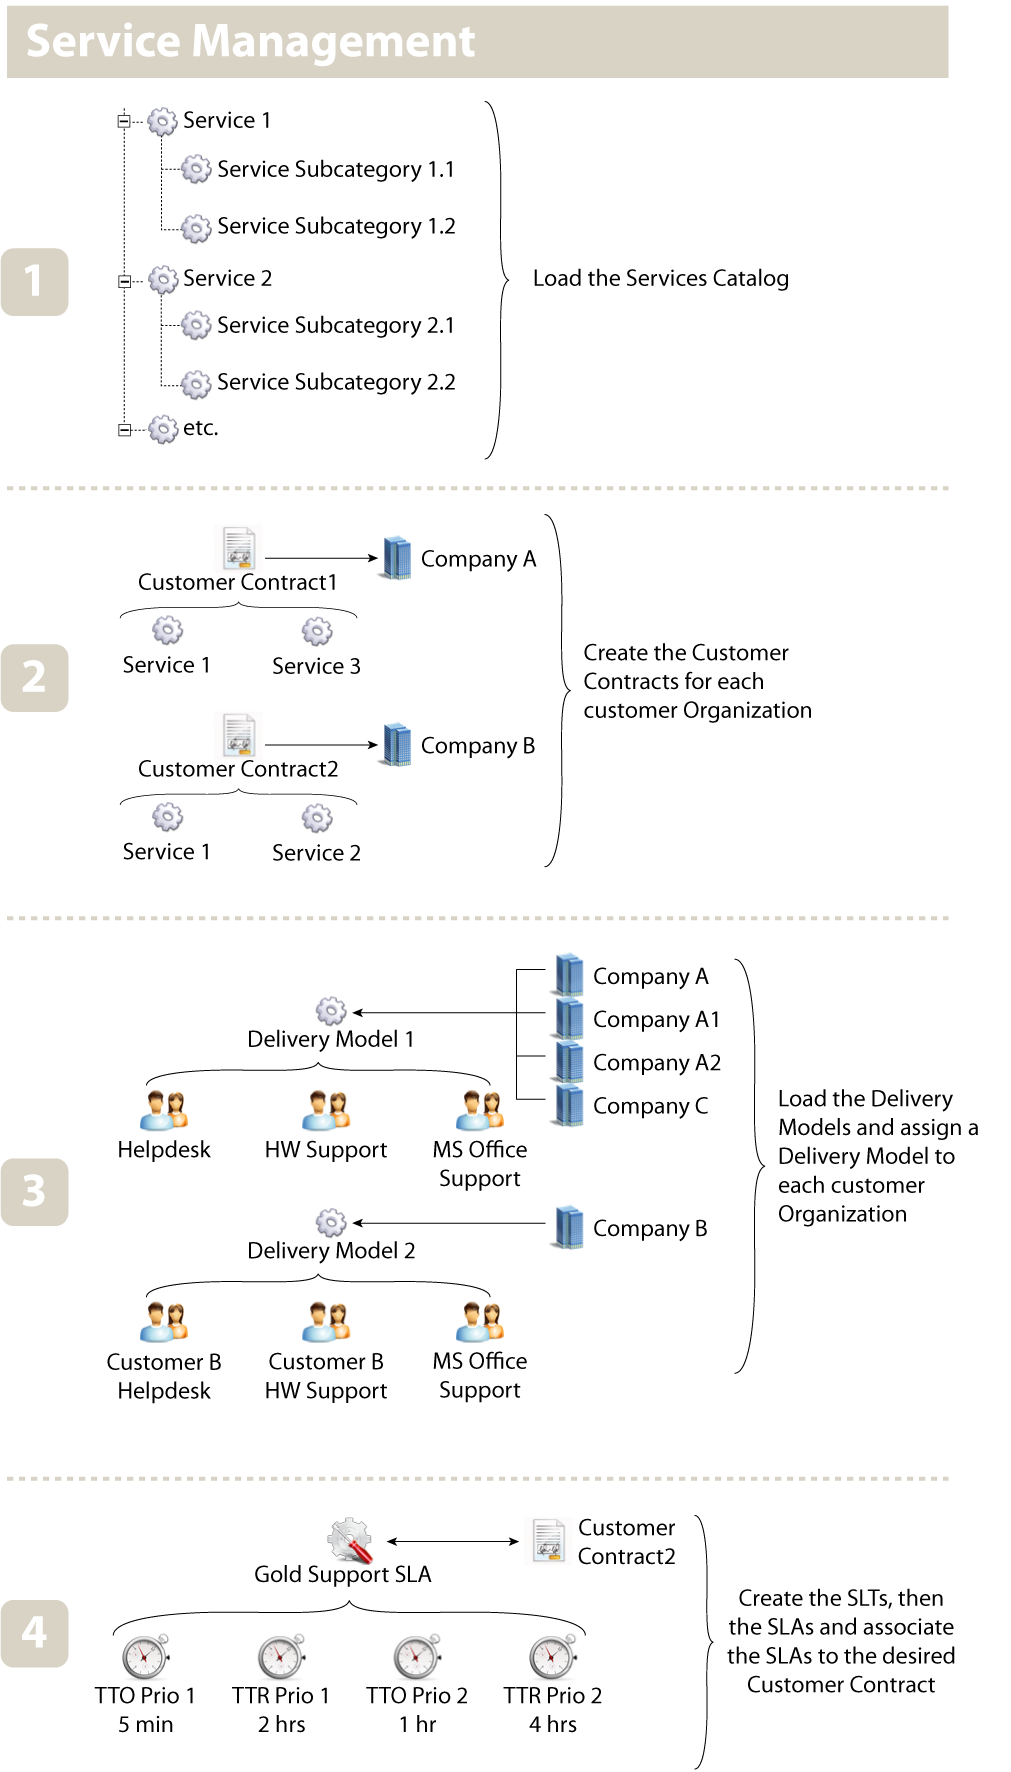
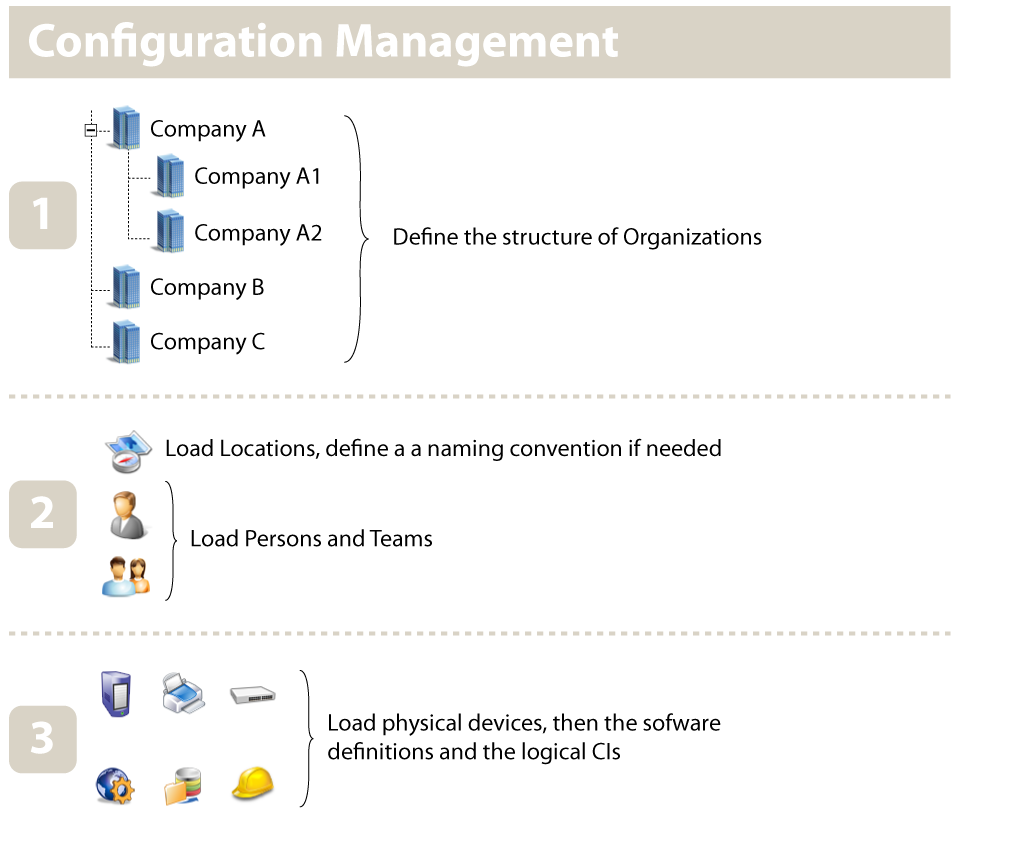
The following schema summarizes the on-boarding process:
This document does not describe in details how to use all the features of iTop. For more details about the usage of iTop, refer to the “iTop User Manual”.
Creating new objects in iTop
There are several ways to create new objects in iTop, depending on the type of object and whether you want to create the objects interactively, one by one, or in bulk mode. The steps to create each class of object from the menu is explained in details in the Data Model Documentation, but there are two other ways that can be convenient for an administrator:
-
From CSV Import: if you wish to create many instances of the same class of objects, it is often easier to import them from an existing data set. The CSV Import tool, under the “Data Administration” menu, is designed for this. Prepare your data in CSV format: as a text file, with one object per line and values separated by a fixed character (semicolon, comma or tab). Then let the CSV import wizard guide you into loading the file into iTop.
-
From the Universal Search: to create a new object of any class, use the menu “Universal Search” in the “Admin Tools” section. Perform a search for objects of this class, then use the “Actions / New…” popup menu to create a new instance of the class.
Configuration Management
Creating organizations
When planning a deployment of iTop, the first decision to be made is about the structure of Organizations. In iTop, Organizations are used for two main purposes: the description of customers and providers entities and the partitioning of the data, from the security point of view. Almost all the objects loaded in iTop have a relation with an Organization, therefore it is important to create a proper structure of Organizations before loading other objects into iTop.
Understanding customers and providers
In iTop, there is nothing such as a “customer” or a “provider”, there are only Organizations. Like in real life, whether an Organization is a customer or provider depends on the point of view. For example the Organization “Company A” can be a customer of “Company B” and at the same time a provider for “Company C”. The customer/provider relations in iTop are represented using Contracts. “Company A” is a customer of “Company B” if there is a Customer Contract with “Company B” as the provider and “Company A” as the customer.
What is the difference between Customer Contracts and Provider Contracts?
A Provider Contract is a slightly simplified version of the Customer Contract, with two limitations:
-
A Provider Contract is not related to any Service from the service catalog.
-
The Service Level Agreement is documented as a free text field on Provider Contracts and therefore cannot be used for automated computations in iTop.
Provider Contracts are useful for documenting contracts with third party suppliers (called underpinning contracts in the ITIL terminology), for which no tickets will be tracked in iTop.
You can of course use Customer Contracts for describing the contractual relation with a third party supplier, but this means that you have to also document in iTop the service catalog of this supplier.
Organizations and access rights
Apart from the customer/provider relations, another reason to create several Organizations in iTop is to restrict access to some areas of the managed data.
In iTop the rights to “read” (or display) objects from the database is defined on a per Organization basis. Each user is given (in the definition of her/his account) the rights to access a set of Organizations.
Organizations can be structured as a hierarchy. When this is the case, the access rights are inherited from the “Parent” Organization to the “Child” Organizations. For example, if “Company A” has two child Organizations: “Company A1” and “Company A2”, then if a user has the rights to access the objects in “Company A”, she/he will also be allowed to access the objects in “Company A1” and “Company A2”. On the other hand, a user who is allowed to access only “Company A1” will be allowed to access neither the objects in “Company A” nor those in “Company A2”.
This means that a user has the same access rights over all Organizations that she/he is allowed to access.
For example, in the current version of iTop, a user cannot have the rights to access the data of the Organizations “Company A” and “Company B” and the rights to create Servers only in “Organisation B”. If she/he is given the rights to create Servers, this will apply to both “Company A” and “Company B”.
Creating Locations
The Locations are very useful for grouping object by geography. Even if the location attribute is not a mandatory field when you create a CI in the CMDB, it is strongly recommended to create Locations beforehand and then to track the locations of all CIs.
Shared Locations
In Enterprise environments, even though the split of roles and responsabilities are in favor of creating several sub Organizations, it is often needed to have “shared” locations among several Organizations to document “co-locations”. iTop does not provide - in its standard version - a way to actually “share” objects between Organizations. However, the Locations are “inherited” from parent Organizations to child Organizations in the same manner as the access rights. This means that a Person, a Server or a Network Device belonging to “Company A2” can be located on a Location owned by “Company A”.
Creating Persons
The Persons are very important in iTop as they are used to define all the contacts and their responsibilities. A Person belongs to one and only one organization. A Person can be a member of one or more Team(s), and therefore should be created before trying to setup Teams.
Also, each user record is linked to a Person object. Therefore Persons must be created before loading user accounts into iTop. The user record defines the access rights (and identification method), whereas the Person object defines the information about the contact: name, location, email address, telephone…
Creating Teams
The teams are linked to several types of object, like contracts or tickets, in order to define responsibilities. Teams are also used as “workgroups” for assigning tickets. Teams used for assigning tickets must also have at least one member (the agent to assign the ticket to). The attribute “Role” on the link between a Team and a Person is not mandatory, so you can leave it empty, but it is useful to define the role of the Person in the Team (Team Leader, Manager…).
Devices and Software CIs
Once the structure of the Organizations, the Locations and the contacts (Teams and Persons) have been loaded, you can start to populate the CMDB.
Since the software instances depend on the software types defined in the software catalog and are documented as installed on a particular host, you should start by documenting:
-
The physical infrastructure: Servers, Network Devices, PCs, etc…
-
The Software catalog, by creating the needed type of “Software” objects
Service Management
Before managing tickets in iTop, the services catalog,
the Delivery Models and the contracts must be
defined. 
Services Catalog
The “Services Catalog” is the list of Services that are available from a given provider Organization. The Services Catalog is documented in iTop by creating Service objects, assigned to the given Organization (considered as the provider of the service). Services are organized in a two-level hierarchy, through the two classes of objects: Service and Service Subcategory. Create the top level Services before loading sub categories.
Once the service catalog (Services and Service Subcategories) is defined, create the Customer Contracts that will link each “customer” Organization to its “providers” by creating one Customer Contract per couple of provider/customer and linking the appropriate Services to the contract.
Delivery Model
The Delivery Model is the object that defines which Team works for which customer. You can use a Delivery Model object to group together all the “support teams” for a given set of Services, or the support Teams dedicated to a particular customer. Each customer Organization must be assigned one, and only one, Delivery Model.
For example, if you have the following Teams:
-
Helpdesk team: a Team that processes all helpdesk requests/calls.
-
MS Office Support Team: a Team that processes all support requests about MS Office.
-
Hardware Support Team: a Team that handles hardware calls (Replacements, new hardware orders)
-
Network Support Team: a Team that handles network related issues
-
Customer B Helpdesk Team: a helpdesk team dedicated to Customer B
-
Customer B Hardware Team: a Team handling hardware calls for Customer B
You can then build two different Delivery Models:
-
“Delivery Model 1” composed of:
-
Helpdesk Team
-
MS Office Support Team
-
Network Support Team
-
-
“Delivery Model 2” composed of:
-
Customer B Helpdesk Team
-
Customer B Hardware Team
-
MS Office Team
-
The “Delivery Model 1” will be used by the Organizations “Customer A”, “Customer A1”, “Customer A2” and “Customer C”; whereas “Delivery Model 2” will be used by “Customer B”.
Service Level Agreements and Targets
In order to compute whether or not the expected Service Level Agreements are respected, iTop introduces two possible types of metrics called SLTs (Service Level Targets):
-
TTO (Time To Own): the time between the creation of a ticket and its assignment to an Agent.
-
TTR (Time To Resolve): the time between the creation of a ticket and its resolution (i.e. measured when the ticket enters the state “resolved”)
A SLT defines a duration associated with:
-
A metric: either TTO or TTR
-
A type of ticket (incident or user request)
-
A priority (since tickets with higher priority should generally be processed more quickly)
A SLA is simply defined as a named group of SLTs (for example to distinguish between “Gold” and “Silver” service levels).
The definition of SLAs/SLTs have two effects in iTop:
-
Notifications can be defined for any percentage of the “threshold” associated with one of the metrics (for example one can configure notifications to send an email to the agent working on a ticket when 50% of the Time To Resolve is reached and to the team leader when reaching 75%).
-
When 100% of a metric is reached, the ticket is automatically set to a special “escalation” state (there are two specific states defined in the tickets’ life-cycle: Escalation TTO and Escalation TTR). Entering such a state can also be used to trigger specific notifications.
For example, one can define the following service level matrix:
| Incidents – Priority High | Incidents – Priority Medium | Requests – Priority High | Requests – Priority Medium |
|---|---|---|---|
| Time To Own: 5 min | Time To Own: 30 min | Time To Own: 30 min | Time To Own: 4 hours |
| Time To Resolve: 1 hour | Time To Resolve: 4 hours | Time To Resolve: 4 hours | Time To Resolve: n/a |
This would lead to creating 4 SLTs, one for each row of the table. These 4 SLTs can be grouped under one SLA named “Gold Service Level”.
Finally SLAs can be associated to Customer Contracts in order to define the applicable metrics for the contract.
Your iTop instance is now ready to run. You may have a look at the Configuration of Notifications to setup email notifications for the tickets.


