Data Model Edition
ITSM Designer - Combodo's customers only
The “Classes” tab of the ITSM Designer screen manages the Data Model. In this tab you can manage the classes (add or remove classes, add or remove fields) and the relations between them (add/remove relations, add/remove fields on n:n relations).
Module Overview
The list on the left of the screen provides two ways for navigating in the list of classes: either gouped by “Module” or by alphabetical order.
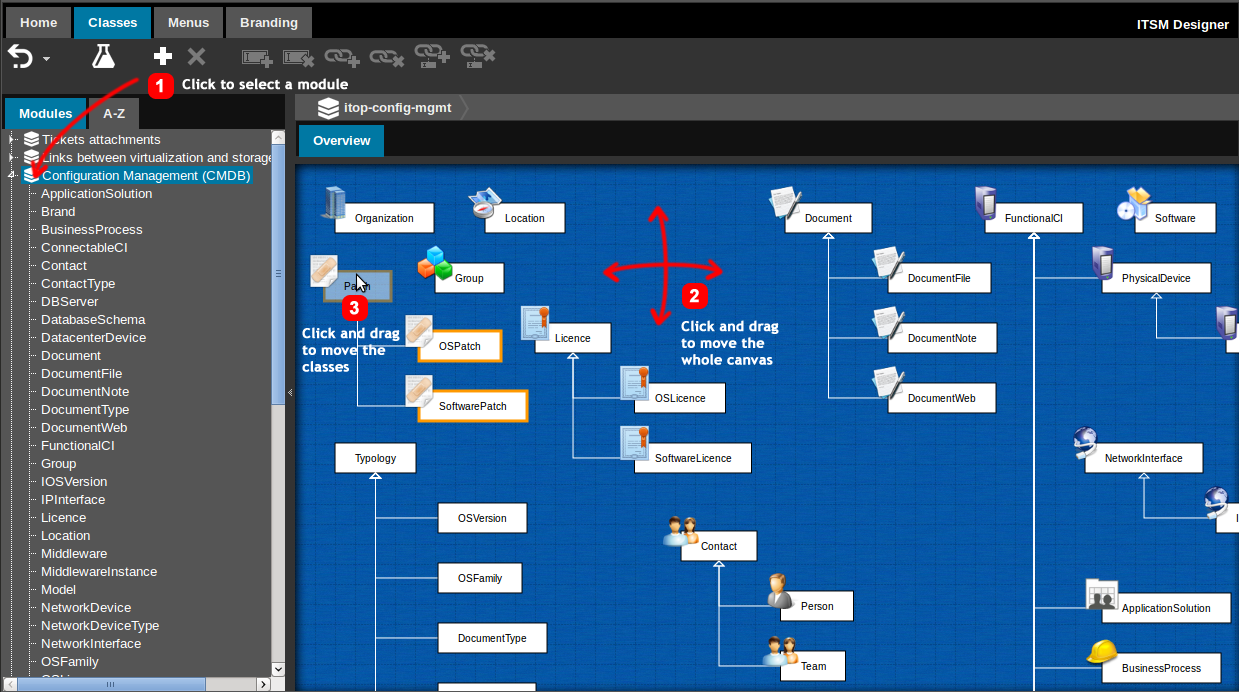
When selecting a module, an overview of all the classes inside this module and their hierarchy (in terms of inheritance) is displayed.
The overview is automatically arranged by the ITSM Designer, but you can re-arrange it to better fit your needs:
-
Click and drag in the blue background of the “Overview” pane to scroll the view
-
Use the wheel of the mouse to zoom in/out
-
Click and drag on a class to move the class and all its subclasses in the overview
The modifications of the layout of the “Overview” are automatically saved by the ITSM Designer.
Edition of a class
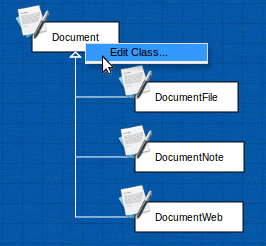
To edit a class, select it from the list in the left pane or right-click on it in the “Overview” pane and select “Edit Class…” in the popup menu.
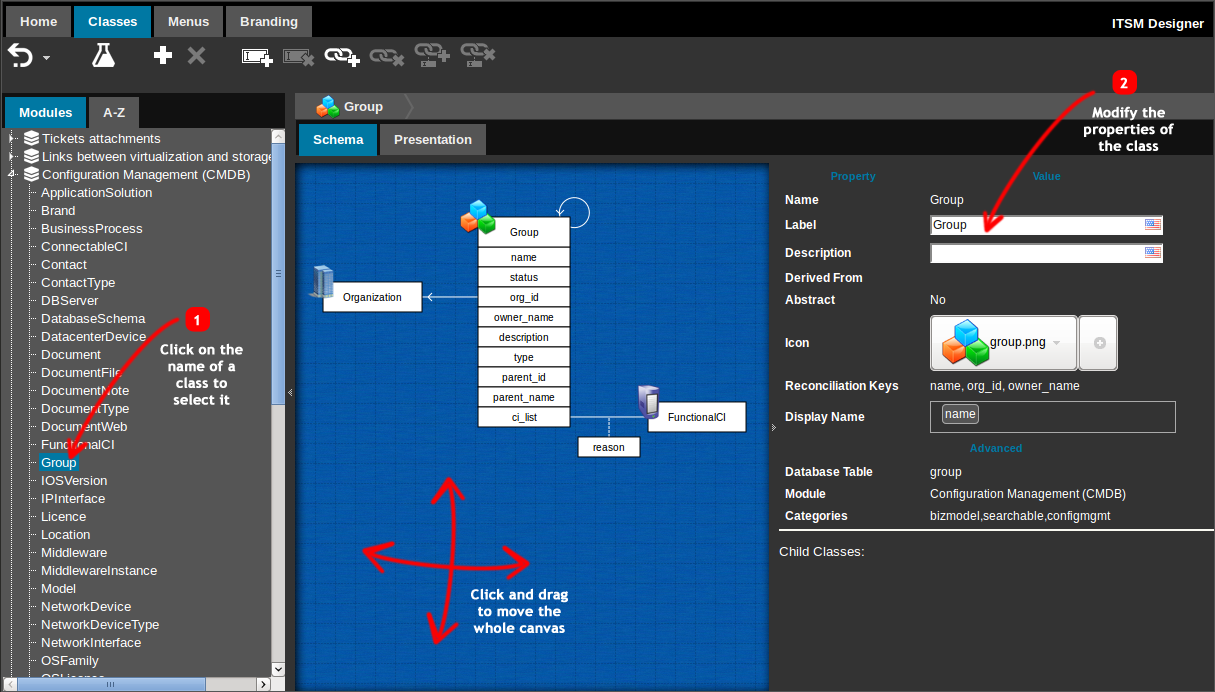
The details of a class is displayed as follows:
The “Schema” tab displays the schema of the class (i.e. its fields) and relations for the current class. The right pane displays the properties of the selected element. As for the “Overview”, the display is automatically arranged by the ITSM Designer, but you can adjust the presentation of the schema:
-
Click and drag in the blue background of the “Overview” pane to scroll the view
-
Use the wheel of the mouse to zoom in/out
-
Click and drag on a class to move the class in the schema
The modifications to the “Schema” view are automatically saved by the ITSM Designer.
Modify the properties of the class by using the form on the right pane. Once a modification is applied, the view is refreshed and the performed modification is recorded in the “Undo history”.
Edition of a field
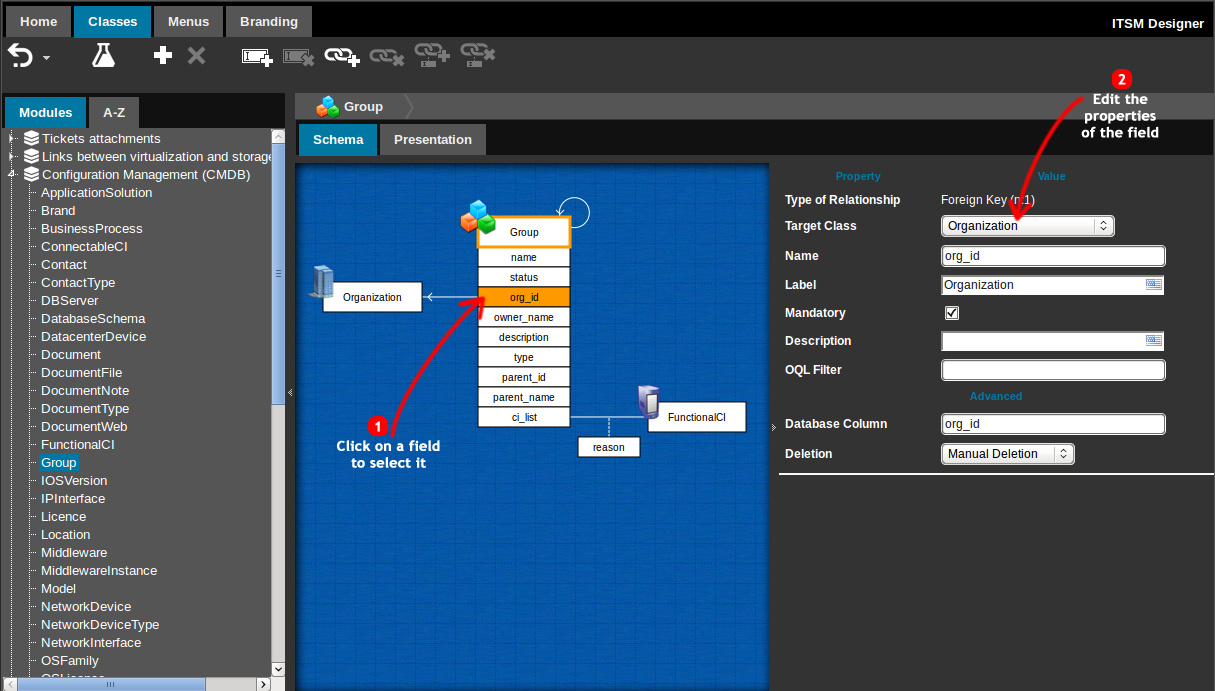
To edit the properties of a field, select the field by clicking on it in the “Schema” view:
Modify the properties of the selected field by using the form on the right pane. Once a modification is applied, the view is refreshed and the modification is recorded in the “Undo history”.
Toolbar
Once a class or field has been selected, additional actions are available via the toolbar buttons:
| Icon | Label | Action |
|---|---|---|
 |
Undo | Click on the button to undo the previous operation, or click on the triangle to select the operations to undo. The button is grayed in case undoing is not allowed (e.g. after a move to production) |
 |
Test | Tests the latest revision to the active instance. This button is shown only if the active instance has been given the role 'Production and Test' |
 |
Add Class | Creates a new class of object. |
 |
Remove Class | Deletes the current class of objects (a confirmation dialog will be displayed). |
 |
Add Field | Adds a field to the current class |
 |
Remove Field | Removes the currently selected field from the current class (a confirmation dialog will be displayed). |
 |
Add Relation | Adds a relation (n:1, 1:n or n:n) between the current class and another class of object. |
 |
Remove Relation | Removes the currently selected relation |
 |
Add Relation Field | Adds a field on the n:n relation currently selected. |
 |
Remove Relation Field | Removes the curently selected field from the n:n relation. |
Creating a new class
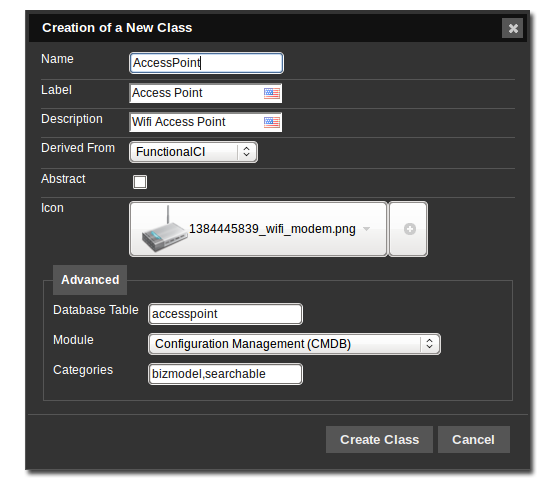
To create a new class, click on the  toolbar button. The following dialog box is
displayed:
Where:
-
Name is the name of the class, as managed internally by the application. This name must be unique.
-
Label is the localized label for this class, as it will appear in the user interface.
-
Description is an optional description providing more information about the purpose of this class. This field is purely informational.
-
Derived From is the parent class of the new class. The new class inherits all the fields from its parent.
-
Abstract determines if the class can be instanciated or not
-
Icon is the icon depicting the class. Pick an icon from the list or use the “+” button to upload a new one.
-
The icon should be 64×64 (before 3.0.0: 48×48 pixels only). Uploaded images are resized if needed.
-
The icon should have a transparent background. For better results use a PNG24 image with a smooth alpha channel for the transparency of the background.
-
For 3.0, SVG format can be used and in that case 240px is fine.
-
-
Database Table is the name of table in the database where to store the fields specific to this class. Must be unique.
-
Module determines in which module the class will be declared. Note: If the parent class is an actual class defined in a module of the datamodel (i.e. if the parent class is neither cmdbAdbtractObject, nor DBObject, nor CMDBObject), the value for the module is ignored, it will be forced to the name of the module in which the parent class is defined. This prevents dependency problems in the resulting datamodel.
-
Categories determines if the class is visible in the application, if it can be searched in the global search, etc.The standard values for Categories are:
-
bizmodel: this is the most common value. Classes in this category can appear in the iTop user interface, can be imported in CSV and are subject to the user rights management defined by the Profiles. -
searchable: classes in this category are indexed by the global search. This used for all usual classes. -
application: this value is used for classes used internally by the application. Only administrators can import (via the CSV import) objects of such classes. Examples of classes from theapplicationcategory are Triggers and Actions used by the notification mechanism. -
addon/authentication: used by the authentication mechanism. Do not use this category unless you known what you are doing!
-
Deleting a class
To delete the currently selected class, click on the  toolbar button. The following dialog box is
displayed:
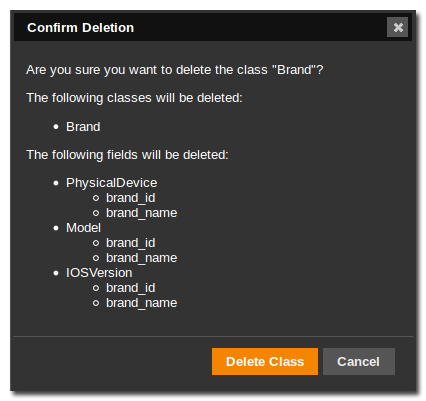
The confirmation dialog shows the impact of the deletion of the class: all foreign keys pointing to the deleted class will be deleted as well, and as a consequence all External Fields based on the deleted foreign keys will be deleted as well.
Creating a new field
To create a new field in the currently selected class, click on
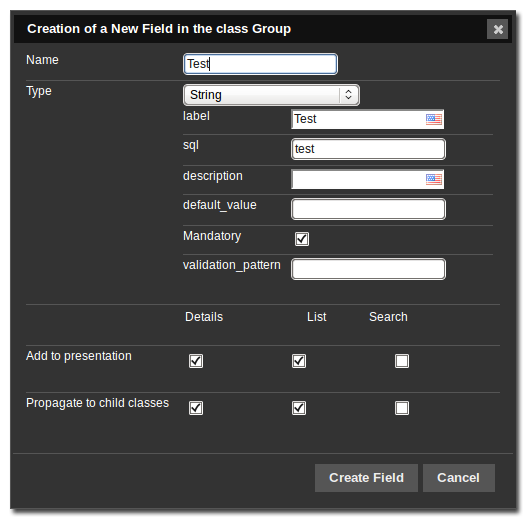
the  toolbar button. the following dialog box is
displayed:
-
The name of the field is the actual “code” to be used for identifying the field in the application. This name must be unique for all the classes of the same “branch” (i.e. with the same ancestor class). Note: the name of a new field must be entered in lowercase for consistency with the iTop datamodel.
-
The label is the actual display label of the field. It depends on the language of the interface.
-
The SQL property determines the name of the SQL column used to store the value of the field in the database. This name must be unique for all the classes of the same “branch” (i.e. with the same ancestor class)
-
The description (optional) provides more information about the purpose of the field. This is purely informational.
-
The type determines the format and the behavior of the field:
The following types of fields are available:
| Type | Meaning |
|---|---|
| Case log | A multi-line text field where each entry is stored separately along with its author and a timestamp |
| Dashboard | since iTop 2.6 A dashboard specific to a class and displayed on every object of that class |
| Date | A date (format YYYY-MM-DD) |
| Date and Time | A date and time (format YYYY-MM-DD hh:mm:ss) |
| Deadline | A date and time that can be displayed relative to the current (ex. passed by 1 hour) |
| Duration | A duration expressed as a number of days, hours, minutes and seconds |
| Email Address | A text string compatible with the email address format |
| Encrypted String | A text string, stored encrypted (using a reversible encryption algorithm) in the database |
| Enumeration (List) | An enumerated list of values |
| Field from a foreign class | A field from a class pointed to by a foreign key |
| File | Binary data, managed by uploading/downloading a file |
| Image | since iTop 2.3 An image/picture uploaded directly into the object to be displayed in the details and lists. |
| IP Address | An IP v4 address in dotted notation (e.g. 10.24.243.148) |
| Long Text | A multi-line text without formatting |
| Number (Decimal) | A decimal number, with the given number of digits (after and before the decimal point) |
| Number (Integer) | An positive integer number |
| OQL | A text string representing an OQL query |
| Password | A one-way encrypted text string, displayed as a password entry |
| Percentage | An integer number between 0 and 100 |
| Phone number | since iTop 2.5 A string allowing integration with IP telephony |
| Stopwatch | A stopwatch used for tracking the
elapsed time on objects with a lifecycle |
| Stopwatch value | A value based on a stopwatch
field |
| String | A one line text string |
| Tag Set | since iTop 2.6 A multi-selection field |
| Template (HTML) | A multi-line text field, with HTML formatting and containing placeholders |
| Template (One Line String) | A one line text string containing placeholders |
| Template (Text) | A multi-line text without formatting, containing placeholders |
| Text | A multi-line text without formatting |
| Text (HTML) | A multi-line text field, with HTML formatting |
| URL | A one line text field following the URL formatting rules |
The last two lines are common to all types of fields; they determine if the field will be added to the “presentation” of the object and if these modifications need to be propagated to the child (derived) classes.
The other properties are specific to the type of field.
Deleting a field
To delete the currently selected field, click on the  toolbar button. the following dialog box is
displayed:
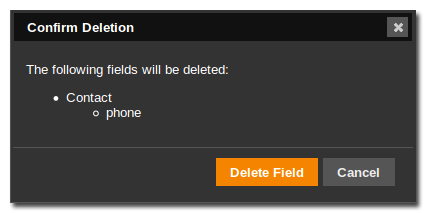
The confirmation dialog shows the impact of the deletion of the field: any External Field referencing the field to be deleted will be deleted as well.
Creating a new relation
To create a new relation with the currently selected class,
click on the  toolbar button. the following dialog box is
displayed:
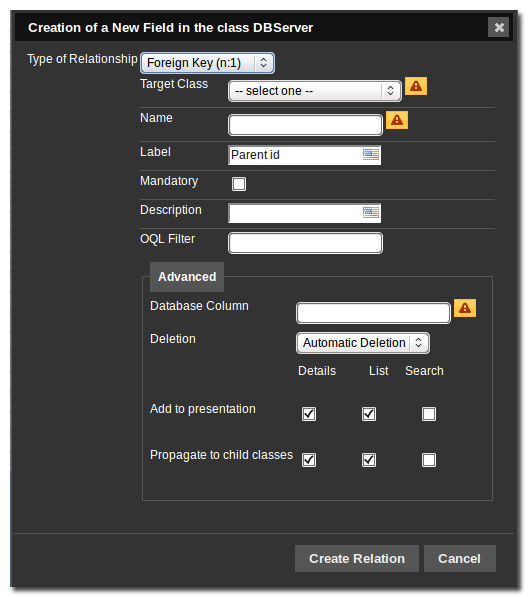
There are three different types of relations:
| Type of Relation | Meaning |
|---|---|
| Foreign Key (n:1) | A foreign key to another object of the specified class (or a derived class) |
| Hierarchical Key | A foreign key to another object of the same class, which will act as the “parent” of the object. Hierarchical keys protect from “loops” in the hierarchy by preventing to select as a parent an object which is already “under” the current object in the hierarchy |
| Many to many (n:n) | The many to many relation is build by automatically creating an intermediate “link” class with two foreign keys. |
| One to many (1:n) | This relation is used to display objects containing a foreign key pointing to the current class. Only classes which already contain such a foreign key are listed in the dialog. |
Foreign Key (n:1)
A foreign key has the following properties:
| Property | Meaning |
|---|---|
| Target class | The class of the target objects that will be related to the current class via this relation. Note that objects of a class derived from the target class can also be related to the current object |
| Name | Name of the field corresponding to the foreign key |
| Label | The localized label for this field |
| Mandatory | Whether or not this relation can be empty when creating or editing an object of the current class |
| Description | An optional, localized, description for the relation |
| OQL Filter | An OQL query used to limit the allowed values for this field. The OQL query MUST return objects of a the “target class” (or one of its derived class). Supported placeholder in OQL is :this->attribute |
| Reload on change of | If you specified an OQL filter, select the fields whose modification will impact the result of the filter. |
| Database Column | SQL column used to store the value of the foreign key in the database |
| Deletion Rule | Defines the behavior of the application when the
object pointed to by the foreign key is deleted. The possible
values are: Automatic Deletion: the current object is deleted as well ( if the foreign key is mandatory) or the foreign key is reset Manual Deletion: the target object can not be deleted until the foreign key is modified (reset or set to point to a different target) |
| Enable the [+] button | Whether or not to allow the “plus” button
displaying the form to create an object of the target class. If the
value is “Depends on the configuration” (which is the default) the
“plus” button will be displayed if the value
allow_target_creation is set to true
in the iTop configuration file. |
| Add To Presentation | Check the columns (Details / List / Search Form) corresponding to the presentation(s) in which you want the new relation to be added. |
| Propagate to Child Classes | Check the columns (Details / List / Search Form) corresponding to the presentation(s) of all classes derived from the current class, in which you want the new relation to be added. |
Hierarchical Key
A hierarchical key has the following properties:
| Property | Meaning |
|---|---|
| Name | Name of the field corresponding to the hierarchical key |
| Label | The localized label for this field |
| Description | An optional, localized, description for the relation |
| OQL Filter | An OQL query used to limit the allowed values for this field. The OQL query MUST return objects of a the “target class” (or one of its derived class). Supported placeholder :this→attribute |
| Reload on change of | If you specified an OQL filter, select the fields whose modification will impact the result of the filter. |
| Database Column | SQL column used to store the value of the hierarchical key in the database |
| Deletion Rule | Defines the behavior of the application when the
object pointed to by the foreign key is deleted. The possible
values are: Automatic Deletion: the current object is deleted as well ( if the foreign key is mandatory) or the foreign key is reset Manual Deletion: the target object can not be deleted until the foreign key is modified (reset or set to point to a different target) Move up: When the parent is deleted, the object is automatically moved one level up in the hierarchy (i.e. attached to the grand-parent) |
| Add To Presentation | Check the columns (Details / List / Search Form) corresponding to the presentation(s) in which you want the new relation to be added. |
| Propagate to Child Classes | Check the columns (Details / List / Search Form) corresponding to the presentation(s) of all classes derived from the current class, in which you want the new relation to be added. |
Many to many (n:n)
A many to many relation has the following properties:
| Property | Meaning |
|---|---|
| Target class | The class of the target objects that will be related to the current class via this relation. Note that objects of a class derived from the target class can also be related to the current object |
| Name | Name of the field corresponding to the relation |
| Label | The localized label for this field |
| Description | An optional, localized, description for the relation |
| Add To Presentation | Check the column “Details” to add an extra tab to the presentation of the curent object, listing the related objects. Many to many relations can not appear in lists or search forms. |
| Propagate to Child Classes | Check the columns “Details” to propagate the modification of the “Details” presentation to all derived classes. |
| Allow Duplicates | Allow to have several links from object A to object B |
One to many (1:n)
A one to many relation has the following properties:
| Property | Meaning |
|---|---|
| Linked class | The class containing a foreign key pointing to the current class. |
| External key | Name of the field corresponding to the foreign key to use (in case there are several foreign keys to the current class) |
| Name | The unique name of the field to create |
| Label | The localized label for this field |
| Description | An optional, localized, description for the relation |
| Edit mode | How the relation will be managed in the user interface: Default (= Actions menu); Add Object only; In place edition; Actions menu; No Edition. |
| Tracking level | How much information about this relation will be kept in the history of the class: Default (=Addition/ Removal only), Complete History, Details (track modified items), No history at all. |
| Add To Details | Check to add the field (as an extra tab) to the presentation of the class. |
| Propagate to Child Classes | Check to add the field (as an extra tab) to the presentation of the child classes. |
Behavior depending on the edit mode value:
| Edit mode | XML code | Meaning when editing the current object |
|---|---|---|
| –select one– | <empty> | When no value is provided in the XML, iTop uses its default actions, see below for its behavior |
| Default | <empty> | same as above |
| #n/a | add_remove | Not available in Designer, except by XML injection Allow to add existing objects = overwrite their ExternalKey to the id of the current object. It proposes a remove which empty the ExternalKey, but it can't be proposed if the ExternalKey is mandatory. |
| In place edition | in_place | You can create a new object in a modal pop-up window. You can also delete child objects assuming no other relationships prevents it |
| Actions menu | actions | Add Actions menus which in current window, allow to massively edit (modify or delete) the related objects, as well as create a new related object -In both cases, this force to leave the current edition mode, loosing any other modification- The creation handles fields dependencies, it presets the ExternalKey as well as fields on which it depends for eg. organization. |
| Add objects only | add_only | Only allow to create a new related object in a separate window, independently of the current object edition, which can be cancelled or completed without effect on the creation. The creation window presets the ExternalKey, unless it depends on another field |
| No edition | none | That (1:n) relationship cannot be edited from the current object, it's in read-only mode |
Deleting a relation
To delete the currently selected relation , click on the
 toolbar button. the following dialog box is
displayed:
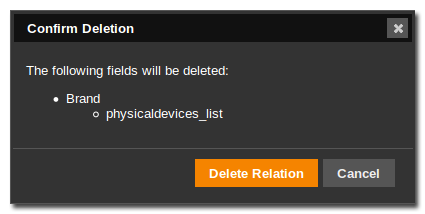
The confirmation dialog shows the impact of the deletion of the relation. Depending on the type of relation deleted some other fields (or classes) may be impacted.
Managing the presentation
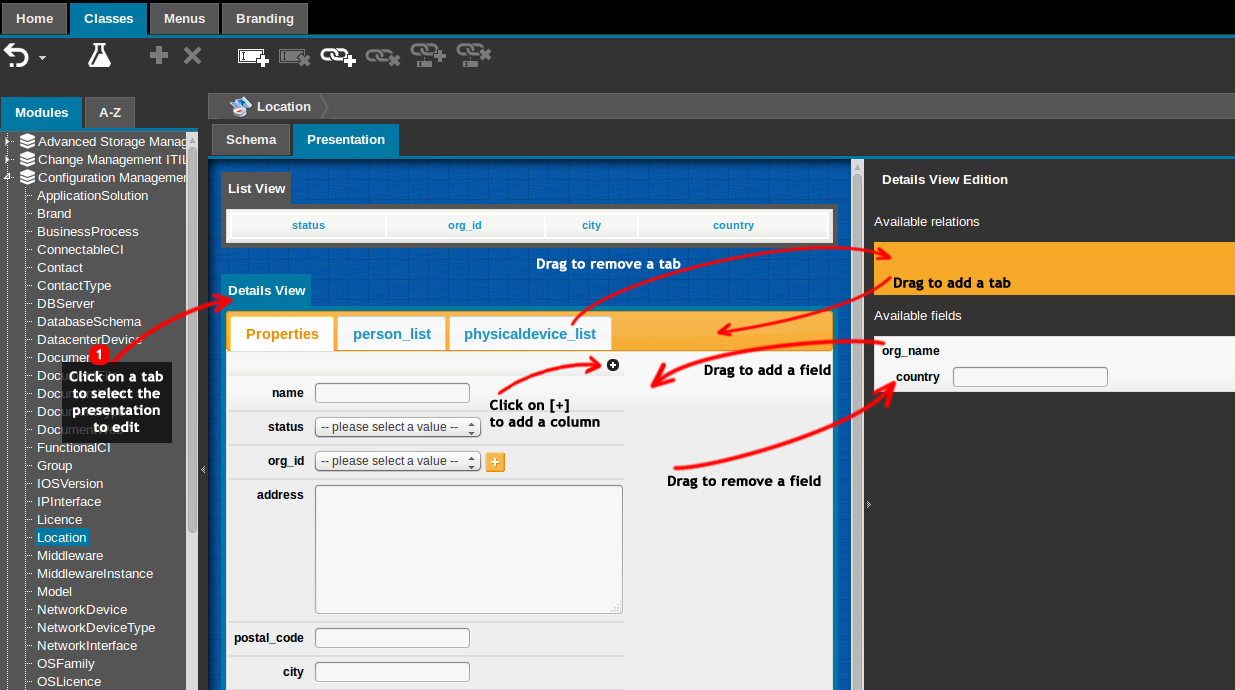
To manage the presentation of a given class, select the “Presentation” tab. Then click on the desired style of presentation to edit “List”, “Details” or “Search Form” by clicking on it in the center pane.
Drag and drop the fields to arrange them inside the presentation or from/to the right pane to add/remove them from the presentation.
Clicking on the small plus (“+”) icon in the “Details” presentation creates a new column in which fields can be dropped. Similarly the small minus (“-”) icon is used to completely remove a column (except the first column which cannot be removed). When column is removed, all the fields previously located in this column are moved back to the “bucket” of available fields in the right pane.
A right-click inside the presentation, displays a popup menu with two choices: “Insert fieldset…” and “Remove field”.
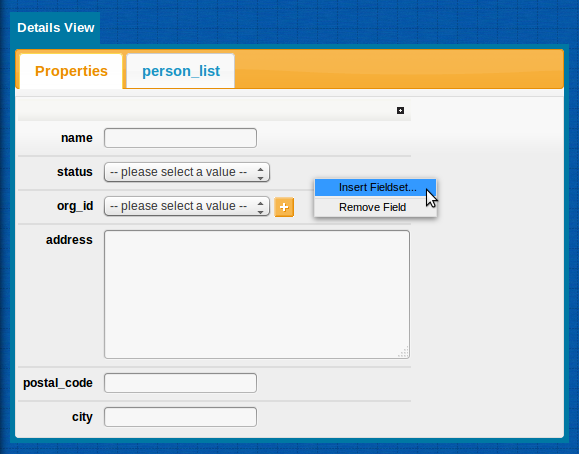
If you select “Insert fieldset…” you will be prompted for the
code and the localized label of this new fieldset: 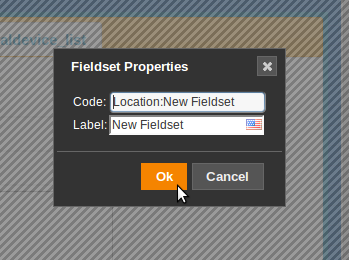
code of the
fieldset is the key of the dictionary entry for the localized
label. Therefore this code must be globally unique among all
entries in the dictionary. In order to ensure the uniqueness of the
code, it is convenient to adopt the convention of prefixing all
fieldset codes by the name of the class.The fieldset is then created, enclosing the selected field. You
can right click-again on the fieldset to edit its properties or
delete it. 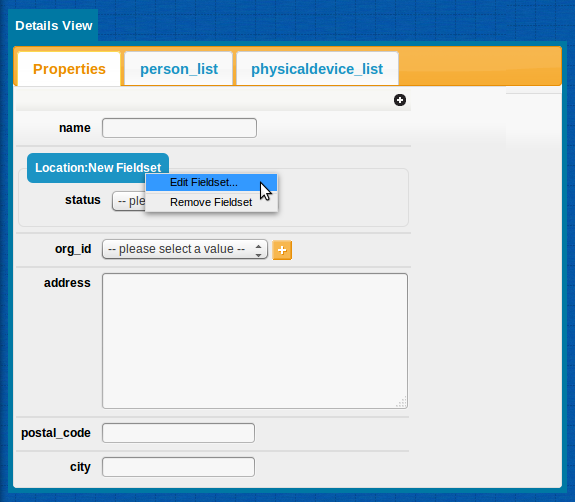
When a fieldset is removed, all the fields previously located inside this fieldset are moved back to the “bucket” of available fields in the right pane.

